- Loading…
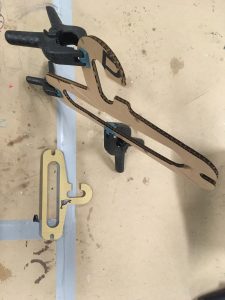
One of our partner schools asked us if we had coat hangers for their lab coats. We did, and we also had a pile of cardboard leftover from other supplies we had ordered them! Here is a quick prototype we will bring to this school when we join them for after school club on Friday. Excited to get some hangers out to our community and upcycle some of the waste from our lab. We will also be using these to hang up our cold weather clothes during our winter break camp when students are inside.
Lesson Extension ideas
Other types of clothing that can be hung.
Other things that get piled up on sofa arms, which could be organized.
Cable management
Fish rack for ice fishing at winter camp inspired by traditional technologies.

Carboard
Scissor / Box Cutter
Computer for design
Laser Cutter 10w+
An element of clothing
Find a pile of carboard you can use to craft
Carefully remove any metal staples for safety
Make sure there are large enough pieces to cut out hangers and lay hangers on them if you aren’t sure. 
Create a functional and appealing form.
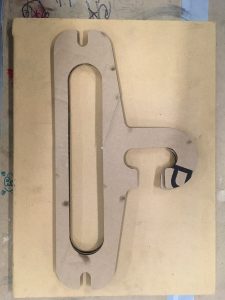
Measure the existing hanger and make sure your design fits inside the same dimensional envelope. Design your cut profile using available graphic design / CAD application like https://boxy-svg.com/ and export for use in your laser cutter, common formats include .pdf and .svg
Make sure corners are rounded so it doesn’t snag on clothing.
Make sure there are no thin parts that could break like around the cat in the example.
Cat design used with permission:

Laminate two sheets together to create a stronger piece of material before cutting if there are too many cuts or voids in the cardboard.

Try hanging a jacket or some piece of clothing on it.
Use something that you might be hanging on it in the future to test its function. Our lab is in Alaska so we tested our hanger using Alaska Native traditional style clothing (Kuspuk).
Determine if you have to add an additional layer of material or if it strong enough already.

Nest multiple instances of the design
Determine the maximum dimensions for cutting on your laser
Determine the maximum dimensions of your material
Place as many copies of your design in the smallest area possible to avoid waste.

Having trouble? Let us know by completing the form below. We'll do our best to get your issues resolved quickly.
"*" indicates required fields