Garangao Invitation Card - SCOPES Digital Fabrication

Lesson Details

Age Ranges
Standards
Fab-Programming.1
Author
Additional Contributors

You need to login or register to bookmark/favorite this content.

Author

Studio 5
Studio 5
K-12 teacher
In line with the Ministry of Communications and Information Technology’s Digital Youth Strategy, STUDIO 5 is mainly aimed at nurturing youth as digital learners by sharpening their 21st century learning skills, as they develop in an all-pervasive digital environment. In… Read More

Summary

Online unplugged lesson introduces one of the Gulf traditions in Ramadan, By building an invitation card to the event using Scratch platform.


What You'll Need

As the session is online everything is provided below :


The Instructions

Introduction

We will start by introducing Studio 5\6, then we will be trying to grab the attention of the participant by an ice breaking question, We will also speak briefly about Ramadan.

1- At the beginning of the session we will briefly interact with the participant trying to open a space for them to speak by asking about Ramadan, if they started to fast, what they think about this Ramadan is it easier than the last year and so on.


  • Note: Ramadan is the ninth month in the Muslim calendar where all Muslims are fasting from the sunrise (Fajer) until the sunset (Maghreb), during this period it’s not allowed to eat, drink, or doing bad things that could earn you bad credits (Sayaeá سيئة) or in general (sins).
  • Ramadan is a month encouraging all Muslims to give charity, strengthen our relationship with Allah (God), and show the kindness and the patience.


2- We will then ask the participant about fasting does it improve energy.


  • Most of the participant thinks being hangry means no energy, but it is really wrong when fasting all of your power will be directed towards your objectives (the things you’re doing), you may feel thirsty and hungry, but it’s just in the first day or two days then you will start to focus better on what you are doing as most of the blood is flowing to the brain instead of the stomach to digest food.

3- Then we will introduce the participant to the Garangao.

Garangao is a tradition in the gulf area to celebrate the kids who started fasting.

The celebration is to encourage these kids to keep fasting as they are in the learning process.

Usually kids start fasting from age : 7; but its up to them to fast 1 min or a full day.


4- During this event most of the families collaborate together, and they are giving for their kids and for the other families kids.


  • Gifts usually nuts, candy, and money.


5- Then we will show the participant a video shows the song the kids sing in the event.


Video Link

6- Then we will be asking the participant about their favourite part in the Garangao.


What we will be doing today

In this part we will be showing the participant what we will do in the session as a practice and what we will need.

1- Firstly: we will introduce the participant to today project, and we will need.


2- Then we will tell the student that we will use Scratch, and we need to code, and we will introduce what does both means.


3- Coding is the process of telling the computer what to do as instructions the computer is going to execute.


4- Scratch is an educational programming language that introduce block-coding as a programming type.


5- Then we will be showing the participant the codes we need to build as will build a few not all of them, but we will be introducing them all.


6- Then we will start practising on Scratch.


Practice

In the practice section we will show the participant how to reach the platform and how to start making the prototype. We will also start making it Step-By-Step.

1- We will start by showing the participant how to reach Scratch platform for the one who don’t have the chat section, and we will also send them the link.


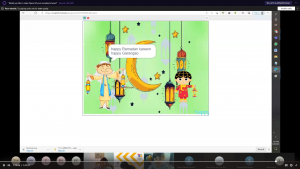
2- Then we will show them what is the prototype we are going to build.


3-Then we will send the files to the participant, the files are sent through the OneDrive, so they have to open the link and download the files.

  • Link is provided

4- After that we can start making the card together.


  • This is how Scratch will look when you first open it.
  • It’s important to till the participant how to navigate within the platform.


  • This is the right side of Scratch window, from here we can add sprites using the button with the black circle, they will appear like the one surrounded with the red lines and using the bin sign we can delete the sprite, it’s important to mention that the options above the red lines are to control the sprite (size, transition, sprite name, direction, and to appear or not).
  • We can also add backdrops using the green button within the green circle.
  • The window where the cat appearing it’s the output screen.


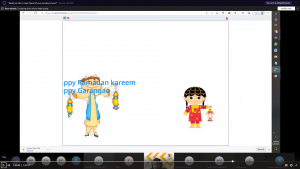
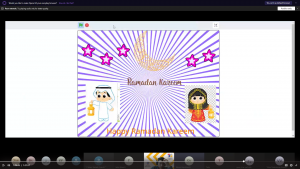
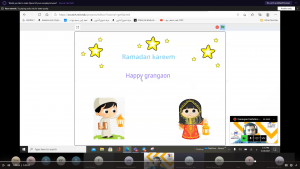
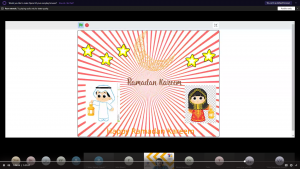
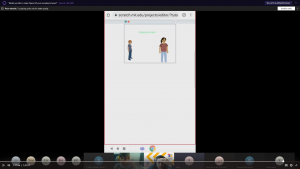
5- Now after explaining this to the participant we can start to add the first sprite which is the boy in my case.

  • By sliding the mouse pointer to this button without clicking this panel will appear in our case we will use the first option with the red arrow to import the sprite from our computer and the one with the pink arrow to draw it on scratch.

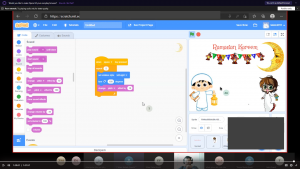
6- After importing the boy picture we will choose the optimal size and place for the boy, then we will paint the sentence “Happy Garangao” and we will add effect to this.


  • Using the bar above we can navigate between the costumes, codes, and sounds.
  • The first thing we need to do is creating the customs, so we will choose the text option, and we will write “Happy Garangao”, Then we will fill it with the colour we like.


  • Then we will duplicate the custom, and we will change the colour of the text to make a colour changing affect using the code.

  • After creating the customs we will now do the coding side, so from the top panel we will choose code to start building the code.

  • This is the code that would let the text to randomly change its colour from the customs we created.
  • For sure there is a much simpler way by only building one costume and choose the colour effect change instruction.

7- After adding the text we will record a sound, and we will add it to the boy.


  • It’s important to mention that if we want to make a change to any sprite we have to choose it first then we can decide what we want to change.
  • We will start by building the code.

  • A very simple code will play the sound we will record when we press on the boy.

  • After pressing on record this window will appear, just make sure to give the permission of using the MIC to the browser, so we can record the sound.

  • So after recording you can hear the record and whether to save it and choose it or to re-record it.
  • After saving the sound we will have to manipulate the sound by adding robot effect to it and some fading in or out, raising the volume and reducing it, and we can make it faster or slower.

8- After that we will add the girl sprite, and it’s free for the participant to code it.

9- Then we will add the crescent, and we will create a rotation effect to it when pressing the upper arrow key.

  • Then we will add the code to it.


10- These steps are in general but however it’s important to let the participant do the thing that it suits him/her.

Standards

  • (Fab-Programming.1): I understand the basic structure of a simple program and can modify values, variables, or other parameters to alter its output, function, or behavior.

Lesson Feedback