- Loading…
Students will design and fabricate their very own mini LED flashlights! Students will create a case that fits all of the internal components of the flashlight. This can be done using the step-by-step tutorial design that follows, or by creating their own unique and original design. They will be given all of the internal components of the flashlight to assemble and solder correctly before inserting it into their designed case.
LESSON OBJECTIVES
At the end of this experience students will be able to:

Instructional Time
The picture below has the specific parts we used for our project as described above.

TEACHER NOTE: Ask students the importance of light and what it would be like living in a world without light. Review main ideas and concepts of light and resistors.
Have students discuss what they know about light and research the basic components of light. You may watch the following video on introduction to light- its types and properties.
https://www.youtube.com/watch?v=CIWEJEYD-bg
Show and define resistors and talk about what they are used for. You may watch the following introductory video on resistors and also find more information at www.resistorguide.com.
https://www.youtube.com/watch?v=Gc1wVdbVI0E&t=139s
Research Ohm’s Law (1827) and learn about the German scientist.
Essential Questions: What are the main components of light and what is a resistor used for?
Formative Assessment: Students should understand the general make-up of light and how it is produced. They should be able to define the purpose of a resistor and when or why it would be needed.
Essential Question: How can you determine the type of resistor needed for your flashlight based upon the voltage produced and the type of bulb being used.
1. Visit www.resistorguide.com to learn more about the fundamentals of resistors, the types, and applications of resistors.
Formative Assessment: To show that students have a basic understanding of resistors and are ready to begin soldering the electronic components, ask questions to have students demonstrate their understanding and knowledge of the definition, types, and applications of resistors.
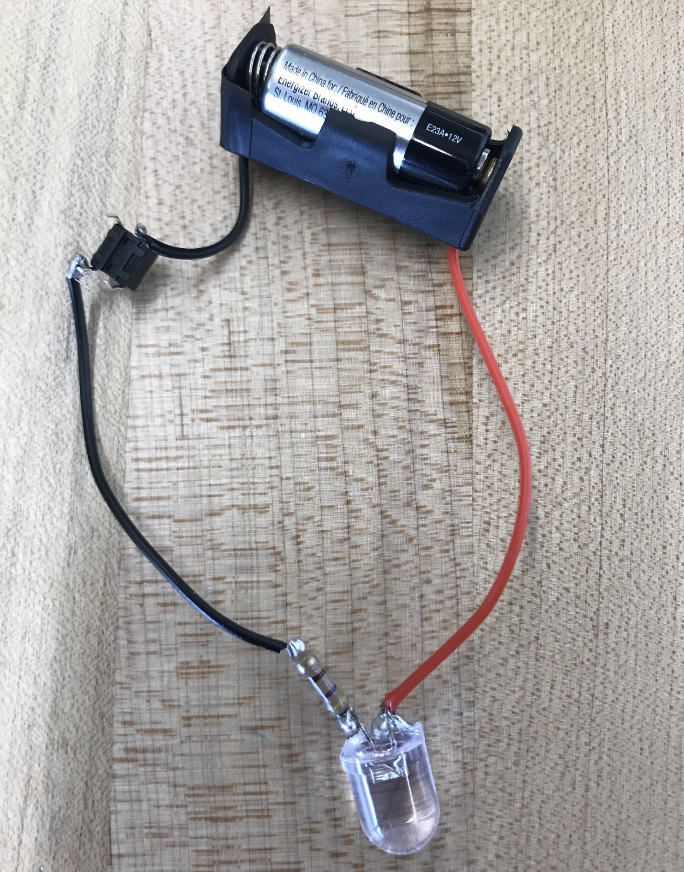
2. Solder the internal components of the flashlight (battery holder, resistor, LED bulb, tactile switch)

Students could use this step for designing their case or design something specific or unique to their own desires (depending on time, materials, etc.). This modification would be solely done at the instructor’s discretion. It would be interesting to see all the different types of cases they would come up with.
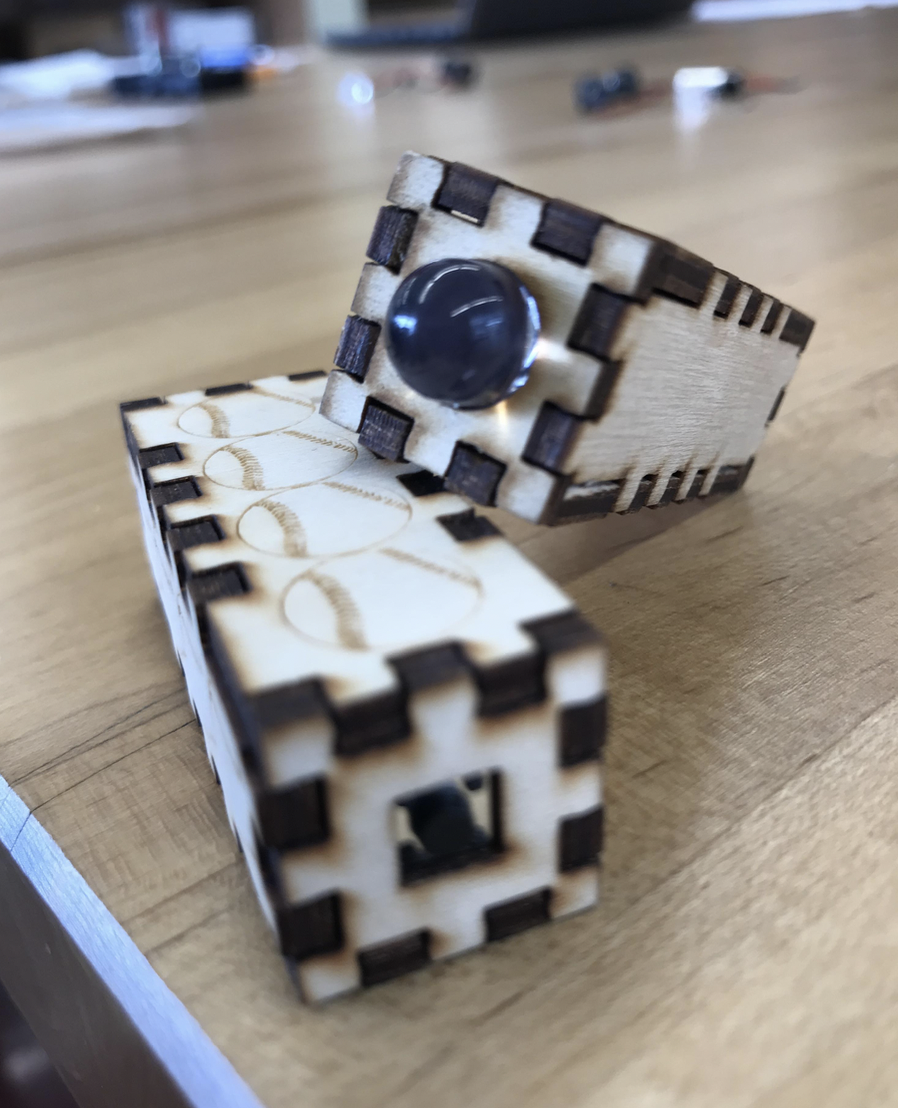
Students will create a simple box vector to house the internal components of the mini LED flashlight by downloading plans from www.makercase.com. Download the .SVG file that is specific for design. Students will then import this file into whatever vectoring software is provided (Adobe Illustrator, CorelDraw, Inkscape, etc). We used the following dimensions for our case: 2.205” X .787” X .787”. We then added a .382” X .382” circle on one end for the LED bulb and a .236” X .236” square on the other end for the tactile switch.
Once the vectored file is completed, students can then use this time to add their own personalization by adding images, words, or designs to be rastered (engraved) on their cases.

After the case is cut out and completed, students can then build the case leaving one side off to insert the internal components. They can then insert the bulb on one end, the tactile switch on the other end, and the battery holder and wires into the case before placing on the final side. Note: we place a small piece of electrical tape to the end of the battery holder to prevent the tactile switch from making contact with the metal on the holder (this made the LED bulb light up without pressing the switch).
Formative Assessment: Have students review the attached mini LED flashlight rubric (attached) and discuss what changes might improve their performance.
In this lesson, students are taught to develop insight and reflective skills that enhance emotional self-control. This awareness of thoughts and feelings create a space for mental and emotional awareness continuing the metaphor of the project where resistors regulate the energy of the input power source (battery) to control the output (light) in the flashlight project. “Self-awareness is the first step (out of four) in improving your emotional intelligence. This skill allows you to spot your emotions as they arise (and not after their devastating effect). It also helps you to anticipate the upcoming emotional reaction by defining and being aware of the things that drive you towards those emotions.” Gil Mayor, Author Originally published at www.fromgnometogoliath.com May 3, 2018
Students discuss light and resistors as metaphors for developing skills of self-awareness. The physics of light video in the lesson plan referenced ‘dark’ night as a time of difficult emotional and psychological stress, stating that ‘everything will be alright’ as a metaphor for lifting of the darkness and bringing ‘light’ into your life. The media and the arts use this light/dark metaphor to illustrate and garner support for reducing stigma associated with living with mental health challenges. https://1.bp.blogspot.com/-52ChOkdpldQ/VFUVvQv0VMI/AAAAAAAABBg/Smu8_lFwy8k/s1600/sattva.jpg
Students are asked to reflect on a time when their emotional state felt both light and dark.
The self -awareness process begins with identifying thoughts and feelings when confronted with difficult circumstances and events in any life situation, which could include the classroom. During FabLab project completion, students can become frustrated and agitated, and lose patience with the completion process. Students are taught to utilize self- awareness as a coping skill by increasing self – awareness, naming thoughts, feelings and behavioral responses. For a kid friendly explanation:
https://learningworksforkids.com/educators/self-awareness/
Students learn that by naming, they create a space – a pause – to choose behavioral responses (outputs). Using the light metaphor, students learn that by controlling the energy source of inputs (thoughts and feelings), the energy of outputs is regulated.
This self-awareness exercise can be expanded by asking students to consider the light and energy metaphor as it may relate to their life experiences and then to share with the group on a voluntary basis. FabLab example would be, considering the emotional energy of frustration and anger, what thoughts and feelings precipitated (inputs) the (behavioral) response you had when the solder didn’t hold from the battery holder to the lightbulb? Did you breathe, stop to think of how to adjust your solder angle (problem-solving), try soldering again (persistence), ask for help, or quit the project and state you couldn’t do it, it was too complicated, intricate, or other? What were you aware of in your thought process and emotional response that influenced your behavior? Asking questions of students to reflect on internal processes assist in increasing self-awareness, and eventually, self-control.
Specific skills taught include making “I” statements- naming thoughts and feelings. Emotions and feeling words are identified and named: Angry or Mad, Anxious, Bored, Calm, Cautious, Confused, Curious, Embarrassed, Excited, Foolish, Frustrated, Happy, Helpless, Hopeful, Jealous, Nervous, Overwhelmed, Proud, Sad, Scared, Shy, Surprised, Worried. A short playlist from The Inside Out movie helps prompt students with emotion naming: https://www.youtube.com/watch?v=dOkyKyVFnSs
Following naming, a body scan exercise increase awareness of how that emotion is felt in the body. This allows students to link thoughts with feelings. Example: (https://soundcloud.com/mindfulschools/body-scan-1 ).
Students choose an emotion to explore, i.e. excitement, and discuss the thoughts, the “I” statements as input to that feeling. Next, how did that thought, ‘power’ the feeling in the body? Frustration, “this is too hard” thought, how did that feel in the body? Perhaps as warm sensations of flushing from an increased heart rate, or a tension or twitching in muscles and joints, maybe muscle stiffening or tightening as tight fists or clenched teeth. Instruct students to interrupt those thoughts to change the outputs. Choose to breath, or another purposeful relaxation response, and notice the outputs as different physical reactions. Students learn to make specific statements “I am having these thoughts, and this leads me to get really mad”; and respond with intentional directed self-statement “I need to slow my body down.” Another example, “I can’t do this, it’s too hard!” is a thought process that may produce the feeling energy of anxiety and overwhelm. By learning to reframe thoughts, “this is challenging, but I can do it with help” can produce a different emotional response as calm and excitement.
Students feel supported that enhances self-confidence in expressing thoughts and emotional states during the FabLab project completion.
The goal is not only to teach students self-awareness that improves emotional self- regulation, but also a lifelong skill of internal awareness and reflection that produces the life long skill of self -development.
Having trouble? Let us know by completing the form below. We'll do our best to get your issues resolved quickly.
"*" indicates required fields