- Loading…
This is a primary lesson that helps students get familiar with Tinkercad for 3D design during the winter season.
iPad or computer
3D printer
KS1 – Observe and make notice of seasonal changes.
Design purposeful, functional, appealing products for themselves and other users based on design criteria.
Generate, develop, model and communicate their ideas through talking, drawing, templates, mock-ups and, where appropriate, information and communication technology.
Use technology in a safe and responsible manner.
Students were excited to try to do 3D modeling, however difficult. Luckily we had done a unit on Scratch Jr where students learned a bit of 2D technology design. Students were familiar with shapes and basics on changing their basic colors/sizes.
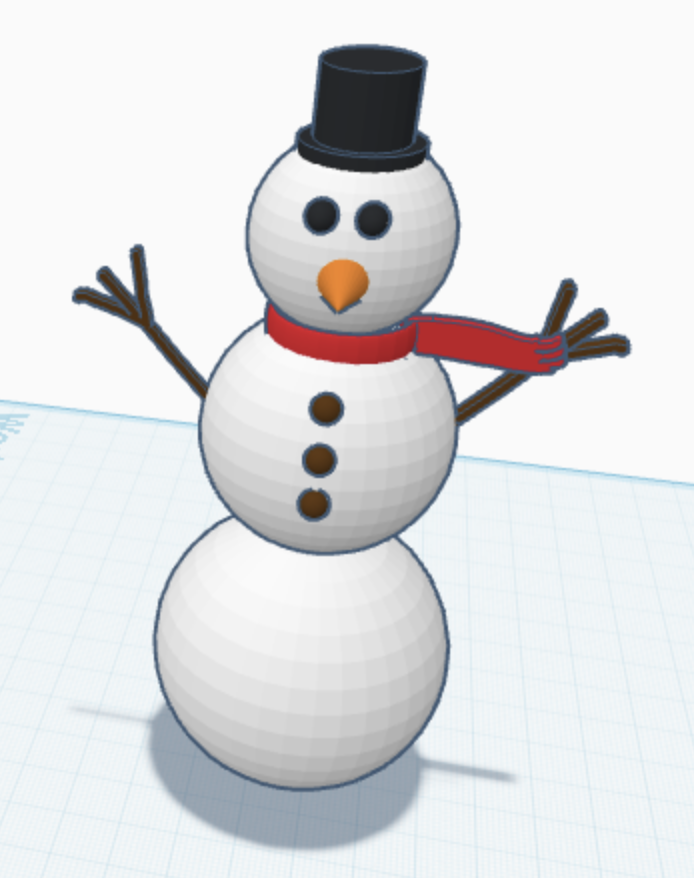
While the weather outside might be frightful, 3D design is so delightful. Students will work independantly, or with a partner, to try to create a snowman that can be 3D printed.
Start with a review of previous design or art related skills they might know. Before this unit, we had just finished a unit on Scratch Jr. We connected the skills between 2D design and introduced 3D design. During this introduction, you can use the attached PPT to help guide the students through similarities and differences between 2D and 3D. Ensure that students understand that 3D adds length as well as height and width.
Slowly go through the presentation and make sure students fully understand why 3D design is important, and how it is different from 2D. Encourage students to accept the challenge.
How to get students into their activity on Tinkercad.
Before students open Tinkercad, ensure you have set up their class with all the students names. Then, add an activity called Snowman so you can monitor and help students when needed, and eventually print out their snowmen.
In Tinkercad, at first the most challenging thing for students to do is to log in. Make sure you have the class code very visable for everyone to see, and if possible, print out the code for all students to keep in their iPad case.
After logging in, instruct them to click on classes (the apple on the left,) then their class. Many students will click anywhere in the bar, so remind them they need to click on their actual class name.
This can be taught over 2-4 lessons, depending on students ability levels and class time. Some students will need additional support so after teaching and giving a task, look for students struggling.
I always start introducing Tinkercad by trying to connect the students with what they might already know. So, I usually just have them take the sphere shape and play around with the sizes, width and length first, then show them how to increase the height as well. Then, I teach them how to use the delete function/garbage can. Then, teach them how to undo using the back button next to the garbage can. Finally, teach them the duplicate button.
Since the goal of this activity is to make a snowman, the goal by the end of the first lesson is to use those skills to make the body of a snowman. They should be able to make a base, middle, and head sphere shape. At this point is where I show the students the grouping feature to keep the shapes together. If time allows at the end of the lesson, show the students that by clicking on the shape, you can change its color in the pop-up tool bar.
For the second lesson, students should learn how to add a cone shape for the nose. This lesson I will start by introducing the magnet button so that they can keep the nose attached to the face easily. By the end of this lesson, they can also use this skill to add half-circles for eyes, a mouth, and buttons. If time allows, the students can make a hat by using the ring shape to make the brim of the hat, and then a thinner cylinder to make the top of the hat.
The final lesson involves using the scribble tool to make the sticks that will be the snowman’s arms. It is important for them to watch a small video on how 3D objects are printed. A good example is this one about baby groot – https://www.youtube.com/watch?v=m_QhY1aABsE. This lesson requires knowledge of using the rotate button. Make sure all students arms are at a 45 degree angle up so that it can be printed easily on the 3D printer.
When you have time, you can go into their files in Tinkercad using the class feature, download, and print their snowmen. If this takes too much time, feel free to print the best model from each class for every student.
Having trouble? Let us know by completing the form below. We'll do our best to get your issues resolved quickly.
"*" indicates required fields