- Loading…

Unplugged lesson aims towards delivering the knowledge of movement and how computers are able to capture and simulate the human movement in order to help disorders and make their life easier and normal.

Unplugged lesson plan that uses free platforms and free online content, everything is provided and free:
1- Duration : 1 Hour
2- Presentation
In this step, we will introduce the theory of motion capture to the participant, and we will present how this technology is helping disordered people.
1- We will ask the participant, what they think about motion capture.

2- Then we will present the meaning of motion capture as technologies that track the movement of people and objects.

3- Then we will present what is biomechanics.

4- Then we will present a video to the participant to show how biomechanics is helping disordered and how the technology is evolving.

5- Then we will ask the participant about how motion capture and biomechanics are connected.

In this section we will show participant the needed module to capture and track movement and how its being implemented using servo motors.
1- We will show participant the two ways used in capturing movement, and we will demonstrate one of them.

2- Then we will show participant how this technology is involved in the sport realm.

3- Then we will present a video shows how we can track movement using cameras.

In this step we will show the second step of capturing and tracking movement using hardware attached to the person or to the object we want to track.
1- We will show participant the final look of what we are going to do and starting the step-by-step instructions in order to build the needed circuit and code it.

2- Then we will discuss the microcontroller with participant, and we will define the board that we are going to use to build our circuit, which is the (Micro-Bit) board.

3- We will show a video present the board to the participant and the main parts are associated with the board.
4- Then we will define the accelerometer module that are responsible for capturing the angles of the body or the object in reference to the ground.

5- Then we will describe the servo motor to the participant and how it works, and we are using it to demonstrate the captured angle and show it to the user.

6- Then we will show the codes we’re going to use to have our prototype working.

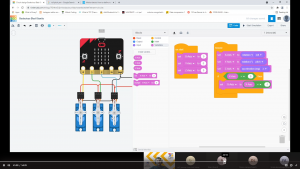
In this step, we will be using Tinker-Cad to demonstrate the circuit we will be building and simulate it.
1- Firstly: we need to go to Tinker CAD and give the participant a quick tour how to navigate in the platform and where to find the circuit section, In order to make a new workspace to start making their circuit.

2- Then we will stage the process of how to make the connection “the wiring” and also where to find the component to be added to the workspace.
3- Then we will show them where to find the coding section and what instructions type we have in order to understand the mechanism of block coding in Tinker CAD platform.

4- Now we will show participant how to code blink LED step by step.

5- This block is a special instruction for pin 13 on Arduino which has an internal LED connected for testing purpose.

6- This Instruction block will make the pin output and change its state, whether HIGH or LOW.

7- This is the delay instruction block which will let the Micro_controller to wait.
 8- This is the final looking for the code.
**Note: the above points are just to show the participant how to make connection and how to code using Tinker CAD.
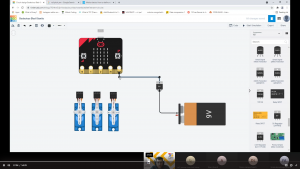
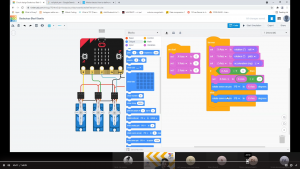
In this step, we will be showing the participant the steps we have to take in order to build the circuit and then code it.
1- We will start by showing the circuit to the participant and how the circuit works.

2- Then we will start by connecting the circuit.
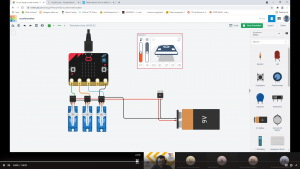
So In our circuit we will need 1 Micro-bit board, 3 servo motor, 1 Regulator, and a battery.
3- We will connect the output of the regulator to the power pin of the 3 servo motors.
4- Then we will connect the ground of the 3 servos to the ground of the Micro-Bit, and we will connect this ground to the ground of the regulator to combine both of the grounds.
5- The battery will be connected directly to the regulator input.
6- then we will connect the servos signal pin to the Micro-Bit pins.
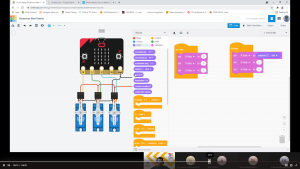
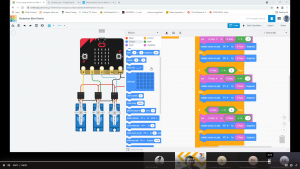
7- After having the circuit connection done, we will have to code the board.

Having trouble? Let us know by completing the form below. We'll do our best to get your issues resolved quickly.
"*" indicates required fields