- Loading…
This lesson originates from Ruth Carter’s approach to costume design for the Black Panther film. Students will create a pattern using software to be laser etched into soft material that is laser cut to make a tabi-style boot. If time allows, students can create shoe accessories such as 3D printed ankle bracelets and holders for electronic devices.
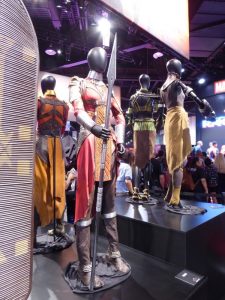
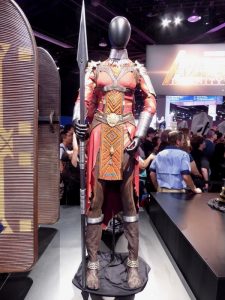
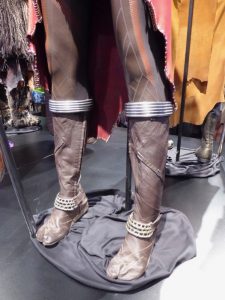
Costume images retrieved from https://hollywoodmoviecostumesandprops.blogspot.com/2017/07/black-panther-cast-film-costumes-on.html
This lesson was inspired by the Dora Milaje, a team of women who serve as special forces for the fictional African nation of Wakanda (see images). Students will create and piece together the components for the project using a variety of digital fabrication and computation methods. This lesson culminates in the creation and display of a tabi-style boot.
As part of the SCOPES-DF Black Panther Collection, this lesson includes the following STEM units:
This lesson uses the following activity modules:
Teacher Notes:
This lesson can be a first dive into using the Fab Lab for future lessons or personal projects.
Key Vocabulary
Adinkra – visual symbols that represent concepts or aphorisms. Adinkra are used extensively in fabrics and pottery among the Ashantis of Ashanti Kingdom and Baoulés of Cote d’Ivoire.
Adire – a name given to indigo dyed cloth produced by Yoruba women of south western Nigeria using a variety of resist dye techniques.
Batik – a technique of wax-resist dyeing applied to cloth made using a technique originated from Indonesia.
CSDT – Culturally Situated Design Tool or web-based application that simulates cultural designs using mathematics and computation.
Dora Milaje – fictional characters appearing in Marvel’s Black Panther comics and movies. They are a team of women who serve as special forces for the fictional African nation of Wakanda.
E-textiles (electronic textiles) – enable digital components such as a battery and a light (including small computers), and electronics to be embedded in them.
Felt – a nonwoven fabric of wool, fur, or hair, matted together by heat, moisture, and great pressure
Inkscape – graphic design software used extensively in the Fab Lab for many design processes
Jika-tabi or Tabi – are shoes modelled from traditional split-toe Japanese socks. Tabi have a divided toe area, are heavy-duty, and often resemble boots.
Laser – a device that emits a concentrated beam of light. Different types of lasers are used in many different fields, from space communications to fabrication. Most laser cutters are capable of cutting through and burning into (etching) different materials.
Xhosa/Zulu – relating to the Xhosa or Zulu peoples of southern Africa and their basket weaving techniques
Materials List
Craft or synthetic felt (1-2 yards per shoe)
White or neutral-colored cloth (1-2 yards)
Scissors
Needles and thread
Batik wax
Natural or organic dyes (ex. tumeric, coffee grounds)
Iron
Newsprint
Digital Fabrication Equipment Details
Inkscape or another vector graphics editor
Culturally Situated Design Tools (CSDTs)
Laser cutter
3D printer (if time allows)
Flora or Lilypad microcontroller
Conductive fabric or thread
Velostat
Neopixel LED
Alligator Clips
Design File Attachments
Preparation / Setup
Depending on how much time, how many students, how many facilitators, and how many computers and tools, you might want to pre-cut any or all of the shoe parts (using a laser cutter).
This project includes three levels of digital fabrication skills:
Step 1 – Introduction to Cultural Art & Costume Design
Once you have welcomed the students, give them a brief explanation about digital fabrication and what the lesson will be about. Students will be given cultural backgrounds to read such as Adinkra, Adire, or Xhosa/Zulu. They will identify cultural designs in the costumes worn by the Dora Milaje in Black Panther.
Black Panther costume designer Ruth Carter did research and noticed many superhero costumes had a textured pattern in common. For Black Panther’s signature texture, it was the triangle, a shape that has featured prominently in African art for centuries.
“T’Challa’s [Boseman] Panther suit has the Okavango pattern on it from Botswana, which is a triangular pattern,” Carter notes. “The triangle is kind of the sacred geometry that you see in a lot of African patterns throughout the continent and it has a sacred meaning. When you go into a close up on the Panther suit, you’ll see the tiny triangle covering his whole suit.”
After viewing the film or reading the comic, students should identify concepts or themes that are represented in other cultures such as Adinkra. In the above example, the Adinkra symbol for security was chosen because it represents who the Dora Milaje are to T’Challa (Black Panther). Other concepts such as strength were used in other parts of the boot.
Students will view the Zulu Mathematics presentation, then complete one of the following tutorials:
Adinkra CSDT: https://csdt.rpi.edu/culture/adinkra/index.html
Ruka CSDT: https://csdt.rpi.edu/culture/scifi/tutorial.html
After the tutorials, students can import a triangle, Adinkra symbol, or another cultural symbol (300 pixel square, PNG file format) into a CSDT and use the code to generate a pattern. Screen capture and save the final symbols and patterns for later.
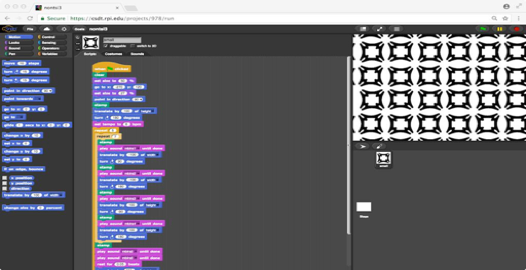
Screen grab from Ruka CSDT.
Step 2 – Digital Fabrication and Batik
Ruth Carter mixed patterns from many different African cultures in her costumes for Black Panther, especially for the Dora Milaje team that contain symbols or motifs.
After students create and save their cultural symbols, they can trace or redraw them in Inkscape or another vector graphics editing program. Then, the digital files can be made ready for laser cutting.
Students will view the Techno Organic Heritage Algorithmpresentation, then laser cut their symbols from wood or another rigid material and use the batik wax resist methodto stamp their symbols on white or neutral colored fabric to create the inner lining of their tabi-style boot. Non-wax methods can be found here and here. The goal is to repurpose a laser cut symbol and stamp it on fabric to create designs.
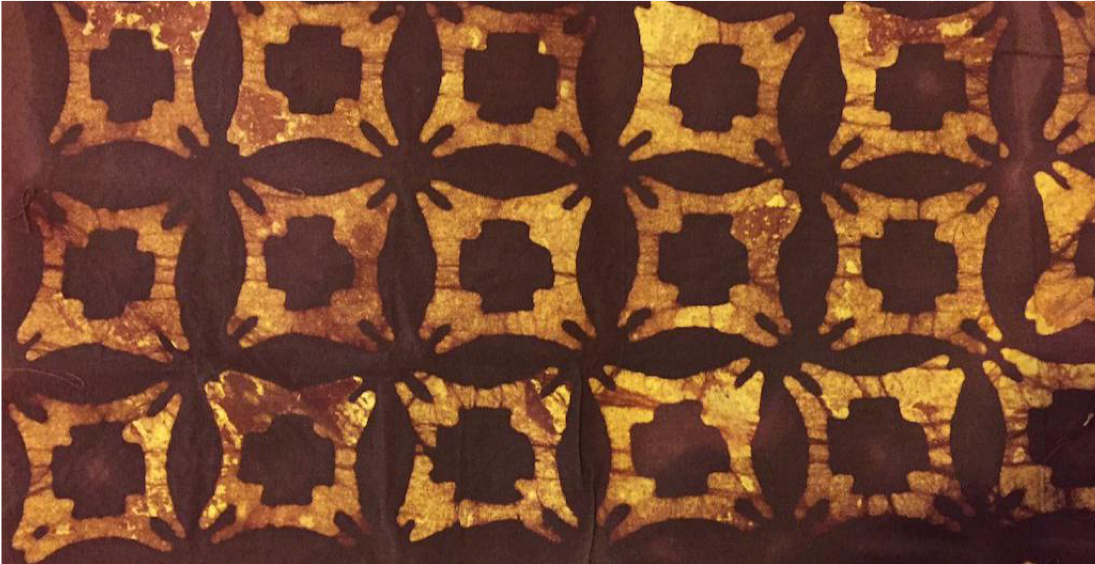
Batik with Adinkra symbol stamped with hot wax and dyed with coffee and beet root.
Step 3 – Laser Etching on Soft Material
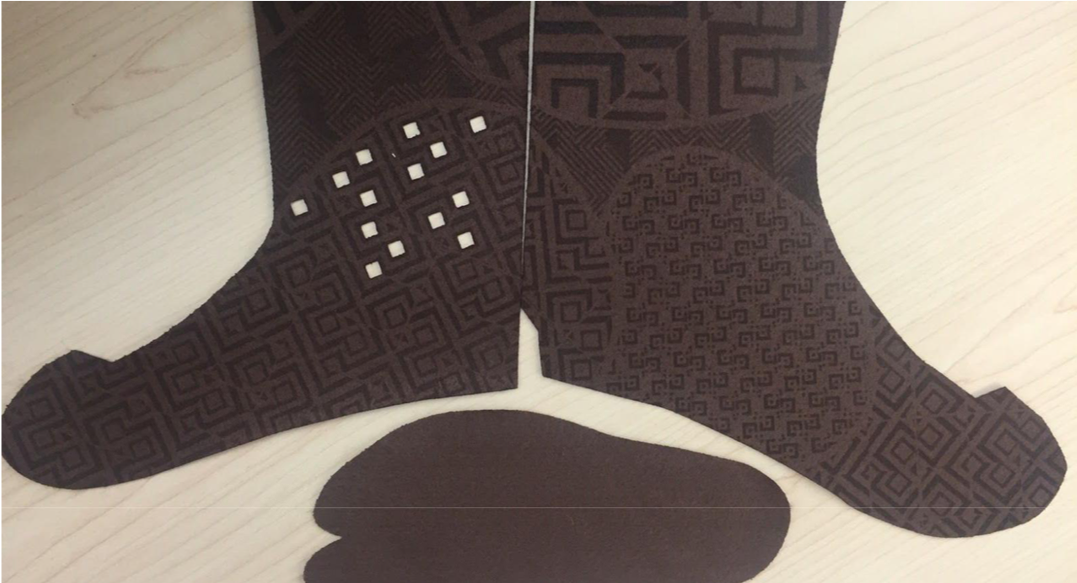
After students batik their tabi-style boot liners, they can decorate the outer boot (felt) layer using fabric markers or paint. More advanced students can etch the patterns created with the CSDT on felt to make the outer boot layer. They should use the tabi-style boot template to arrange and layout their patterns.

Laser cut and etched felt material (based on template file).
Step 4 – Laser Cutting From Soft Material
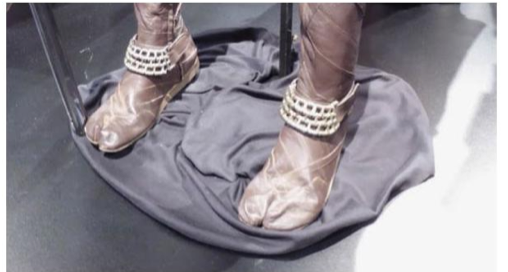
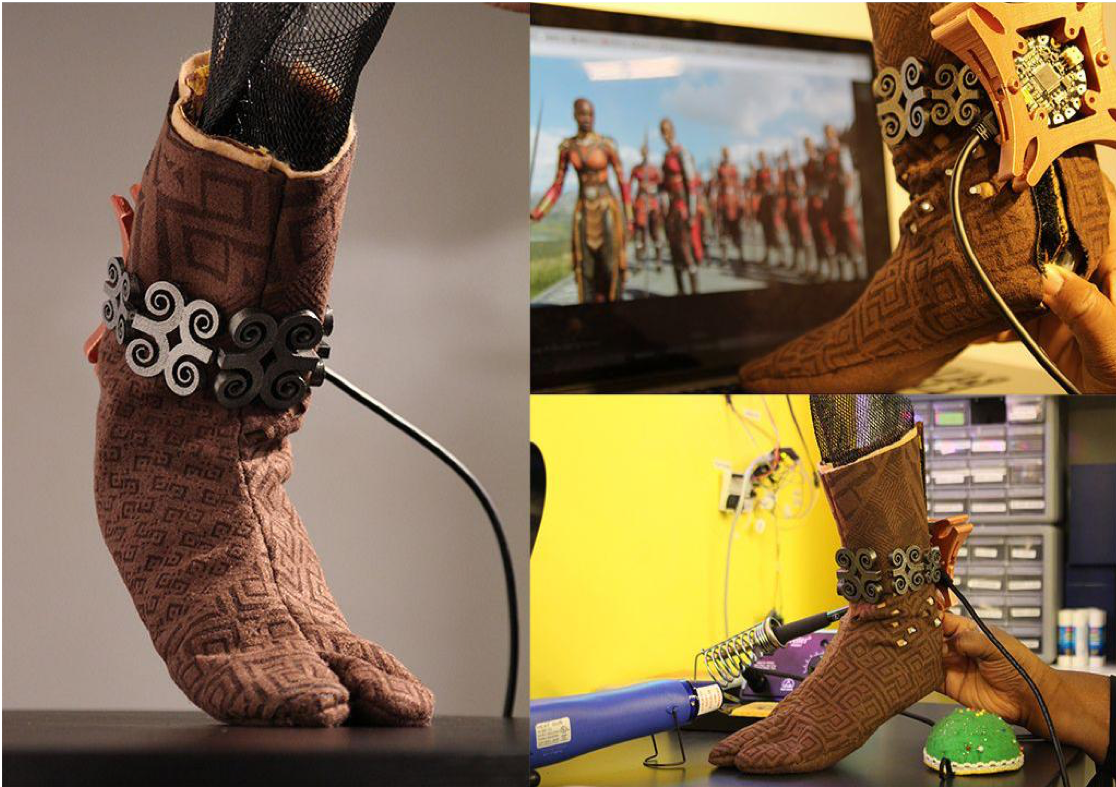
The tabi boot style was chosen because it most closely mirrors a boot worn by the Dora Milaje in the film. Also, note the accessories on the boots.
If time allows, students can research and choose a different style template.
After students decorate the outer tabi boot felt material, they need to cut out the shoe parts using the provided template and a laser cutter.
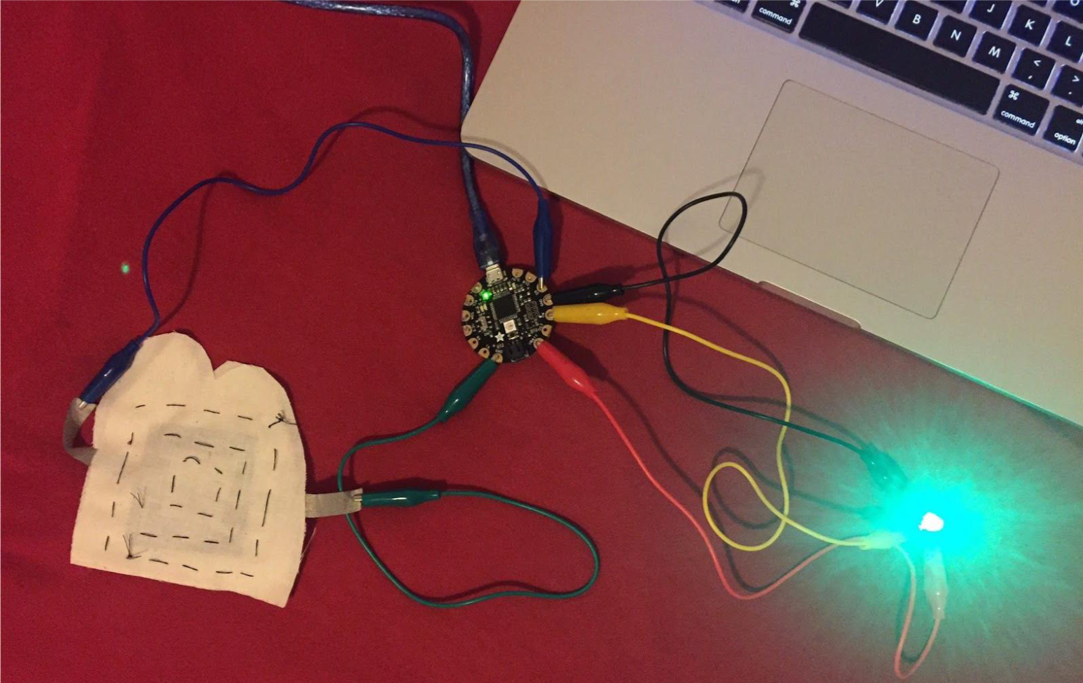
Step 5 – E-textiles & Wearables
Many of the costumes and props in Black Panther are powered by electronics. In the real world, e-textiles enable digital components and electronics to be embedded in clothing and shoes. After students cut out their shoe parts from the felt they can add electronics by inserting wearable microcontrollers (Flora, Lilypad), LEDs, and velostat pressure sensors .
Students will view the Kimoyo E-Textiles & Wearablespresentation, then attach electronics with conductive fabric, or thread and LEDs or even electroluminescent patches (el panels).
Students will need to learn basic electronics such as what is featured on the CSDT website: https://csdt.rpi.edu/culture/performingarts/index.html. This includes the basic concepts of circuits, coding, and how they can be applied to sensors.
Depending how much time you can dedicate to this step, you can also guide the students through several iterations of a design process, by having them prototype their designs and wear them in a Black Panther-themed fashion show.
Extensions:
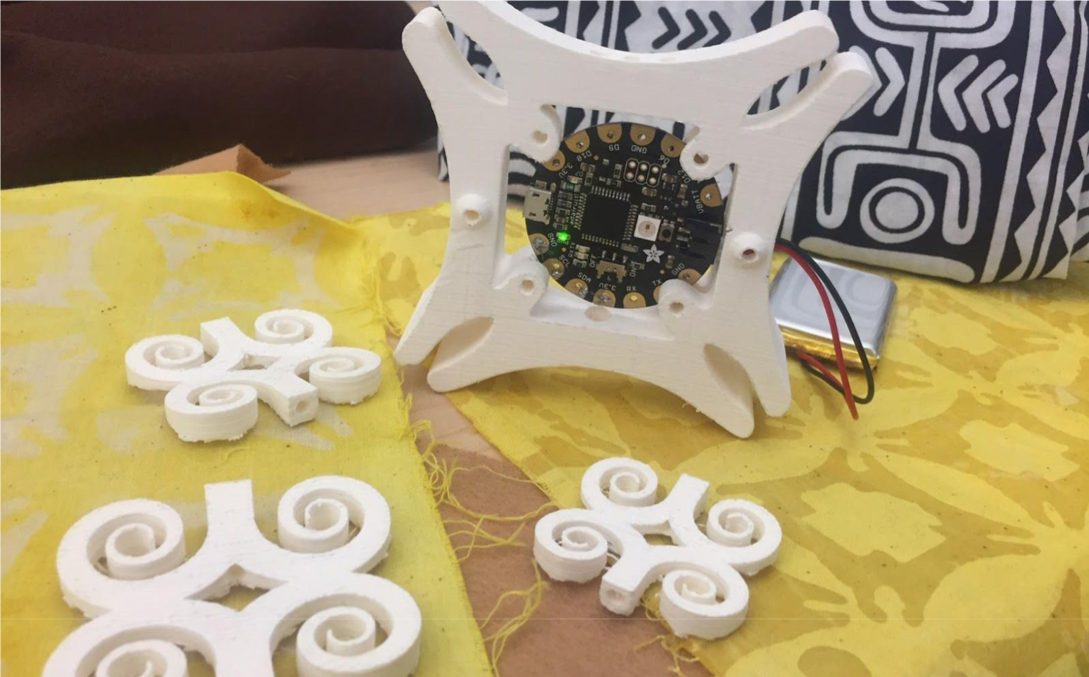
Master fabricator Daniel Smithwick repurposed an Adinkra symbol as housing for a Flora using Tinkercad.
Step 6 – Assembly and Final Presentation
To complete the boot, first sew the front seam of the batik liner, or middle felt layer (middle layer contains electronics) together. Next, sew the front seam of the outer felt layer. Put the liner/middle layer inside of the outer layer and attach both to the sole of the boot. Pin and sew the top layers to the sole.** Turn the boot inside out and fix any holes or gaps in the seams.
**If the velostat pressure sensor is in the sole make sure the ends of the conductive fabric or threads for power (+) and ground (-) are between the outer and middle layers.
Using a needle sew the conductive fabric/thread to the middle layer and create two stitches (+ -) to where the microcontroller is housed. Sew a pocket in the middle layer for the battery (ex. near the microcontroller). Use velcro, or stitch the top and back soles together. Adding accessories is optional.
After assembling their boots, students will present their final projects to the whole class or a celebration with parents and/or community members. This is an opportunity to facilitate conversations between parents and adult family members.
Having trouble? Let us know by completing the form below. We'll do our best to get your issues resolved quickly.
"*" indicates required fields
Excellent documentation and cultural approach! I will try to incorporate some steps in my classes. Thanks for share this lesson : )
Thank you, Victor. Please do let us know in what ways you use the lesson.