- Loading…

This lesson works with students to learn basic skills in making; they will use CAD to make a design, laser printer to engrave / cut their design, calipers to measure, and they will build a simple circuit.


laser printer
1/8″ acrylic
5mm LED bulbs
2032 cell battery
copper tape
caliper
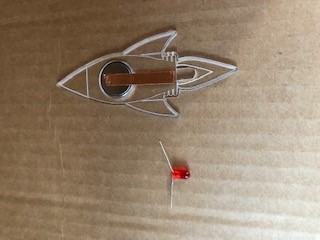
Students will use a caliper to measure the battery and LED
Show students how to use a caliper. They will use this to measure the width of their battery as well as the length and width of their LED. Once they have these measurements written down they are ready to find their images.
Students will either create an image or copy and paste one from online
Students should think of an image that they would like to light up. The image can have engraved details on it if they wish. The most important thing that they consider during this process is that their image has a place for holes for the battery and LED to go.
Their image can be something that they design themselves or a cut and paste from online.
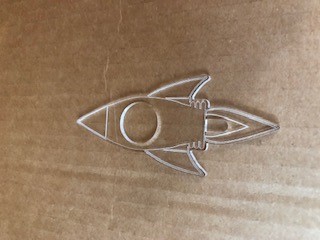
Once the image has been outlined with a hairline to cut, they will need to make the holes for the LED and battery. The battery hole will be a circle, the LED hole should be a half oval, with one side flat and the other rounded. These holes should be set as hairlines so the shapes are cut out of the acrylic. To make assembling the circuit easier, the flat side of the oval for the LED should be closest to the battery hole. Our rockets are 4″x2″ which is the perfect size for a small project like this.
Students will use the laser printer to cut their objects out
Show students how to change the settings in the laser printing software for vector and raster. We like using translucent or clear acrylic as this allows the light to shine around the cut edges. Go over safety protocols for your space with the students at this time – don’t bump the laser, don’t open the lid while cutting, etc…
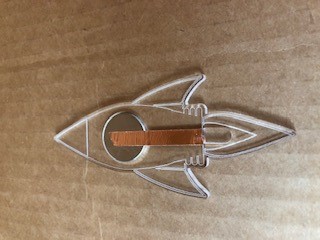
When their object comes off the laser cutter, have them place their battery and LED in the corresponding holes to ensure that they fit. If they do not, the student will need to re-measure and enlarge or shrink the holes accordingly.
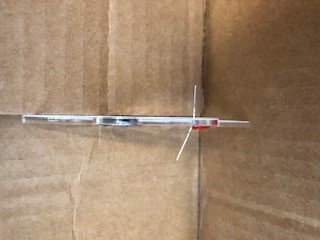
Students will figure out which sides of the battery and LED are positive and negative
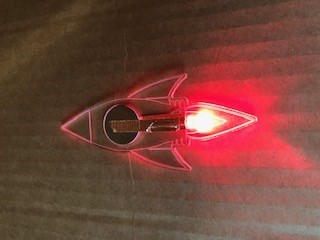
Have each student figure out how to light up their LED using only the battery. This is easiest achieved by having them straddle the LED on the battery, with one wire of the LED on either side of the battery. If the LED does not light up, they can remove the LED and rotate it so the wires are on the opposite side of where they started. They should note that the positive leg of the LED is longer than the negative. The smooth side of the battery has a small + sign to show that it is positive.
Students will start their circuit.
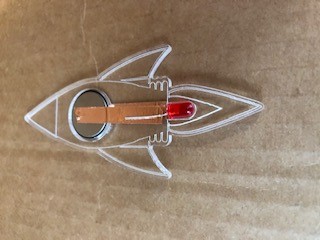
Students should measure the distance from the flat part of the oval where the LED will go to about halfway across the battery. They will need two pieces of copper tape this length. They will place the battery in the hole, and run one piece of copper tape on the acrylic from the start of the LED hole, and across the battery. Then, turn the acrylic shape over and do the same thing on the other side. This will be a path for the energy from the battery to be transferred to the LED
Students will complete their circuit
Have students split the LED wires apart so the light can slide into the oval hole, with one wire on each side of the acrylic. Make sure the longer leg is on the side with the smooth side of the battery. Have students push the wires against the copper wire to make sure their LED lights up. If not, have them turn the LED around to see if they just put it in backwards. Once the LED is lit, use small pieces of copper tape to secure the LED wires to the copper tape already in place on the acrylic.
Having trouble? Let us know by completing the form below. We'll do our best to get your issues resolved quickly.
"*" indicates required fields
This looks awesome- will you post with some of the design files?
Thanks!
Thank you Sarah! I have attached the file under “Lesson Materials” as Rocket Cut File. Have fun!