Advancements in Agriculture: Introducing the Smart Scarecrow - SCOPES Digital Fabrication

Lesson Details

Age Ranges
Standards
Fab-Safety.2, Fab-Modeling.2, Fab-Fabrication.2, Fab-Design.2
Author
Additional Contributors

You need to login or register to bookmark/favorite this content.

Author

Suhas Labade
Suhas Labade
K-12 teacher

Summary

This lesson introduces students to the complexities of modern agriculture and highlights the role of technology and innovation in farming practices. The main focus is on the Smart Scarecrow, a prototype designed to protect crops from birds and wild animals, as an example of a use of technology for Human Wildlife Conflict. Students will learn about the evolution of agricultural practices, the importance of collaboration in the agricultural ecosystem, and how advancements in technology have made farming more efficient and productive. Through discussions, case studies, and a hands-on activity, students will understand the significance of technology in shaping the future of agriculture.


  • Pre-assessment: Before the lesson, conduct a pre-assessment to test students’ existing knowledge about agriculture empathy and technological advancements in farming. This can be done through a short quiz or open-ended questions. We can ask them about the problems faced by farmers.
  • Agricultural History: Provide students with a brief overview of the history of agriculture, highlighting significant milestones and key developments in farming practices over time. This will set the foundation for understanding the evolution of agriculture.
  • Interactive Discussion: Engage students in a discussion about the challenges faced by farmers in modern agriculture, such as feeding a growing global population, climate change, and the impact of pests and wildlife on crops. Encourage students to think critically about potential solutions to these challenges.
  • Familiarity with Smart Scarecrow: Share basic information about the Smart Scarecrow product. Present images or videos demonstrating how it works and its benefits. This will help generate curiosity and interest among students about the upcoming lesson.

A short video of working model and Documentary on our Smart Scarecrow is attached in attachments, please refer.


What You'll Need

List of Material Required:-

  1. 6 mm Plywood – 2.00 Sq Ft
  2. 1.75 mm PLA Filament for 3D printing – 50gms/20mtrs.
  3. 12V BO Motor-1 nos
  4. Red and Black Wire 0.5 mm diameter – 1 meter
  5. Nut and Bolts M8*10- 8Nos
  6. Acrylic Sheet 6mm for Gear Cutting.
  7. StyroFoam Sheet 18mm -6sq ft
  8. 50W Megaphone Loudspeaker-1 Nos (https://www.amazon.in/Ekavir-Portable-Handheld-Megaphone-Recording/dp/B0BCGHBL6P)
  9. 12v 10W Solar Panel-1 Nos (https://www.amazon.in/Generic-Solar-Panel-10W-12V/dp/B08ZN9BQ66)
  10. Relay Timing Circuit Module. (https://robu.in/product/timing-delay-switch-circuit-with-double-mosfet-control/)
  11. Air Tight Sealed Plastic Container Box- 1 Nos.
  12. 1″ inch Hollow MS Pipe – 7 ft
  13. 1/2″ inch Sq Tube- 4 ft
  14. DC Power Jack Pair- 1Nos
  15. 12V 1.5ah Rechargeable battery
  16. 8 in Dia Plastic Ball for Making Face of Scarecrow


List of Machine & Tools Used:-

  1. Laser Cutter.
  2. 3D Printer.
  3. Power Drill Machine.
  4. Hot Glue Gun.
  5. Soldering Station.
  6. Welding Machine.
  7. Digital Multimeter.


The Instructions

Designing of Mechanism in 2D software and Laser Cutting of Parts

Designing of the Scarecrow Body Mechanism in 2D Software. Which will be converted into DXF file and will be cut on 5mm Plywood sheet on Laser Cutter or CNC Wood Router. This is the main body mechanism for motion of Scarecrow. A type of Slider-Crank mechanism is used used here to provide up and down motion to Scarecrow Hands.

You can refer the .ai File for Laser Cutting. I have used RD works for Laser Cut designing.


  1. Set the desired parameter of Power & Speed for Laser Cutting Machine as per material and machine setting.
  2. I have set power 60 and speed 10mm/s for our 70W SIL Laser.
  3. Now take a Plain ply sheet without any bend or previous cut, place it on the platform of laser cutting machine and clamp it properly, now set the origin point and frame the cutting area.
  4. Now Close the Door Panel of machine , then switch ON the laser tube and compressor and start cutting the sheet.
  5. After the cutting is done, turn off the laser tube and compressor, wait till all the smoke is exhausted from the Fan and then open the door panel, remove all the clamping and take out you laser cutting parts.


3D Printing of Nut & Bolts for Motion of Linkages

You can refer the STL file for 3D Slicing provide in Lesson Material. This Half Threaded Nut and Bolts will used for connecting the linkages for smooth motion.

  • I have taken a standard file of nut and bolt of m6*20, which you can scale in the slicer as per your linkage hole dimension.
  • Use PLA/ABS Material for Good Printing Quality and Strength.
  • Better to use max infill for extra strength.
  • Put the Bolt Head Flat Lying of the Bed, hence the threads will be printed properly.


Assembly of all body parts Together

Now we will assemble all the body part together, to automate the mechanism.

  • Place all the part of table and assembled it with the Nuts & Bolts.
  • Your Mechanism is ready now.
  • Lets Automate it, attached the motor from the backside of Main-Body and mount the small gear on it as shown in image.

Electronics Connection

For automation and controlling the hand motion of scarecrow, I have used delay timing circuit module (HW-0516 Dual-MOS Trigger Cycle Circuit Timer Delay Module) with 12V DC Motor, which trigger the circuit at particular time interval.

The mechanical part is finished, now lets move towards electronics.

  1. Make the connection as shown in figure.
  2. You can Refer this Video link for programming of the Timmer module (https://youtu.be/YU4rAmI5MI8)


The following abbreviations are used for the Timer Module.

OP : open

CL : closed

LOP : cycles (loops)

OFF: off (emergency)

ON : on

C-P : sleep mode on

0-d : sleep mode off

000 standard view


You make a programming for 10 Sec Motion and 5 Mins Delay for Long lasting power.


Connection of Loudspeaker

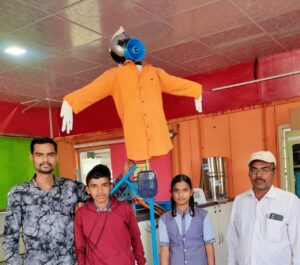
We have used a 50 W Microphone Loudspeaker for making different sounds from Scarecrow, this microphone has a inbuilt circuit which can record the sound, play music from SD card/U-disk etc.

  1. Connect the Microphone at the Top of the Body ( on the Head of Scarecrow), and extend the controlling module wiring in the control box at bottom.
  2. The Microphone can be inserted with a SD card loaded with some scary sound like Gun Shots, Tiger sound, Eagle sounds for scaring the wild animal and birds.
  3. This Sound Clip should have some delay between two sounds otherwise it will be making continuous sounds and battery will drain drastically.
  4. All the Electrical connection must be enclosed in a waterproof sealed casing as shown, for protection from raining and dust.

Finishing of the Model

Turning the scarecrow into a healthy and smart personality while also creating a metal stand for him to stand in the field.

Materials you will need:

  1. Scarecrow body structure with all the assembly.
  2. Foam or padding material
  3. A nice shirt or clothing
  4. Metal stand or frame
  5. Tools like scissors, glue, or sewing kit (depending on the materials used).


Finishing the Scarecrow:-
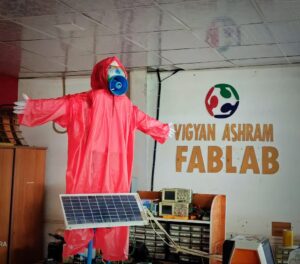
 

  • Add foam to the scarecrow frame :- Take the foam or padding material and shape it to fit the scarecrow frame. Focus on areas like the chest and arms, to give it a more human-like appearance. The foam will add the illusion of muscles and a healthy body.


  • Dress the scarecrow :- Put the nice shirt or clothing onto the scarecrow. You can choose a shirt that you think looks good on your “fit scarecrow man.” Secure the clothing in place with glue or sewing, ensuring it won’t easily come off due to wind or weather.