Basketball Game – SCOPES-DF

Lesson Details

Age Ranges *
Fab Tools *
Author

Author

Amany Ayman
Amany Ayman
Informal educator
I am a dedicated STEM education specialist in Fab Lab Egypt, with a passion for delivering innovative and engaging learning experiences. As a certified Fab Academy graduate, I have a strong foundation in digital fabrication, CAD design, electronics, and programming.… Read More

Summary

It’s a fun learning session, focusing on programming concepts like variables and introducing new components to students like 7-segment and IR sensor with Arduino, all through a fun project.


The basketball project involves scoring points by throwing paper balls and competing against each other.


Here is Tinkercad Project link, it has all circuits and codes ready!


The Session Schedule is as follows:
  1. Recap on inputs, outputs, conditions, and Tinkercad environment
  2. Introducing new components, which are the 7-segment, its pins, and simple code
  3. Introducing “Variables” and applying it with a counter code
  4. Making a basketball project, integrating newly acquired skills, and applying its steps through the engineering design process (explore – plan – create – improve). Finally, integrate the project and assemble components on a 3d printed basketball and play with it!


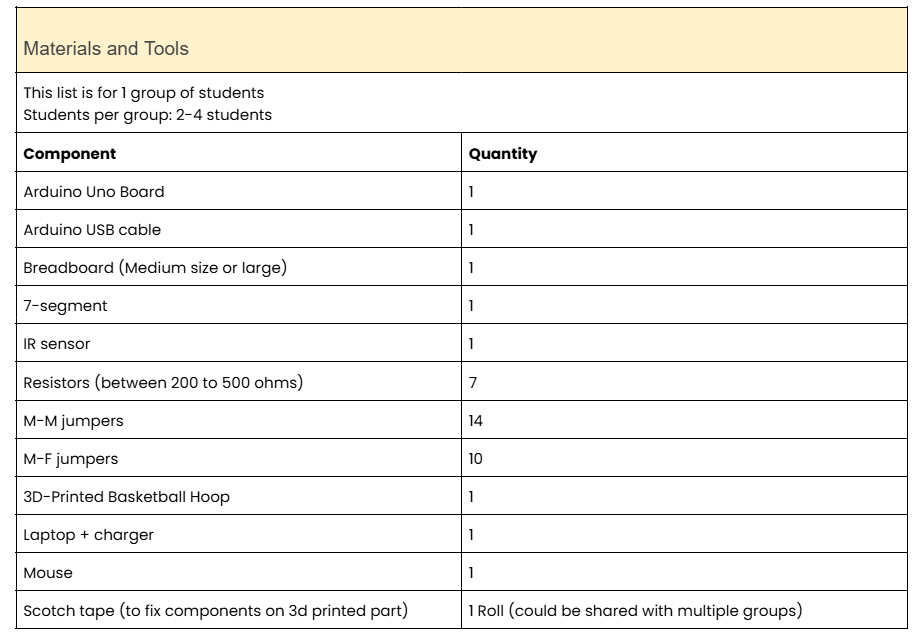
What You'll Need

Learning Objectives

By the end of the session, participants will be able to:


  • Apply a project through the engineering design process (explore – plan – create – improve)
  • Wire 7-segment and understand how it works, its pins order 
  • Build a counter code by using a variable and incrementing it 
  • Plan their code by writing steps/instructions on paper (simple pseudo code)
  • Write an algorithm inside Tinkercad (block programming) 
  • Use the simulation to run the code and debug it
  • Integrate hardware with a ready-made 3d printed basketball hoop to build a complete project 


Reflection

This basketball project makes learning variables thrilling by turning abstract concepts into a competitive game. Introducing the 7-segment display through scoring mechanics, then assembling components on a 3D-printed hoop bridges coding to tangible play, where debugging errors become part of the fun!


Another Aspect is the Engineering Design Process the students go through. The four steps in sequence to build the basketball project is:

  1. Explore: Students explore new components (7-segment) and concepts (variables and counters).
  2. Plan: Students write the Pseudo-code.
  3. Create: Students write code and build the wiring on Tinkered, then upload code and wire components.
  4. Improve: Students troubleshoot the wiring or code, and make adjustments or improvements.


The Instructions

Basketball Demo

Gaining students' attention with the project and announcing that they will build it by the end of this session!

  1. Welcome the students to the session
  2. Announce that we will learn new electronic components and programming concepts!
  3. Show the students the basketball project and ask them to play with it and score points (Demo Video)


Engineering Design Process Overview

Explaining the 4 steps that we will follow in Today’s session

  • Explain that to be able to make the project, we will follow certain steps, it’s called the engineering design process
  • Name the four steps: Explore, Plan, Create, and Improve
  • Explore: We will explore the new concepts and components and practice how to use them
  • Plan: Write down the project code sequence on paper (pseudo code)
  • Create: build the code and wiring on both Tinkercad and offline
  • Improve: Troubleshoot any errors and solve any challenges


Tinkercad Recap

Refreshing students' memory of Tinkercad software and how to use it

  • [before the session] Prepare a project with a button and LED connected to Arduino and write its code on Tinkercad
  • Ask students questions about the program GUI:
  • What menu should help us get components from?
  • How to use a component? And where to put it?
  • Where do we write the code? What button do we click?
  • Can we simulate on Tinkercad? How?
  • Which tab in block programming can we get an “if condition”?
  • After asking and engaging with students, expand on their answers and demo different menus 
  • Demo the project of the LED and button

Exploring 7-Segment

Practice using the 7-segment

  • Ask students what 7-segment used for
  • Explain that it displays numbers between 0 to 9 
  • Explain that each segment has a pin to control it, just like an LED. using this Reference photo
  • Elaborate that just like it’s a regular LED, each needs a separate resistor to avoid burning it
  • Advise students to wire it on Tinkercad with pins “in order” for easier coding. Starting from pin a, b, till f and neglect dp pin
  • Explain that to be able to control it, we use a regular block “set pin to high/low”


Introducing Variables

Having a discussion about how the basketball changes the number with each ball, and how it changes

  • Ask students how they think the basketball changes the score
  • Explain that the number changes, it’s not constant. Expand on what changes around us in life and what is constant
  • For example, in a school, the class and teachers are the same, but the weather changes, and the topic we learn changes each day..etc
  • Elaborate that in coding as well, there are variables that change within the project
  • Explain that a variable is like a bucket in which we put inside it a value, and it has a limited space so when we put a new value it forgets the old one


Counting how many times we clicked a Button!

We will try creating a variable that counts how many times we click a button

  • Build the wiring of a button with students (wiring the button reference)
  • Ask students about what they think a serial monitor is
  • Explain that it shows values like an LCD or a screen, but inside the computer, Explain “print to serial monitor” Block
  • Ask students how to build this code. How can we make a counter? 
  • Explain that it does a simple operation: when we click a button, it adds 1 to its previous value!
  • Build the code and simulate it


Explaining the project

Explaining the basketball project requirements

  • Announce that students will be divided into teams to build the basketball project themselves!
  • Ask 2 volunteering students to come and play with it to let the class know how it works
  • Reflecting on the project, the basketball could sense balls passing the hoop, and it displayed how many balls went through, counting from 1 to 9, then restarting from 1 again
  • Explain basketball project components:
  • Input: IR sensor to detect if the ball has passed
  • Output: 7-segment to show the score (how many balls have passed)
  • Controller: Arduino
  • Wiring: through the breadboard and jumpers
  • The project requirements are:
  • Implementing on Tinkercad (wiring, coding, and simulation) 
  • Integrating the project using hardware components and also the 3d printed basketball
  • Announce the timing for the 3 steps ahead
  • Plan: 10 mins
  • Create: 45 mins
  • Improve: 10 mins


Plan Phase

planning the coding algorithm

In this phase:

  • Observe students progress
  • Provide guidance or feedback when needed


Create Phase

building the code and wiring

In Create phase:

  • Observe students progress
  • Provide guidance or feedback when needed
  • Give each group 1 3D-printed basketball hoop so they can mount components on it.
  • Give Hints to students when needed:
  • Use PIR inside Tinkercad as it has no IR sensor
  • Stress on using 7-segment pins “in order” to make it easier to control. Also, use the reference image when needed
  • Control all 7-segment pins from the first loop and just change the status (High or Low) to avoid forgetting any pins. Also, it’s easier to just copy them all at once


Improve Phase

Testing the project, solving errors in code, wiring on simulation or actual components

In this phase:

  • Observe students’ progress while they wire and test the project on-ground before integration
  • Provide guidance or feedback when needed
  • Troubleshoot wiring and code in Tinkercad to reach a successful simulation
  • Troubleshoot the project after wiring on-ground
  • For example, if it jumps and counts 2 points at once, that means it counted 1 ball as 2, so we can make the delay in code a bit longer to wait 1 second before it counts another ball


Presentation

Each team presents their project, sharing successes and challenges

  • Announce that we have all done great work!
  • Ask them to give their attention to their peers while they present their project
  • Provide feedback after each presentation 
  • Thank each team for their efforts 


Lesson Feedback

Contact us

Having trouble? Let us know by completing the form below. We'll do our best to get your issues resolved quickly.

"*" indicates required fields

Name*
Email*
This field is for validation purposes and should be left unchanged.
?