Butterfly Designer - SCOPES Digital Fabrication

Lesson Details

Subjects
Age Ranges
Standards
6-8.RST.3

You need to login or register to bookmark/favorite this content.

Author

Jessica Brennan

Summary

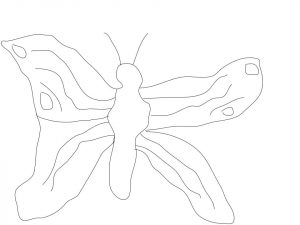
This is a lesson to help students recall the different parts of a butterfly’s anatomy while also working on creating a finished product with a vinyl cutter. This is meant to be used during a unit where students are learning about butterflies as a hands-on project to support learning.

What You'll Need

Google Draw

Computer(s) and/or Laptop(s)

Vinyl Cutter

Vinyl

Cut Studio

Weeding tool

USB connector for computer to Vinyl Cutter connection

Example butterfly

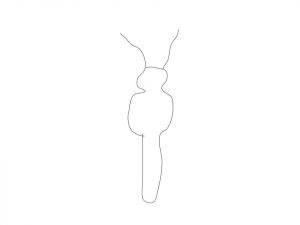
Template to get students started


The Instructions

The Drawing Phase

This is when students will draw out their butterflies on Google Draw. They will either create a butterfly from scratch, use a teacher-made template, or create a butterfly as a group/class depending on grade level and class size.

  • Students will be introduced to the assignment during class. The teacher will reiterate that we have been learning about butterflies and now it is time to see if we can create anatomically correct butterflies of our own design.
  • Ask students to navigate to Google Draw while showing on the projector the steps to get there. **For some age groups you may need to assist them with navigating to the page, or use one page for the whole class if they do not have computers.**
  • Show students an example butterfly that you have already drawn to give them an idea of what you are expecting. Tell them that if needed, there is a template available for the body of the butterfly. (Only offer this if you feel the students need it I.E. Special Education or younger students) 
  • Provide a list of requirements:
  • Butterflies need to have:
  • Antennae
  • Head
  • Thorax
  • Abdomen
  • Forewing
  • Hindwing
  • Students can be as creative as they’d like! Make different patterns, but make sure they understand that it needs to be able to be cut in the vinyl cutter.
  • Students will spend the rest of class working on butterflies and if they don’t finish they will complete the butterfly for homework (or if it is a class or group butterfly, they can complete it as a “Do-now” 
  • Let students know that the next step is going to be transferring the design(s) to cut studio and preparing them to be cut with the vinyl cutter. 


The Cutting Phase

This is when the students prepare the design in Cut Studio, prepare the vinyl cutter for printing (adjust blade etc.), and make their design!

  • Students will start this part by moving their design to Cut Studio to prepare it for cutting. Depending on the students’ experience with Cut Studio and the vinyl cutter, this may require additional teaching regarding how to use the software and prepare the cutter. 
  • Once the students have set up the cut and made sure the extrusion lines are where they need to be, they will adjust the blade on the cutter and complete a test print to make sure they are ready to go. 
  • The students will cut the vinyl to fit the machine and insert it into the machine before connecting the computer to the machine to complete the print. 
  • Students will cut their design, troubleshooting as necessary if it doesn’t come out the way they wanted it to. 
  • Students will weed the design and decide where they want to place the stickers (outside of the fab lab, in the classroom, on a device, etc.)
  • The class will show off their designs to each other and we will discuss the different parts of the butterfly, having students point to each part on the design(s) as we discuss it. 


Standards

  • (6-8.RST.3): Follow precisely a multistep procedure when carrying out experiments, taking measurements, or performing technical tasks.

Lesson Feedback