Decorative Box Lantern - SCOPES Digital Fabrication

Lesson Details

Subjects
Age Ranges

You need to login or register to bookmark/favorite this content.

Author

Nathan Pritchett
Nathan Pritchett
Fablab manager
I am the Executive Director of the Hardesty Center for Fab Lab Tulsa, a non-profit makerspace located in the Kendall-Whittier neighborhood of Tulsa, Oklahoma that provides education, community, workforce and business programming that teaches innovation, design-thinking, problem-solving and change-making, together… Read More

Summary

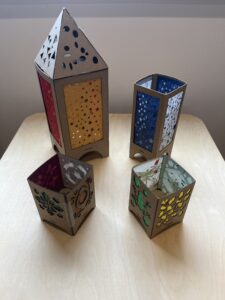
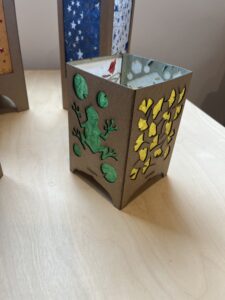
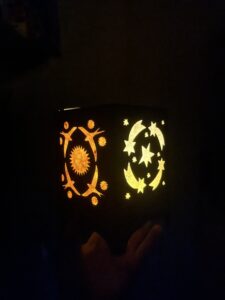
This lesson takes the creative and cultural tradition of lantern making and combines it with a tech-based lesson in digital design and fabrication. Students will use 2D design software to create box lanterns that are laser cut from chip board and assembled with decorative paper using double sided tape. Many cultures utilize lanterns for important celebrations and events due to their positive and peaceful history. While they are no longer needed solely for light, they are used as a sign of hope. 

What You'll Need

  1. Computer
  2. 2D Design Software, Inkscape
  3. Design Template File
  4. Laser Cutter
  5. Chip Board or Mat Board
  6. Decorative Tissue Paper (assorted colors and patterns)
  7. Scissors
  8. Double Sided Tape
  9. Battery Operated Tealight

The Instructions

Engage

To get students excited about the topic and ready to explore the process of lantern making, the instructor will present examples of the technical use of lanterns, as well as the cultural use of lanterns.

  1. Discuss the functional use of lanterns as a protective enclosure for a source of lighting.
  2. Show photos of lantern festivals from around the world, such as Diwali, India; St. John’s, Poland; Tokyo, Japan; and Salt Lake City, United States.
  3. Ask students to describe how the lanterns support culture events. What do they represent? What materials and colors do they use? And why?
  4. Discuss the Word to Know: Inspiration – Gather information and don’t limit yourself. Look for what resonates with you.
  5. Ask students to share their personal experiences from attending a festival that used light.
  6. Ask students if there are other examples of lanterns that they appreciate.

Explore

Students will explore and research lanterns from different cultural events.

  1. Discuss the Word to Know: Ideate – Coming up with new ideas.
  2. Ask students to review different websites to explore photos and videos of events that use lanterns.
  3. Ask students to gather inspiration for their own personal lantern design. Will the lantern represent a person, an animal, a hobby, a symbol, an idea?
  4. Discuss the Word to Know: Prototype – Making your idea real or tangible in some way so that people can interact and give feedback.
  5. Using pencil and paper, ask students to unleash their inner creative genius to sketch design ideas!
  6. The instructor can encourage simple sketches to visually prototype their ideas.

Explain

Using what they've learned from the engage and explore stages, students will create their own lantern designs. The instructor will present the project materials and instruction on software and hardware tools.

  1. Discuss the Word to Know: Innovation – Designing new solutions to meet the requirement of our project.
  2. The instructor can explain any constraints to the project, such as scale, materials, tools, and time.
  3. Using 2D design software, students digitize and model their prototype sketch designs.
  4. The instructor can explain the concepts of positive and negative space, patterns, silhouettes, stencils, and structure that are useful for this type of design.
  5. Using a laser cutter, students cut the digital design files from Chip Board or Mat Board.
  6. Using scissors, students cut tissue paper to fit the design areas.
  7. Using double side tape, students affix the tissue paper to the inside panels of the lantern.
  8. Using double sided tape, students construct and assemble the lantern shape.
  9. To complete the project, turn on the tealight and place it inside the lantern.


Extend

As students are building their lanterns, the instructor will guide them through iterations, revisions, and improvements to their original lantern design.

  1. Discuss the Word to Know: Iterate – Repeatably making new versions of an idea with the intent to make it better.
  2. Ask students to keep improving their ideas.
  3. If there are problems, take time to correct them with new ideas.
  4. Encourage students to solicit constructive feedback from others in the class.
  5. Discuss the Word to Know: Collaboration – By working together and combining our knowledge, we can produce something better than any one of us can do on our own.
  6. The instructor can ask students to not just think about what’s right and what’s wrong but consider why it works or doesn’t work.

Evaluate

The instructor will lead a discussion with the students of what they have learned during the project.

  1. Once complete, the instructor can ask students to share and reflect on what they’ve learned – the good, the bad and the unexpected.
  2. Ask students what they enjoyed most about the project.
  3. Ask students what was most challenging about the project.
  4. Ask students if they could do the project a second time, what would they do differently.

Lesson Feedback