EmpowerHer: Designing Solutions for Hair Challenges with Tinkercad - SCOPES Digital Fabrication

Lesson Details

Subjects
Age Ranges
Fab Tools

You need to login or register to bookmark/favorite this content.

Author

Pieter Verduijn
Pieter Verduijn
K-12 teacher
Born in the Netherlands, Pieter Verduijn is a multilingual educator with 18 years of work experience in Dutch, Aruban, and American education systems. His colleagues refer to him as the “Jack of all trades” as he combines his talents in… Read More

Summary

In this project, we’ll be exploring the basics of 3D printing using a fantastic tool called Tinkercad. But this is not just any project; it’s a chance for you to unleash your creativity and problem-solving skills while making a real-world impact.


Girls often face unique challenges related to hair care – from styling difficulties to organization struggles. The students’ mission is to design and 3D print customizable hair accessories that address specific needs or problems related to hair maintenance, styling, or organization. This project is not just about creating something visually appealing; it’s about designing solutions that empower and make a difference in the daily lives of girls.

What You'll Need


Materials Needed:


  • Computers or laptops with internet access
  • Tinkercad accounts (free to sign up)
  • 3D printer (optional for printing prototypes)
  • Sketching materials (paper, pencils, markers)
  • Presentation software (e.g., PowerPoint, Google Slides)


The Instructions

Introduction (15 minutes):

Introduce the concept of the lesson and its objectives.

In this step, you will introduce students to the lesson and set the stage for exploring the world of 3D printing and design to address real-world challenges related to hair care. It’s essential to create engagement and understand the objectives from the outset.


  • Start with a Hook:
  • Begin the lesson with an attention-grabbing statement or question related to hair care. For example, you could ask, “How many of you have ever struggled with finding the perfect hair accessory?” or “Imagine a world where every girl has access to innovative solutions for their hair care needs.”
  • State the Objectives:
  • Clearly outline the objectives of the lesson, emphasizing the goal of empowering students to design solutions using Tinkercad.
  • Example: “Today, we will explore the challenges girls face in managing their hair and use Tinkercad to design customizable accessories that make a real-world impact.”
  • Introduce the Problem:
  • Provide context by discussing common hair challenges girls encounter, such as styling difficulties or organization struggles.
  • Share relevant statistics or anecdotes to illustrate the significance of the problem.
  • Example: “Girls often spend a lot of time and effort on hair care, but they still face challenges like tangled hair, lost accessories, or limited styling options.”
  • Explain the Importance:
  • Emphasize why addressing these challenges is important, highlighting the potential impact of innovative solutions on girls’ daily lives.
  • Connect the lesson to broader themes of creativity, problem-solving, and empowerment.
  • Example: “By designing practical and stylish hair accessories, we can empower girls to feel confident and express themselves while overcoming common hair care obstacles.”
  • Engage in Discussion:
  • Encourage students to share their own experiences and insights related to hair care challenges.
  • Facilitate a brief discussion to generate interest and build rapport among students.
  • Example: “Let’s take a moment to share some of our personal experiences with hair care. What are some challenges you’ve faced, and how have you tried to overcome them?”
  • Preview the Lesson Flow:
  • Provide an overview of the lesson structure, highlighting the key steps and activities students will engage in.
  • Example: “Today, we’ll start by discussing common hair challenges, then move on to brainstorming solutions and creating prototypes using Tinkercad. Finally, we’ll reflect on our designs and celebrate our creativity!”
  • Set Expectations:
  • Clarify expectations regarding participation, collaboration, and respect for diverse perspectives.
  • Encourage students to approach the lesson with an open mind and a willingness to explore new ideas.
  • Example: “Throughout the lesson, I encourage you to participate, ask questions, and share your thoughts actively. Let’s create a supportive and inclusive learning environment where everyone feels valued and empowered.”
  • Transition to the Next Step:
  • Signal the transition to the next step of the lesson, preparing students for the hands-on activities ahead.
  • Example: “Now that we’ve set the stage, let’s dive into the exciting world of designing solutions for hair challenges! We’ll start by exploring common hair care issues and brainstorming ideas for innovative accessories.”


Utilize visuals, such as images or short videos, to complement your introduction and engage students visually. Additionally, consider incorporating anecdotes or personal stories to make the topic more relatable and engaging.

Empathize and Define

In this step, students will delve into understanding the specific challenges girls face in hair care and narrow down their focus to one key challenge that they will address through their designs. It's crucial to foster empathy and encourage students to consider the needs and experiences of others.

  • Introduction to Empathy:
  • Start by explaining the concept of empathy and its importance in design thinking.
  • Define empathy as the ability to understand and share the feelings and experiences of others.
  • Example: “Empathy is about putting ourselves in someone else’s shoes and understanding their perspective. By empathizing with our users, we can better identify their needs and create solutions that truly address their challenges.”
  • Discussion on Hair Challenges:
  • Facilitate a group discussion where students share common hair challenges they have observed or experienced.
  • Encourage students to consider a wide range of issues, including styling difficulties, maintenance struggles, and organizational problems.
  • Use prompts to stimulate discussion, such as “What are some everyday tasks related to hair care that you find challenging?” or “How do you think these challenges might differ for different individuals?”
  • Personal Reflection:
  • Provide time for individual reflection, where students can think about their own experiences with hair care challenges.
  • Encourage students to jot down notes or sketches to document their thoughts.
  • Example: “Take a few moments to reflect on your own experiences with hair care. What challenges have you faced, and how have you tried to overcome them? Consider how these challenges might influence your design ideas.”
  • Identify Key Challenges:
  • Guide students in identifying the most prevalent or impactful hair care challenges discussed during the group and individual reflections.
  • Encourage students to consider factors such as frequency, severity, and potential for improvement.
  • Example: “Based on our discussion and reflection, let’s identify the key hair care challenges that we want to focus on addressing. Which challenges do you think are most important to tackle, and why?”
  • Select a Focus Challenge:
  • Facilitate a decision-making process where students collectively choose one specific hair care challenge to address through their designs.
  • Encourage students to consider the feasibility of addressing the chosen challenge within the scope of the lesson.
  • Example: “Now that we’ve identified our key challenges, let’s vote on which one we want to focus on for our designs. Remember to consider factors like feasibility, impact, and the resources available to us.”
  • Define the Challenge:
  • Once a focus challenge has been selected, guide students in defining it with clarity and specificity.
  • Encourage students to articulate the problem statement in a way that communicates the issue they intend to solve.
  • Example: “Now that we’ve chosen our focus challenge, let’s define it with precision. How would you describe the problem we’re aiming to solve? Let’s craft a clear and concise problem statement that will guide our design process.”
  • Transition to Ideation:
  • Signal the transition to the next step of the lesson, where students will brainstorm ideas for addressing the defined challenge.
  • Emphasize the importance of building upon their empathetic understanding of the users’ needs.
  • Example: “With our focus challenge defined, it’s time to generate creative solutions! In the next step, we’ll brainstorm ideas for hair accessories that address the specific needs of our users. Let’s use our empathy and creativity to design innovative solutions that make a real difference.”


Encourage students to actively listen to each other during the discussion and respect diverse perspectives. Remind them that the goal is to identify a challenge that resonates with the group and has the potential for meaningful impact.

Ideate and prototype

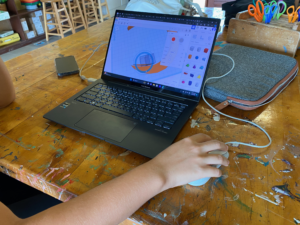
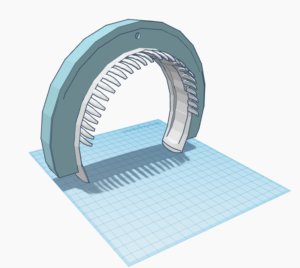
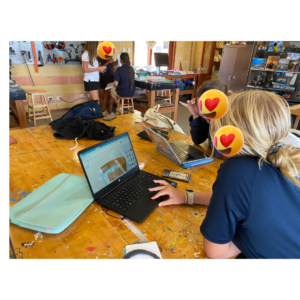
In this step, students will unleash their creativity and generate ideas for hair accessories that address the defined challenge. They will then use Tinkercad to create prototypes of their designs, iterating on them to refine functionality and aesthetics.

  • Introduction to Ideation:
  • Begin by explaining the concept of ideation and its role in the design process.
  • Emphasize the importance of generating a wide range of ideas and thinking outside the box.
  • Example: “Ideation is all about brainstorming creative solutions to the problem we’ve defined. There are no bad ideas during this phase – we want to explore as many possibilities as we can before narrowing down our options.”
  • Brainstorming Session:
  • Facilitate a brainstorming session where students generate ideas for hair accessories that address the defined challenge.
  • Encourage students to think creatively and consider a variety of approaches and designs.
  • Provide prompts to spark ideas, such as “How might we use technology to improve hair care?” or “What features would make a hair accessory more functional and stylish?”
  • Sketching Designs:
  • Instruct students to sketch out their initial design ideas on paper.
  • Encourage them to include annotations or notes to explain the features and functionality of their designs.
  • Emphasize the importance of capturing their ideas visually, even if they’re not skilled artists.


  • Review and Feedback:
  • Allocate time for students to share their sketches with their peers and provide feedback.
  • Encourage constructive criticism and suggestions for improvement.
  • Emphasize the value of collaboration and collective brainstorming in refining ideas.


  • Select Design Concepts:
  • Guide students in selecting one or more design concepts to develop further into prototypes.
  • Encourage them to choose ideas that are innovative, feasible, and aligned with the defined challenge.
  • Example: “Now that we’ve brainstormed a variety of ideas, let’s narrow down our options and choose one or two design concepts to prototype. Consider factors like practicality, uniqueness, and the potential impact of each idea.”
  • Introduction to Tinkercad:
  • Provide a tutorial on using Tinkercad to create 3D designs.
  • Cover essential tools and functions, such as shapes, grouping, resizing, and alignment.
  • Include demonstrations and examples to help students familiarize themselves with the software.
  • Prototype Development:
  • Instruct students to use Tinkercad to create digital prototypes of their chosen design concepts.
  • Encourage them to experiment with different shapes, sizes, and configurations to bring their ideas to life.
  • Remind students to consider the user experience and ensure that their prototypes are functional and user-friendly.

  • Iterate and Refine:
  • Encourage students to iterate on their prototypes based on feedback from peers and their observations.
  • Emphasize the importance of refining both the functionality and aesthetics of their designs.
  • Example: “As you work on your prototypes, don’t be afraid to make changes and try out new ideas. The design process is all about iteration – refining your designs based on feedback and testing until you achieve the best possible solution.”

  • Documentation:
  • Instruct students to document their design process, including sketches, digital prototypes, and notes on iterations.
  • Encourage them to annotate their documentation to explain their design decisions and the problem-solving process.
  • Transition to Testing:
  • Signal the transition to the next step of the lesson, where students will test their prototypes and gather feedback.
  • Encourage students to approach testing with an open mind and a willingness to iterate further based on the results.
  • Example: “Now that we’ve created our prototypes, it’s time to put them to the test! In the next step, we’ll test our designs to see how well they address the challenges we’ve identified. Let’s continue refining our prototypes to create impactful solutions.”


Throughout this step, encourage students to embrace experimentation and explore unconventional ideas. Remind them that failure is a natural part of the design process and an opportunity for learning and improvement.

Print and Reflect

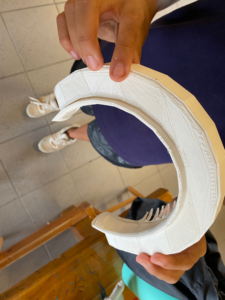
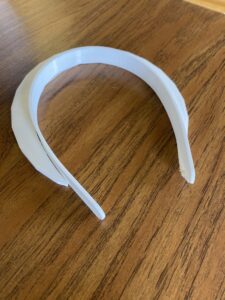
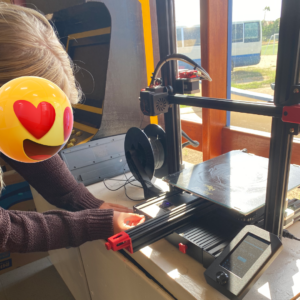
In this step, students will have the opportunity to observe the 3D printing process of selected designs and reflect on their overall design journey. They will discuss the impact of their designs, lessons learned, and the broader importance of girls in STEM

  • Introduction to 3D Printing:
  • Provide a brief overview of the 3D printing process, explaining how digital designs are translated into physical objects layer by layer.
  • Discuss the significance of 3D printing in rapid prototyping and innovation.
  • Demonstration of 3D Printing:
  • If possible, conduct a live demonstration of the 3D printing process using a selected design.
  • Walk students through each step, from loading the filament to initiating the print job.
  • Explain key concepts such as layer height, infill density, and support structures.
  • Observation and Discussion:
  • Encourage students to observe the 3D printing process closely, noting any interesting or unexpected aspects.
  • Facilitate a discussion about the significance of seeing their designs come to life in physical form.
  • Prompt students to reflect on the journey from ideation to prototyping and the role of iteration in the design process.


  • Reflection Session:
  • Allocate time for students to reflect individually on their design journey.
  • Provide guiding questions to stimulate reflection, such as: What were the biggest challenges you faced during the design process? How did you overcome them?
  • What aspects of your design are you most proud of? Why?
  • How do you think your design will impact the lives of girls facing similar hair challenges?
  • What did you learn about the importance of girls in STEM through this experience?
  • Celebration of Achievements:
  • Celebrate the accomplishments of the students and acknowledge their creativity, perseverance, and teamwork.
  • Highlight notable design elements or solutions that stood out during the reflection session.
  • Reinforce the importance of innovation, collaboration, and empowerment in STEM fields.
  • Conclusion and Looking Ahead:
  • Conclude the reflection session by summarizing key insights and lessons learned.
  • Emphasize the value of the design process as a journey of discovery and growth.
  • Encourage students to continue exploring opportunities to apply their creativity and problem-solving skills in future projects.
  • Transition to Next Steps:
  • Signal the end of the lesson and transition students to any follow-up activities or assignments.
  • Encourage students to carry forward the lessons learned from this experience and continue making a positive impact in their communities and beyond.


Lesson Feedback