- Loading…
Vinyl cutting is used in graphic design and fabrication to create stickers, signs, decals, iron on and other graphics.
In this activity, students will be taught how to combine basic shapes to form icons. They will also learn about setting up the vinyl cutter , weeding and transfer.
In order to produce an acrylic led lamp, we normally will engrave on a piece of acrylic and use a LED lamp base. Laser cutter is an expensive equipment. In this lesson, we will be replacing engraving with vinyl.

Acrylic sheet
LED lamp base
Design software (Inkscapes, CorelDRAW, ect.)
Vinyl Cutter + materials (vinyl, scissors, weeding tools)
Transfer Paper
Silhouette Studio Designer / Business Edition
In this exercise, we will explore how to combines shapes together to form new shape.
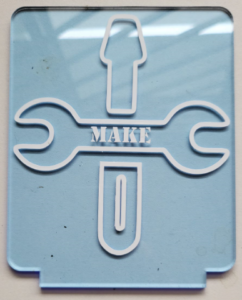
Let’s look at this sign.

How many shapes can you see?
Now let’s try to create a spanner using CorelDraw.
Create a new document in CorelDraw
1) Using the shapes like ellipse and rectangle, create the spanner.
In the toolbox, click the Ellipse tool . Hold down Ctrl, and drag in the drawing window until the circle is the size you want. You can draw an ellipse or a circle from its center outward by holding down Shift as you drag.

2) Combine the shapes together.

3) The virtual segment delete tool lets you delete portions of objects that are between intersection.
Let’s explore how to use it by watching this video.
Using the virtual Segment Delete tool, delete all the overlapped line.

4) Join all the lines together. Select the whole image and do a right click and select combine.

5) Try to create the screw driver yourself.
6) The trapezium tool can be found under the common shapes.

7) You can add text to your design.

8) With the techniques that you have learned, design your own logo.
Export your design to svg.

We will now send the design file to the vinyl cutter. We will weed, apply sticker and transfer the design on to the acrylic.
9) Let’s watch a video on how to use the silhouette cameo.
Open your svg file in the silhouette Cameo Designer / Business Edition.

10) Click on the send button & make sure you set the material to Vinyl Matte.
Send the file to your silhouette cameo. I have separated the cutting so that I can cut in different colors.


11) Weeding – removing the excess material that you do not want on your project.

12) Apply transfer tape to vinyl
|
13) Apply the vinyl on the the acrylic.

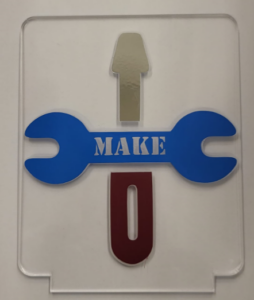
We are going to simulate the engrave line in an acrylic using vinyl
Using the same svg file, we are going to perform an offset to the design.


The result

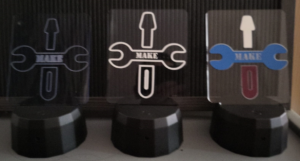
We shall now test the effect on the lamp base.
Students shall reflect on their experiences.
Have students reflect on their experience with vinyl cutting. Ask them to consider how the skills they learned could be applied in other disciplines or contexts.
Having trouble? Let us know by completing the form below. We'll do our best to get your issues resolved quickly.
"*" indicates required fields


