- Loading…

This lesson has been adapted from the Harvard-Smithsonian Center for Astrophysics lesson. In this lesson, students will learn about the supernova remnant Cassiopeia A and how astronomers take a look at the universe 10,000 light-years from Earth. Students will use 3D printing to hold a dead star in their hands. This will show the students how digital fabrication can shape how we learn and better understand the universe.

a. Printable model of the Cassiopeia A Supernova remnant
A 3D print ready model with supports: 600k triangle OBJ, 27 MB
b. CasA Supernova remnant volumetric data
ASCII VTK files created from telescope data: 3.94 MB
c. STL
Commonly accepted by a wide range of 3D printers: 28.06 MB
d. THING
Proprietary file format for Makerbot brand printers: 14.31 MB
-Select the 3D printer of your choice.
Introduce students to Cassiopeia A (the dead star) and discuss how it was discovered.
Objects in space are rather far away. The Moon is our closest celestial neighbor at nearly a quarter-million miles from Earth, and the nearest star, our Sun, is 93 million miles away.
These extreme distances mean that it’s usually impossible to touch real objects in space (meteorites that fall to the ground notwithstanding). Advances in both astronomy and technology, however, now allow you to do the next best thing: hold a 3-D model of one based on real data. Cassiopeia A is located about 10,000 light-years from Earth. How does that compare with our local cosmic objects of the Sun and Moon? One light-year equals the distance that light travels in a year, or just under 6 trillion miles (~10 trillion km). This means that Cassiopeia A is an impressive 60,000,000,000,000,000 miles (100,000,000,000,000,000 km) from Earth. But since it’s in our Milky Way, it’s in our cosmic backyard, so to speak.
The story behind such a remarkable feat starts with how astronomers study space. Unlike previous generations of sky gazers, today’s astronomers look at the Universe in many kinds of light, across the full electromagnetic spectrum. Through advanced telescopes and detectors, scientists can “see” from radio waves to gamma rays. Why is this important? We need to look at the Universe in all the types of lights to even begin to understand it. Take X-rays, for example. Back in 1999, NASA’s Chandra X-ray Observatory was launched in order to observe the high-energy Universe including such things as colliding galaxies, black holes, and supernova remnants.
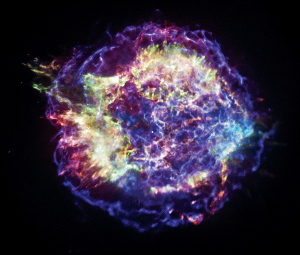
One such supernova remnant that Chandra studies is Cassiopeia A. About 400 years ago, in our own Milky Way galaxy, a star that was about 15 to 20 times the mass of our Sun, detonated in a supernova explosion. If we look at Cassiopeia A in optical light, the kind the human eye detects, we see a delicate filamentary structure at around 10,000 degrees Celsius.
Death comes alive in the X-ray image of Cassiopeia A from Chandra, however, looking at material that’s millions of degrees hot. There is so much energy that it heats up the debris field to temperatures that cause the material to glow in X-ray light.

Credit: NASA/STScI

Credit: NASA/CXC/SAO
Discuss how the data of Cas A was processed.
When a satellite such as Chandra observes an object in space, its camera records photons, a packet of energy that makes up electromagnetic radiation, a.k.a. light. The arrivals of these photons are recorded by detectors aboard Chandra and delivered to Earth via NASA’s Deep Space Network, a series of large radio dishes around the globe. The data are coded in the form of 1’s and 0’s, and scientific software (back on Earth) then translates that data into a table that contains the time, energy, and position of each photon that struck the detector during the observation. The data are further processed with software to form the visual representation of the object.
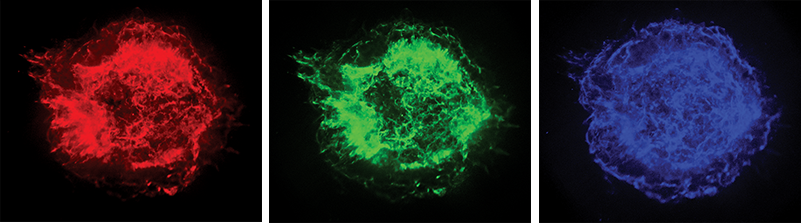
Once the data are in the form of an image, different colors can be assigned to various slices of light detected. For example, a common color palette of chromatic ordering is based on the amount of energy and often includes three layers: red is applied to the lowest energy band, green to the medium, and then blue to the highest energy band in the dataset. When this is done for X-rays detected for Cassiopeia A, new and important information is revealed. The blue, wispy arcs in the image show where the acceleration is taking place in an expanding shock wave generated by the explosion. The red and green regions show material from the destroyed star that has been heated to millions of degrees by the explosion.
Credit: NASA/CXC/SAO
Explain and show the timelapse captured of Cas A.
NASA’s Chandra X-ray Observatory has observed Cas A many times over the 17 years it has been in operation. The aggregate amount of observing time is over two million seconds, which means there is a great deal of information to work with. Scientists can use this rich dataset to go beyond a static image and see it moving over time.
A time-lapse movie of Chandra’s X-ray data was made by combining observations taken in 2000, 2002, 2004, and 2007. Scientists can use this to measure the expansion velocity of the leading edge of the explosion’s outer blast wave. The researchers find that the velocity is about 11 million miles per hour. But that’s not all.
By combining X-rays from Chandra with infrared data from another orbiting NASA observatory, the Spitzer Space Telescope, plus visible light information from telescopes on the ground, something special can be done. For the first time, a three-dimensional reconstruction of a supernova remnant was created using these data taken in different types of light.
https://chandra.harvard.edu/deadstar/casa_timelapse.mp4

Explain how astronomers 3D modeled Cassiopeia A and show video links.
Because Cassiopeia A is the result of an explosion, the stellar debris is expanding radially outwards from the explosion center. Using simple geometry and the Doppler effect, we can create a 3-D model. That data was imported into a program originally used for brain imaging, which was then modified for astronomy data by the Astronomical Medicine Project at Harvard.

The insight into the structure of Cas A gained from this 3-D visualization is important for astronomers who build models of supernova explosions. Now, they must consider that the outer layers of the star come off spherically, but the inner layers come out more disk-like with high-velocity jets in multiple directions.

While this 3-D model is exciting for astronomers who study exploded stars, the work on Cassiopeia A is not solely for the experts. Collaboration with specialists at the Smithsonian Institution led to the creation of the first-ever 3-D print of a supernova remnant based on observational data. That’s the story of how one cosmic object – or at least a representation of one – came down to Earth. It’s taken hundreds of years, a journey of trillions of miles, and some incredible scientific and technical advances, but now anyone can hold (the remains of) a dead star in their hand.
https://youtu.be/cbivazf-4Ew?list=UUcvatGFnbYUCgXRapk1dMvw

Show Kimberly Arcand TEDX TALK
This presentation, recorded at TEDxProvidence in 2016, steps through the process of transformation and translation on how to take a supernova into the third dimension. Go behind the scenes on how to hold (the remains of) a dead star in your hands (in plastic, and in a much smaller scale!) with Chandra’s Visualization Lead, Kimberly Arcand.

Before starting go over 3D printing safety rules.
Use links and supporting files to 3D print Cassiopeia A.
a. Printable model of the Cassiopeia A Supernova remnant
A 3D print ready model with supports: 600k triangle OBJ, 27 MB
b. CasA Supernova remnant volumetric data
ASCII VTK files created from telescope data: 3.94 MB
c. STL
Commonly accepted by a wide range of 3D printers: 28.06 MB
d. THING
Proprietary file format for Makerbot brand printers: 14.31 MB
-Select the 3D printer of your choice.
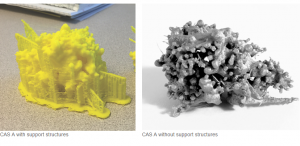
This example (shown left) was printed at 0.2mm layer height, 10% infill, 2 shells with MakerBot PLA filament at an extruder temperature of 215 C with a raft and supports. To make your 3D printed model more accurate, you will want to remove as much of the supporting material and raft as possible. Great care should be taken when performing this task to avoid breaking the jets. Most of the material will break off easily by hand, but you can get more accurate results by enlisting the help of a few tools. If you have access to a heat gun, or hair drier, the plastic wisps leftover from the supports can be removed by quickly applying a blast of heat. Be careful not to overheat, and melt the plastic. Additionally, you can use a Dremel or other similar rotary tool to sand away rough spots and carve out some of the interior gaps. As a final tip, you could use a soldering iron to weld some extra plastic to the base of the jets to reinforce them.

https://chandra.harvard.edu/deadstar/3DPrinter.m4v

Now start printing!
Having trouble? Let us know by completing the form below. We'll do our best to get your issues resolved quickly.
"*" indicates required fields