- Loading…
For the freshman skills class, students have been learning that in the real world, you often need to connect multiple disciplines to solve problems, which culminates in a CSI unit trying to figure out who stole an item. In Psychology, Juniors have learned about the physical response your body has to lying, and why they happen (and why other things might also make that happen). In Physics, Juniors learn Ohms Law. Physical Computing, Juniors have been learning about circuits. They learned that resistance removes some of the flow of electricity. They have learned that elements like light, temperature, and pressure can change the amount of resistance in a circuit. They also briefly learned that their bodies reflect different amounts of light as their heart beats blood. They then learned how to program Microbits to read those changes in resistance and show it on the screen.
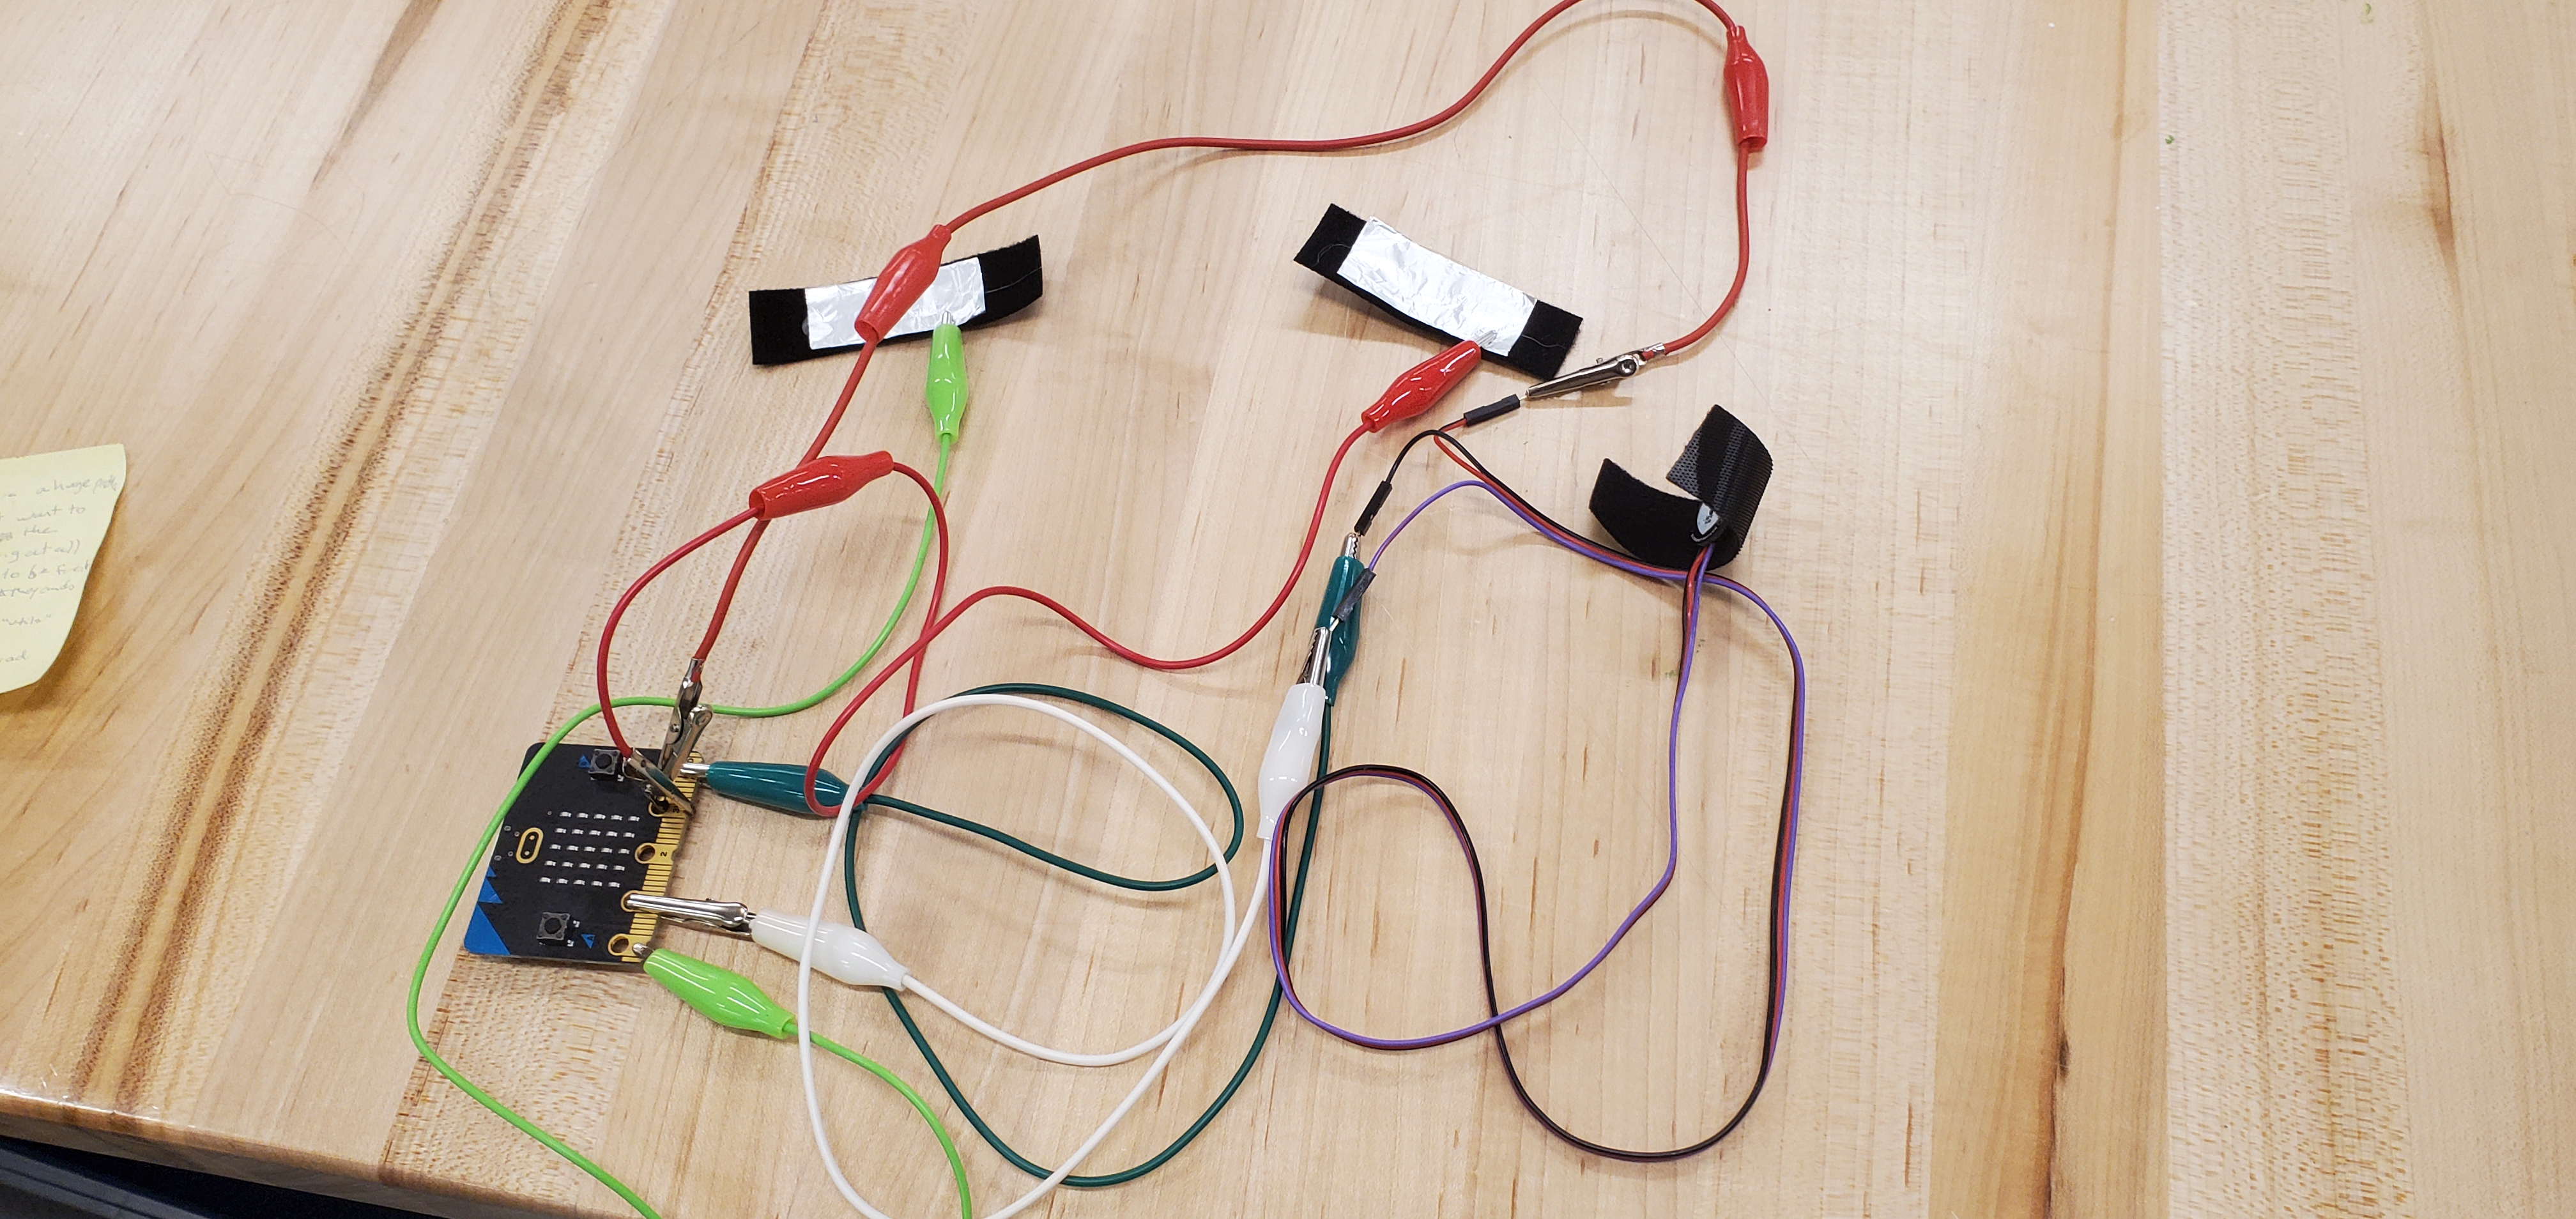
For this lesson, students will create a lie detector, which works by showing on a computer screen what the voltage differences are in pulse and galvanic skin sensors, as well as the change in pulse. They also explore why those sensors detect lies, and discuss the ethical implications around bodily autonomy, freedom and safety around the use of lie detectors, thinking about their role in the world as makers. They then complete the lie detector design – using user-centered design principles to make a lie detector that the teachers will use in front of the freshmen for a CSI unit.
Students will understand
Students will be able to:
This lesson came up entirely naturally – I learned that there was going to be a transdisciplinary CSI lesson that last year Jaymes Dec had built a lie detector for, and this year I realized my students could very easily do the same – I was moving into using pins and breadboards, and helping students pull back layers of how things worked, and the galvanic skin sensor response is a super easy way to bring home the idea that sensors are often just sensing changes in resistance. So, we’re connecting student learning across disciplines, opening up an understanding of what is going on in computing devices in the real world. Students were excited to learn about this, and talk about it, especially given they had done the same project before. When I spoke to my students, they were also naturally interested in the ethics of making lie detectors and if we should trust them, bringing in Philosophy as well.
The students very much enjoyed making lie detectors – they almost enjoyed it too much, as they spent a lot of time trying it out on each other. Can’t beat it for engagement, with everything from the philosophy to the psychology to the electronics and programming.
I interspersed the lie detector lesson with a lesson about making escape rooms, and it was a very busy time of year, and I’m trying to make sure everything is set up before the end of the year (and so are the Psychology and Philosophy teachers I invited to guest lecture when their parts came up, and the Skills teacher who will be using the lie detectors in her class). This meant that the lesson wasn’t particularly tight – it was drawn out in different orders across each section of the class. I would love to do this again next year, knowing exactly what the Philosophy and Psychology parts of the lesson can look like, being more sure to make sure that the Design parts (how do you make a lie detector that looks and feels like something that will get the desired results?) are better described and tighter, so that the experience flows better.
It is very cool to see how many different disciplines can come together in a technology class, however, and to use those connections for engagement.
Ask students what they know about the physical signs that someone might be lying
From Psychology class, students should be able to answer this question – they should know that someone might sweat more, and their heart might race faster, or they might be less able to answer complex questions if they are lying. Write these answers on the board so students can see them while they answer the next question.
This question can be done as a think/pair/share
Connect what students just said about lying to what they know about resistance and electronics
Ask students:
It will probably be harder to just come to the conclusion that you can change light levels bouncing back for the pulse sensor, so you can just explain that to students.
You may have prepared small containers with enough materials for a group of students to create their lie detectors. Pass those out to each group of students making a lie detector and make sure the students understand the materials.
Students build the galvanic skin sensor using the materials you have provided
If students have understood the lessons on how you can connect a microcontroller’s pins to a breadboard and a circuit, they should be able to connect jumper cables correctly to read values, so you should not necessarily provide students with the instructions; you should instead wander and help them as necessary. I did find that I helped students figure out what to do as a group, and would then allow them to do it individually
Here are the steps for the galvanic skin sensor:
Program the sensor to collect readings
Students should also know how to do this – wander and help as necessary.
Hook someone up to the lie detector
Ask someone questions while hooked up to the pulse sensor and the Galvanic Skin response sensor.
Add the data from the pulse sensor to the lie detector as well
It is often helpful to have students do this without the Galvanic Skin Response sensors connected, and then connect them together later, but these instructions assume you are adding to the same sensor.
It is worth noting that data logger can be buggy – you should wander and help students do this, and sometimes if it doesn’t work you just need to redownload the code. Common problems that aren’t fixed by redownloading involve – check that no wires that shouldn’t be touching (like P0 and GND) are, check that the program is reading analog not digital from the pin.
Watch what happens with the pulse sensor plugged in as well
Ask someone questions while hooked up to the pulse sensor and the Galvanic Skin response sensor.
Now that students have the basics of the programming and the electronics, remind them that these lie detectors will be used by teachers who will be asked questions in front of the freshman, and let them know they can design everything around the electronics.
Give students time and materials and space to design. Many students in my class used the laser cutter to make boxes that would hide the electronics, one used a 3D printer, and one was fine with just using zip ties for cable management.
A few students wanted to add lights or sound when someone was lying to make it more lie-detector-ish rather than just displaying values.
Let students get creative with this, and make sure to point out the needs of the users.
Students consider the ethical implications of creating a lie detector such as what they've just done.
How do you feel about using GSR and pulse data to detect lies? Why does it work? When doesn’t it? Would you be comfortable using it in a court of law? Who does this disproportionately affect?
Having trouble? Let us know by completing the form below. We'll do our best to get your issues resolved quickly.
"*" indicates required fields