- Loading…

Students will demonstrate understanding of various sea floor features, create a digital and physical model of a sea floor, and then practice mapping the sea floor (bathymetry) using dowel rods and 3D modeling in Excel.

CNC Router or 3D Printer
Laser Cutter
Computer and Sculptris Program
1/8 inch Dowel Rods or grilling skewers
2 inch thick foam insulation
Design Files
Using the free downloadable program, Sculptris, students will design a model sea floor that incorporates multiple sea floor elements.
Download the program Sculptris (https://pixologic.com/sculptris/), and the template block to be loaded in the program. Using the crease, push and other tools sculpt the block into the various sea floor elements required.


Download the file as an STL and carve it on your CNC Router or print it on your 3D printer.
Carve your block out of 2 inch insulation foam from the resulting .STL file. If you do not have a CNC machine you could print them out on a 3D printer. If you scale them down from the original design file, you will have to make changes to later parts of the project.


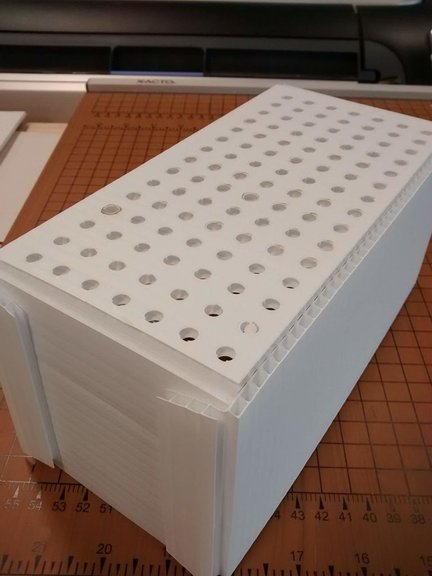
Laser cut the box template that will be used to put dowel rods down to mark the depth to the carved surface. Put .25 centimeter or mm marks on the rods to measure depth.
Use the template file to laser cut the box out of cardboard or corrugated plastic. Black lines ore for cutting and red lines are for partial cuts to fold. Fold the box as shown and glue it together. Fit it over the sea floor model.


Using the marked dowel rods, insert them into each hole vertically and record measurements on a spreadsheet in Excel. Use this data to map the sea floor (Bathymetry)
Mark some small dowels (we used grilling skewers) at .25 centimeter or 1 mm intervals and poke them into the holes of the box to measure the depth. Enter each measurement as a negative number in the corresponding box in a spreadsheet. When all of the data is entered, highlight it and click on “All Charts” on the Insert menu. Look for the “Surface” option and select the 3D Surface chart. Compare the resulting chart with your original digital design or sculpted sea floor model.


Having trouble? Let us know by completing the form below. We'll do our best to get your issues resolved quickly.
"*" indicates required fields