- Loading…

Learners will work with a pre-designed glider template and make simple modifications to personalize and improve its flight. Adjustments may include adding paper clips for balance or modifying the nose cone.
Tools Used:
Laser Cutter (for pre-cut parts)
Vinyl Cutter (for decorative elements)
Focus:
This level introduces learners to basic fabrication tools and flight concepts. The emphasis is on hands-on experimentation and understanding how small changes affect performance.
Materials:
3mm corrugated cardboard or 1.5mm or 3mm balsa wood
Thick (~110lb) cardstock for vinyl cutter
Paperclips or 3D printed nose cones
Note: construction paper is too fibrous to cut cleanly.
Facilitator Considerations:
This activity has several possible variations, depending on what machines you use and materials you have available.
Balsa wood body, wings, and tail = laser cutter only
Balsa wood body + cardstock wings and tail = both laser cutter or laser cutter + vinyl cutter
Cardstock body, wings, and tail = vinyl cutter only
3D printed nose weights = optional (you can use paperclips or tape pennies on, instead!)
Learners will be able to…
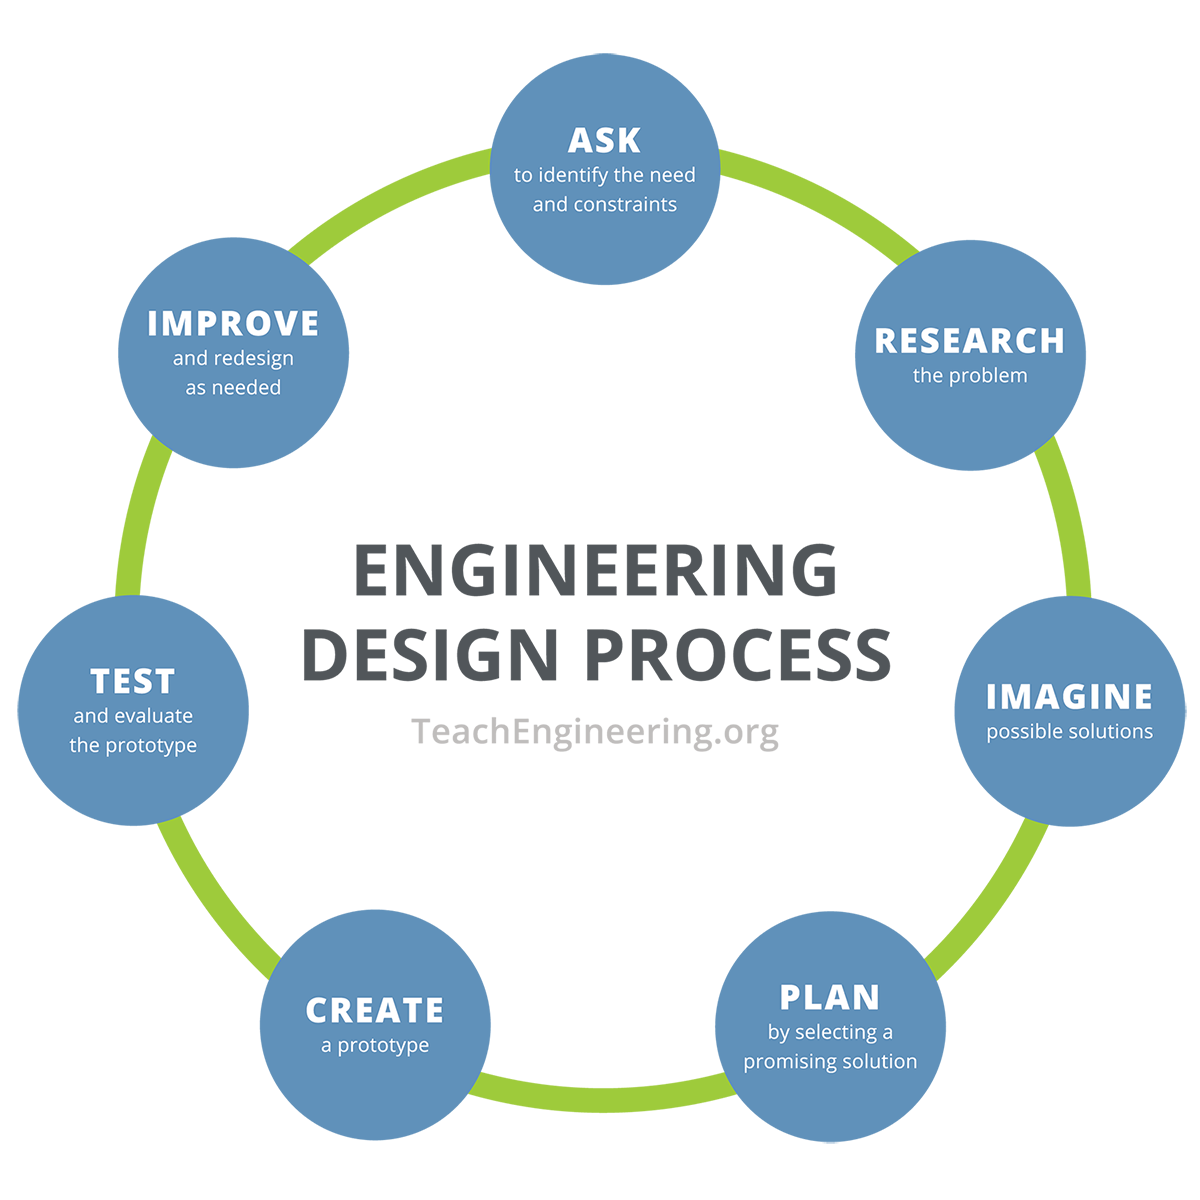
Describe the steps of the iterative engineering design process using a pre-made glider model.
Explain the four forces of flight (lift, weight, thrust, drag), using examples from their glider tests.
Calculate the average distance of their flight trials using simple data collection.
Evaluate how parameter changes affect flight performance.
Tips:
Learners can work alone or in groups of 2-3.
If using cardstock, you can cut this on the laser cutter or vinyl cutter, or both simultaneously, to save time!
Designs can be cut all at once instead of in separate design/redesign steps: ask each learner or group to design up to three (3) versions of their fuselage, wings, or tail at the beginning of the activity, and cut them together in a single batch. They can then mix and match these parts to test different configurations.
Create a testing zone:
Vinyl cut and install our floor decals, or roll out a tape measure for quicker setup and cleanup.
Prepare Fab-in-a-Box for this machine combination lesson.
Setup and Preparation:
Prepare a sample glider using a parametric model in xDesign. Adjust a few variables, such as wing span or tail height, to create a visually distinct version, and begin cutting it on the laser cutter or vinyl cutter as learners walk in. This live demonstration not only sparks curiosity but also provides a concrete reference when introducing the parts of the glider and the four forces of flight: lift, weight, thrust, and drag. You should also have a completed glider on hand for comparison. Ensure that all devices have access to xDesign and that the fabrication tools are tested and ready to go.
Welcome class and introduce them to the activity with context and key terms.
Welcome:
Welcome the class, and begin with an open discussion about what they’ll be doing today: designing and testing gliders using digital tools and fabrication equipment. Invite learners to share what they already know about flight or gliders, and encourage curiosity by asking questions like:
“What makes something fly well?”
“Have you ever built something that flies?”
Context:
Planes’ designs must balance all of these forces. The shapes, sizes, and materials used for the wings, body, nose, and tail can all drastically affect the way a plane flies. How can you engineer a plane to take advantage of these forces?
5. Aerodynamic: of or having a shape which reduces the drag from air moving past.
6. Fuselage: the body of a plane
7. Horizontal Stabilizer: the tail of a plane
8. Engineering Design Process:
In the Real World: Engineers don’t create perfect designs on the first try. They test, redesign, and retest their ideas again and again, making small changes each time based on their observations. This is called iterative prototyping, and it’s a key part of the engineering design process. Instead of thinking of mistakes as “failures,” think of them as rough drafts of a finished product. Each one is a step closer to success!
Key terms:
Key Science Concept: Aerodynamic Forces
Four main forces keep planes in the air: thrust, lift, gravity, and drag.
1. Thrust: the force propelling a plane forward. Thrust is most often generated by fuel combustion (or your throw!).
2. Lift: the force acting upward on a plane’s wings to keep it aloft. Lift is generated as a plane moves forward and air moves more quickly across the top of its wings than beneath them. Generally, the larger the wings, the greater the lift.
3. Gravity: the force pulling a plane’s mass down toward the ground. Lighter materials can help a plane stay airborne longer.
4. Drag: the frictional force a plane experiences from air flowing past it. Drag is the opposite of thrust, and slows a plane down. It is largely influenced by its tail design.
Which of these forces act against each other?
Which forces are present when a plane is sitting stationary on the ground?
What about taxiing in (rolling along) the runway?
Demonstrate the basic functions of the chosen CAD software. Focus on essential tools like shapes, mirror, and path editing. Create a simple design in real-time, explaining each step clearly. Encourage students to ask questions and interact during the demonstration.
Demonstrate the basic functions of the xDesign Focus on essential tools like shapes, mirror, and path editing. Create a simple design in real time, explaining each step clearly. Encourage learners to ask questions and interact during the demonstration.
Ideate
Optimize the glider’s performance by adjusting the shape of its wings, tail, or body and adding a nose weight.
xDesign steps can also be found:
In xDesign under Content
Explain how the laser cutter, vinyl cutter, and 3D printer work and the roles each have in the balsa glider building process. Demonstrate how to set up the machines and load the material. Show how to transfer a design from the CAD software to the machines for production.
Laser Cut Fuselage (body)
Connect laser cutter:
Turn the laser cutter on and connect it to your computer via USB
Open xTool’s XCS software
Select “connect device” in the upper righthand corner of XCS
Choose your laser cutter from the pop-up menu
Import design file:
Click the file folder icon in the upper lefthand corner. From the dropdown menu, select “import image.” Choose your file.
Select the circular handle to rotate your design as needed to fit onto your stock.
Note: Do not resize within XCS! Remember: your design is parametric, and the slots are perfectly calibrated for the width of your stock material. If you resize outside of your CAD environment, the slots will also change.
Configure cut settings:
Select “user-defined material” from the dropdown materials list.
Combine all elements (lines) you want to cut on a single layer.
To add or switch layers, click “move to.”
Select “cut” under the “processing type” menu.
Check settings
For 1/16” balsa wood, we suggest the following (power/speed/pass):
Score: 40/150/1
Engrave (raster): 30/200/1
Cut: 100/15/1
Note: the machine will automatically score and engrave before it cuts, and cut inside elements before outside elements.
Prepare laser cutter:
Open the laser cutter lid and place stock (balsa) onto the honeycomb.
Manually drag the laser head over the center of the stock.
Close the lid.
Click “auto focus” and wait for the machine to focus.
Open the lid. Manually drag the laser head to the top left corner of the desired cutting area.
To check framing, click “framing” in XCS and then press the button on the machine. The laser head will frame the area to be cut. If it does not fit on the stock or overlaps a previous cut, adjust the starting position as needed.
Run the job:
Click “process” in XCS, followed by the button on the machine.
Remove pieces:
Check to make sure all pieces are cut through, and
rerun (adjusting settings as necessary) if not.
Remove workpieces and scrap from the machine.
Close the lid.
Vinyl Cut (wings and tail)
Prepare the machine:
To turn the machine on, long-press the power button on its right side for 2-3 seconds.
Open the machine’s hood.
On the tool carriage, pull the locking mechanism completely out.
Place the autoblade into the tool slot, and make sure it is fully inserted.
Push the locking mechanism back into place.
Prepare the cardstock:
Use a light hold cutting mat (or one where most of its “sticky” has worn off.”
Position your cardstock on the paper.
Load prepared cutting mat into the machine.
Configure cut settings:
Turn off half cut.
Run job:
Click “send.”
Remove your pieces:
Don’t peel the paper off the cutting mat! Instead, turn the whole thing upside down and peel the cutting mat off the paper instead.
Assemble
Insert wings through the slot in the plane’s fuselage (body). Make sure they’re centered; the notch will help keep them in place.
Slot your horizontal stabilizer (tail) into place.
Optional: Add a paperclip nose weight! (Taped-on pennies also work.)
Note: If time allows, have students create vinyl sticker decals to decorate their gliders.
Test and Evaluate
Stand in the same spot, and attempt to apply the same force for each launch.
Measure and record the glider’s distance traveled after each flight.
Note: This is best done in a hallway or gym. Using a line of tape on the ground will help students throw from the same spot.
Optional math tie-in: Launch at least three times, and calculate the average distance traveled.
Redesign, and Try Again
Adjust your design files to try again. This works best if you adjust only one part at a time!
Open the floor for any final questions about the CAD software or the machines used during the activity. Summarize the key points covered in the lesson, including how parametric changes in the glider design influenced flight and how the four forces of flight interact.
Discussion Questions:
What did you notice when you changed one part of the glider design?
Which of the four forces of flight seemed most affected by your design changes?
How did your glider’s performance compare to your expectations?
If you could change one other variable, what would it be and why?
What surprised you about how small changes affected flight?
Optional: have students present their projects in a “mock round table” discussion. This can benefit students in their understanding of peers’ design process and how to lift one another up.
Optional Tie-ins:
Historical Figures in Aviation:
Wright Brothers: Discuss the pioneering work of Orville and Wilbur Wright in developing the first successful powered airplane. Highlight their use of engineering principles and experimentation, which can inspire students as they design and test their own gliders.
Amelia Earhart: Explore the achievements of Amelia Earhart, the first woman to fly solo across the Atlantic Ocean. Her story can motivate students to pursue their own aviation-related projects and careers, emphasizing the importance of perseverance and innovation.
Howard Hughes: Examine the contributions of Howard Hughes to aviation and aerospace engineering. His work on advanced aircraft designs and record-breaking flights can provide context for the engineering challenges and opportunities in aviation.
Charles A. Lindbergh: Discuss Charles Lindbergh’s historic solo nonstop flight across the Atlantic Ocean. His achievements can serve as a case study in the importance of aerodynamics, endurance, and the human spirit in aviation.
Career Connections:
Learning to design and fabricate gliders using CAD software, a laser cutter, vinyl cutter, and 3D printer, opens up a variety of exciting career paths:
Aerospace Engineer: Highlight the role of aerospace engineers in designing and testing aircraft, spacecraft, and related systems. Discuss how the skills learned in designing and building balsa gliders can be foundational for a career in aerospace engineering.
Aviation Specialist: Explore the various careers within the aviation industry, including pilots, air traffic controllers, and maintenance technicians. Emphasize how understanding the principles of flight and aerodynamics is crucial for these roles.
By exploring these connections, students can see how the skills they develop in this lesson can be applied to various professional fields, inspiring them to pursue their interests and passions.
Having trouble? Let us know by completing the form below. We'll do our best to get your issues resolved quickly.
"*" indicates required fields