- Loading…
This lesson reflects on “Everyday in the life of a Biomedical Engineer”
What does a Biomedical Engineer do?
Biomedical Engineer
Conduct research, along with life scientists, chemists, and medical scientists, on the engineering aspects of the biological systems of humans and animals. Design and develop medical diagnostic and clinical instrumentation, equipment, and procedures, using the principles of engineering and biobehavioral sciences. Research new materials to be used for products, such as implanted artificial organs. Develop models or computer simulations of human biobehavioral systems to obtain data for measuring or controlling life processes. Adapt or design computer hardware or software for medical science uses.
Related careers include those listed below:
Doctor/Surgeon
Physicians who treat diseases, injuries, and deformities by invasive, minimally-invasive, or non-invasive surgical methods, such as using instruments, appliances, or by manual manipulation.
Synthetic Biologist
Develop usable, tangible products, using knowledge of biology, chemistry, or engineering. Solve problems related to materials, systems, or processes that interact with humans, plants, animals, microorganisms, or biological materials.
Time Required
Five+ Contact hours with students. Additional five+ hours reserved for 3D printing.
Teacher Preparation
Supplies, Problem/Project Based Learning experience, prerequisite skills and knowledge using 3D CAD software and 3D printers.
Facility Needs
Class-set of Internet enabled computers (Chromebooks will work), 3D Printer with generic splint file, pre-printed generic splints for each table, and writing utensils. Technology needs include a projector/TV with appropriate connection to a computer. The ability to stream video via YouTube.
Classroom Materials:
Pencils, Markers, Engineering Design Process Data Sheet
Digital Fabrication Software & Equipment
USB Flash Drives, access to Tinkercad (online 3D modeling software), Cura software, and 3D printer (Optional: 3Doodler Pens)
Design Files attachment
Identify: Articulate the criteria and constraints of the challenge.
As students enter the classroom, the instructor will produce the generic splint file on the 3D printer.
The instructor will organize students into teams of 2-4 people.
As the 3D printer continues to print, the instructor will introduce the activity: “Imagine a basketball player jammed their finger during a game. Now, imagine the player was fitted with a personalized splint, allowing them to continue play. Over the next five days, we are going to learn to design with 3D printing and discover the power of creating a custom medical instrument.” The instructor will then pose the question: “Imagine that YOU jammed your finger. What part of your hand hurts? Be as specific as possible”. Examples may be “the area between the top two knuckles on my ring finger”. Student should use their Engineering Design Process Data Sheet to record their answers under “Identify”.
3D printing is a time-consuming process. In order to make a splint for you or a player in time for them to return to the game, these designs should take between 10-30 minutes to print. Students will write this down under “Identify” as a project constraint. Print time will be covered later.
Research: Analyze one solution (splint) to this challenge. Tinkercad Intro: Gain familiarity with the online CAD software Tinkercad. Develop Solutions: Sketch initial ideas for splints on paper.
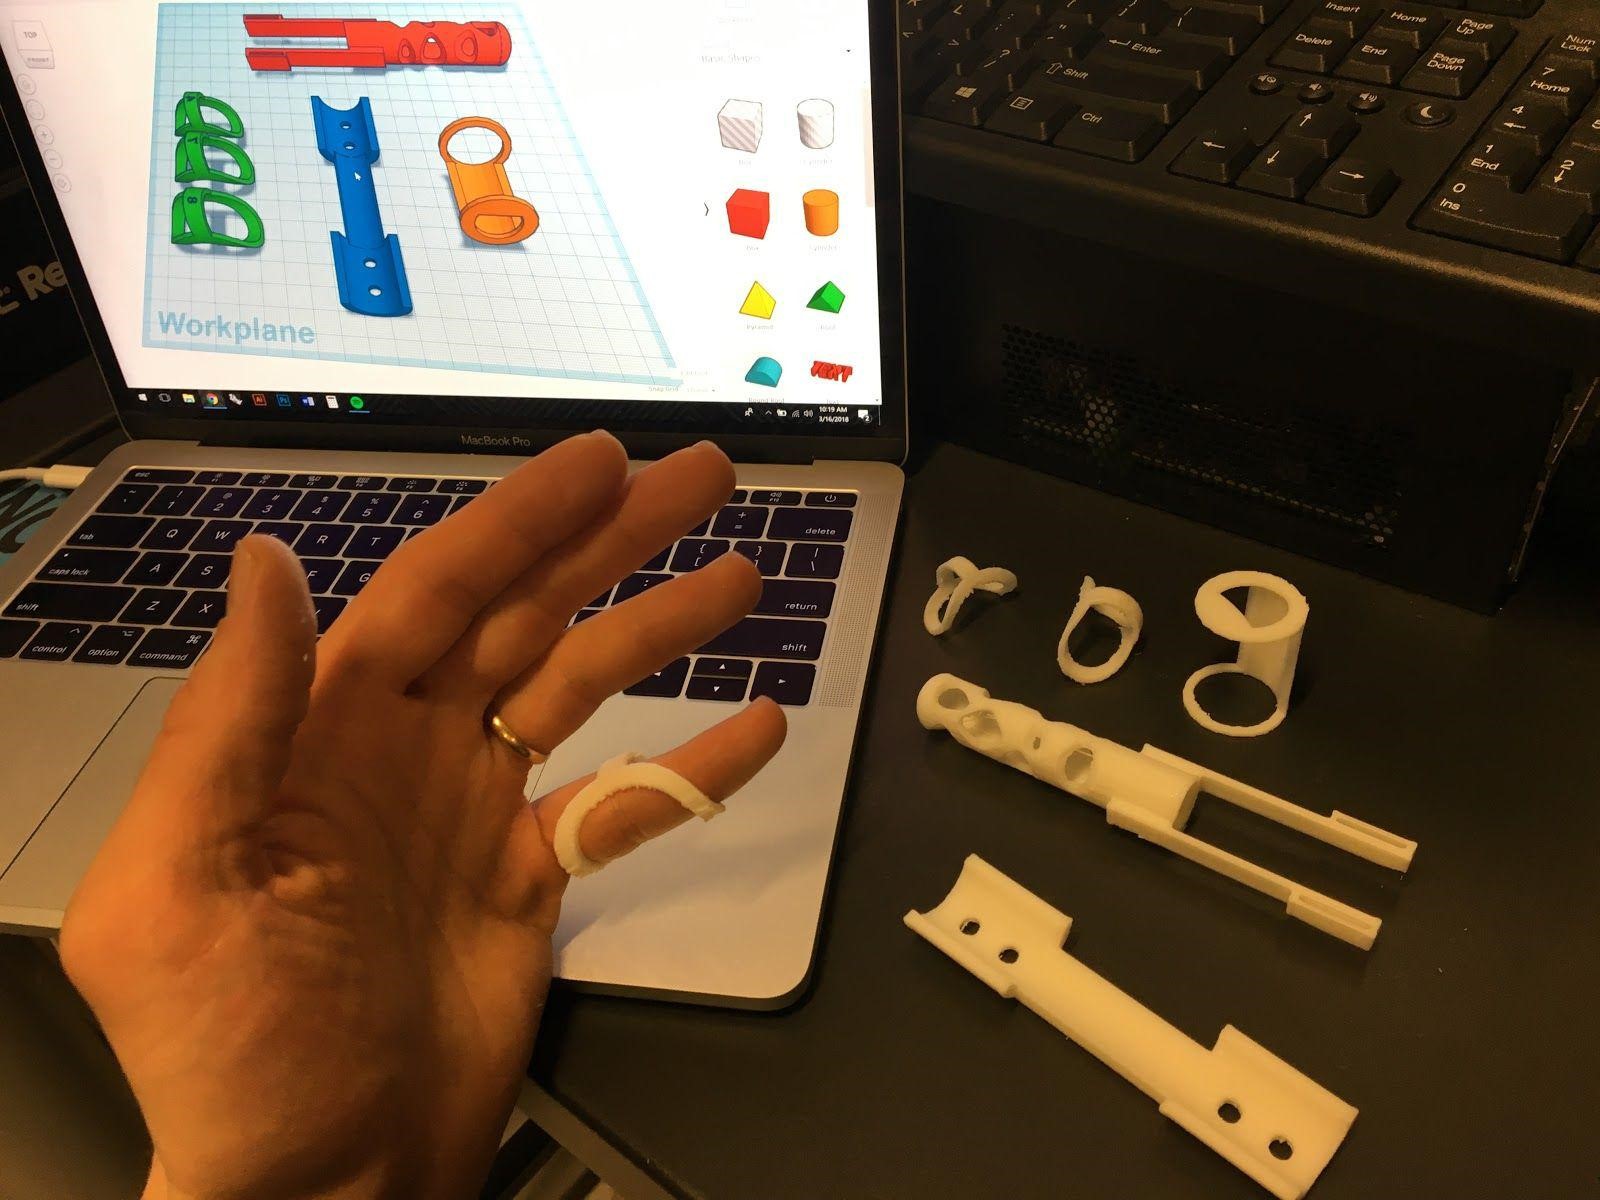
Students will then have the 3D printed generic splints shared with them in groups of 2-4. Allow students to first observe the splint then put in on their fingers. The instructor will ask the students “in what ways does this device solve your problem and in what ways does this device fail to help you?” Students should record and share their answers under “Research”.
The instructor tells the students that their first step toward making their own 3D print is becoming familiar with the software. The instructor leads the students in signing-up for Tinkercad online. After signing up for Tinkercad, the students are directed to complete the tutorial exercises under the “Learn” tab.
Students will begin designing their splint based on a model they find from the Tinkercad community. After completing the tutorials, students are encouraged to search for models of splints. The instructor will allow students time to search, then choose a splint model to redesign or “Tinker” for the students’ particular needs (listed under “Identify”). The instructor will refer students back to their EDP Data Sheets once students have found their model splint. The students will draw more than one rough sketch of their re-imagined splint in “Develop Solutions” before returning to Tinkercad.
Debrief student’s current understanding of Tinkercad and their project goals.
Before continuing, the instructor will encourage students to demonstrate their knowledge of Tinkercad. Students should be able to do the following commands:
Within their groups, students should also be able to explain the reasons they chose their virtual model splint. Students should refer to the needs listed on their EDP sheet under “Identify”. If a student’s model doesn’t fit their needs, the instructor will encourage them to select another.
Select Solution: Choose and refine the splint to digitally design.
The instructor will pass out rulers for this step. Students should select one design from “Develop Solutions” to create a refined sketch for “Select Solution”. The goal of this step is for students to apply scale and measurements to their splint design. For example, students can measure the width, thickness, and length of their fingers, and record these values as the measurements for their splint with some adjustment. Note: measurements in Tinkercad are from the edges of an object, thus roughly 2mm or ~1/8th” should be added to measured width and thickness otherwise finger holes will be too small. Later, these numbers can be precisely input into Tinkercad to create perfectly sized shapes.
Prototype: Resize and modify the model splint to fit the new design from “Select Solution”.
Students will spend a majority of the remaining time designing their new splint based on their sketches from “Select Solution”. The instructor will lend help to students but encourage them to learn from their peers if they have questions about specific Tinkercad commands.
Cura Intro: Export .STL file into CAM software to prepare for 3D printing.
Students should rename their Tinkercad file based on any classroom norms ex. school/class/student. The instructor will direct students to “Export” their design to download as an .STL file. Once downloaded, the students may open their file in the Cura software. Note: Instructors should use the CAM/slicer software provided with their 3D printer. If none exist, use Cura.
Students should locate the “Print settings” bar located in the top right in Cura v.4.0. The instructor should inform students about the meaning and importance of Layer Height, Infill (%), Support, and Adhesion. Students should select “Slice” to calculate the print time of their file. If print times exceed 30 minutes or longer than allowed, students should either return to Tinkercad and modify their design or adjust the mentioned settings in Cura. Once the file is approved, the instructor will print the students’ designs.
Please note: 3D printing will likely occur outside of class hours. It may take several hours to complete all 3D designs.
Provide students with supplemental activities while their splints are printing.
Since printing can be a slow process, the instructor should provide students with additional activities. This can include the following:
Test: Students will assess the functionality, strengths, and weaknesses of their designs. Communicate: Students will solicit feedback from a peer and reflect on their designs.
When their splint finishes, the student will test their designs. Answers to probing questions about their 3D printed splints are recorded under “Test” of their EDP Data Sheet.
Once they have tested and recorded their results, students will find another group to help assess their splint. The instructor should encourage a healthy dialogue of constructive feedback. After hearing from their peers, students should record their own final thoughts around their splints. Record these responses under “Communicate” on their EDP Data Sheet.
Redesign: Students create new splint models based on feedback from their original.
As an extension of this activity, the instructor may allow students to go back and make changes to their first splits to create a second and improved splint. Alternatively, students could design an entirely new splint based on the concepts and skills they acquired while creating their first model.
Having trouble? Let us know by completing the form below. We'll do our best to get your issues resolved quickly.
"*" indicates required fields


