- Loading…
In this lesson, students investigate ergonomics, anthropometrics, and user-centred design by designing a compact screwdriver handle for use in confined spaces. Students begin by comparing everyday products and discussing which designs are easier or more comfortable to use. They then learn how designers use ergonomic and anthropometric data to make products safer, more comfortable, and more effective.
Students collect simple hand measurements, analyse existing ergonomic products, generate and develop design ideas, and create a physical or sketch prototype. They then use Autodesk Fusion to model a compact screwdriver handle suitable for 3D printing. The final outcome is a 3D printed screwdriver handle prototype that includes ergonomic features such as grooves, rounded edges, anti-slip or anti-rolling details, and a 1/4 inch magnetic bit holder.
The lesson also introduces a sustainability focus through material efficiency, waste reduction, repairability, and product longevity. Students reflect on how a durable, comfortable, interchangeable-bit screwdriver can reduce the need for multiple tools and how 3D printing decisions such as size, infill, support material, and failed prints affect material waste. This connects well to SDG 12, which focuses on responsible consumption and production, including reducing waste through prevention, reduction, recycling, and reuse.
tudent resources
Classroom materials
Digital fabrication tools
By the end of this lesson, students will be able to:
The reflection questions are included on my FLA diary: https://fla.academany.org/2025/labs/barcelona/students/david-fernandez/learning-diary/week11/
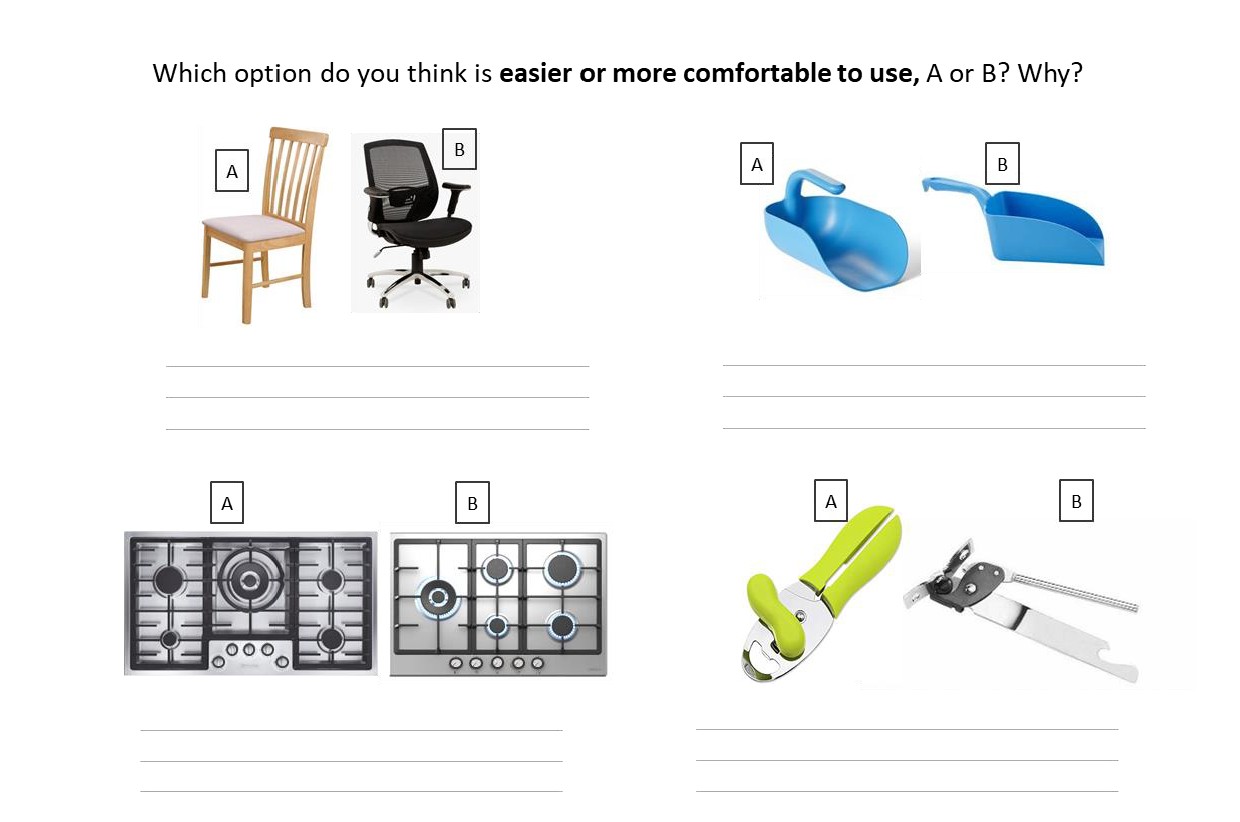
Students compare product pairs and decide which option is easier or more comfortable to use. They justify their choices using simple design language.
Give students the starter activity sheet. Ask them to choose option A or B for each product pair and briefly explain their choice. Discuss answers as a class and introduce the term ergonomics.
Prompt students to use words such as comfort, grip, reach, safety, control, force, and ease of use.
Students learn the meaning of user-centred design, ergonomics, and anthropometrics. They explore how designers use information about the human body to make products safer, more comfortable, and easier to use. This provides the foundation for the screwdriver design challenge.
Use the booklet pages on User-Centred Design, Ergonomics, and Anthropometrics. Read and discuss the key definitions with students. Ask students to complete the short questions in the booklet to check understanding before moving into the practical design task.
Students collect simple anthropometric data by measuring hand width. They calculate an average and consider how hand measurements can help designers create better hand-held products.
Ask students to measure the hand width of three classmates and record the results in a table. Students calculate the average hand width and discuss how this information could help when designing handles, tools, and other hand-held products. They also identify other useful measurements for designing a screwdriver, such as finger length, palm size, grip diameter, or hand span.
Students are introduced to the main design challenge: to design a compact screwdriver handle for use in confined spaces. The product should be comfortable, safe, compact, easy to grip, and suitable for interchangeable screwdriver bits. Students identify the key design requirements before beginning their ideas.
Present the design brief from the booklet. Ask students to highlight or list the main requirements of the screwdriver: compact size, ergonomic shape, comfortable grip, anti-slip features, anti-rolling features, safe edges, and compatibility with 1/4 inch screwdriver bits. Students write a short success criteria list for their own design.

Students use idea generation techniques to explore different possible screwdriver handle designs. They experiment with different shapes, grip features, anti-roll details, and compact forms. The aim is to create a range of ideas before choosing one to develop.
Students sketch several different handle ideas and add short annotations explaining the ergonomic features. Encourage them to create different solutions rather than repeating the same shape.
Students choose one of their initial ideas and develop it further. They improve the shape, add more detail, and explain how the design responds to the brief, the hand measurements, and ergonomic principles.
Students select their strongest idea and create a more detailed drawing. They should annotate the design to explain features such as comfort, grip, finger grooves, rounded edges, anti-roll shape, size, and bit holder position.
Students create a quick physical prototype of their developed screwdriver handle design before modelling it in CAD. This helps them test the size, grip, comfort, and overall shape of the handle in the hand. The prototype allows students to identify improvements before committing to the digital model.
Students use simple materials such as cardboard, foam, clay, plasticine to create a quick model of their developed screwdriver handle. They test how it feels in the hand and check whether the shape is comfortable, easy to grip, compact, and suitable for use in confined spaces. Students collect brief peer feedback and make at least one improvement or note before moving into 3D modelling.
Students use Autodesk Fusion to create a 3D model of their screwdriver handle. They follow the tutorial as a guide but adapt the model to include features from their own design.
Students follow the Fusion tutorial to model the screwdriver handle. They should include at least one personal ergonomic feature from their design development, such as finger grooves, rounded edges, an anti-roll surface, or a custom grip shape. When finished, students export the model as an STL file for 3D printing.


Students prepare their CAD model for 3D printing and manufacture the screwdriver handle. They consider print orientation, material use, support material, and print quality. After printing, they clean and finish the prototype.
Students import their STL file into the slicing software and prepare it for printing. Briefly discuss how print settings affect material use and waste. After printing, students remove supports if needed, sand rough edges, glue the magnetic holder, and check that the prototype is safe to handle.


Students test their printed screwdriver handle against the design brief. They evaluate comfort, grip, safety, use in confined spaces, anti-roll performance, and material efficiency. They use feedback to identify possible improvements.
Set up a simple testing activity using screwdriver bits, screws, and a confined-space test area. Students test their prototype and ask a peer for feedback. They complete a short evaluation explaining what worked well, what could be improved, and how the design could be made more comfortable, durable, or sustainable in a future version.
In this section the teacher can find a proposed rubric to assess the outcomes of the project


Having trouble? Let us know by completing the form below. We'll do our best to get your issues resolved quickly.
"*" indicates required fields