Introduction to 3D Designing with a 3D Pen and Sketchbook - SCOPES Digital Fabrication

Lesson Details

Age Ranges
Fab Tools
Standards
MS-ETS1-1, MS-ETS1-2, Fab-Modeling.2

You need to login or register to bookmark/favorite this content.

Author

Pieter Verduijn
Pieter Verduijn
K-12 teacher
Born in the Netherlands, Pieter Verduijn is a multilingual educator with 18 years of work experience in Dutch, Aruban, and American education systems. His colleagues refer to him as the “Jack of all trades” as he combines his talents in… Read More

Summary

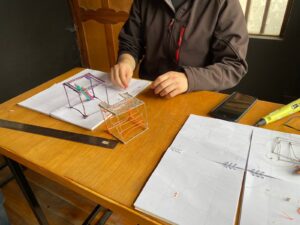
Students will learn the basics of 3D designing and geometry through hands-on activities using a 3D pen and a 3D sketchbook (or folded square papers). They will create simple 3D objects, understand spatial relationships, and develop problem-solving skills.


What You'll Need

  • 3D sketchbooks or square papers (foldable)
  • 3D pens
  • Light source (such as a phone flashlight)
  • Rulers and compasses
  • Pencils
  • Erasers
  • Worksheets with prompts (optional)


The Instructions

Day 1: Introduction to 3D Designing Concepts

Introduce students to the concepts of 3D design, spatial relationships, and the use of the 3D sketchbook as a tool for creating optical illusions. Duration: 45 minutes

Introduction (10 minutes):


  • Begin the class by engaging students with a thought-provoking question: “Have you ever thought about how the objects you see in video games, movies, and architecture are created in three dimensions?”
  • Discuss the importance of 3D design in various fields, such as architecture, engineering, animation, and product design.


Exploring Spatial Relationships (10 minutes):


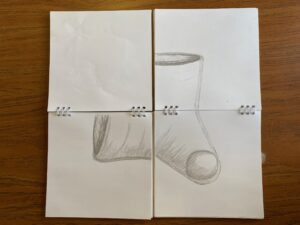
Display two images side by side: a flat 2D drawing of an object and a 3D model of the same object.

Lead a class discussion about the differences between the two images.

Ask questions like:

  • What do you notice about the 2D image compared to the 3D model?
  • How do the shapes and details change when we move from 2D to 3D?
  • Why is it important to understand spatial relationships in design?


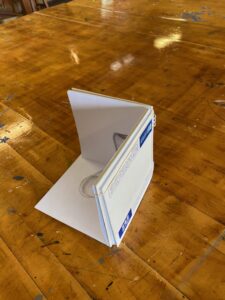
Introduction to the 3D Sketchbook (15 minutes):


  • Show examples of simple 3D illusions created using the 3D sketchbook or folded papers. Display an example of a drawing that appears in 3D when the paper is folded.
  • Explain how the 3D sketchbook works: by using shading, light, and clever folding, we can trick our eyes into seeing a 3D object on a 2D surface.
  • Discuss the advantages of this approach, especially for those without access to computers or 3D modeling software.


Demonstration (10 minutes):


  • Distribute a sample 3D sketchbook or folded paper to each student.
  • Use a flashlight or phone light to demonstrate how shading can create the illusion of depth on the page.
  • Show how folding the paper can complete the illusion and make the object look 3D.


Wrap-up (5 minutes):


  • Encourage students to think about how they could use the 3D sketchbook to create their own 3D illusions.
  • Preview the upcoming lessons where they will be creating their own 3D designs using the sketchbook and a 3D pen.
  • Assign a short homework assignment: Have students find a simple object at home and try to draw a 2D representation of it that could be transformed into a 3D illusion using the techniques learned today.


Differentiation:


  • Offer additional examples for students who grasp the concept quickly.
  • Provide prompts and guiding questions for students who may need extra support in understanding the concept of spatial relationships and 3D illusions.


Day 2: Creating a 3D Illusion with a Glass of Water

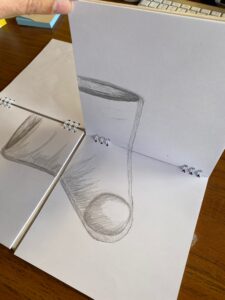
Guide students through the process of using shading and light to create the illusion of a 3D glass of water using the 3D sketchbook or folded papers. Duration: 60 minutes

Review and Warm-up (10 minutes):

  • Start the class by reviewing the concepts discussed in the previous lesson, such as spatial relationships and the use of the 3D sketchbook.


Introduction to the Exercise (10 minutes):

  • Remind students of the optical illusion they observed in the first lesson.
  • Explain that today, they will be creating their own optical illusion of a 3D glass of water using shading, light, and folding techniques.


Demonstration (15 minutes):

  • Display a simple outline of a glass of water on a projector or whiteboard.
  • Using a flashlight or phone light, demonstrate how to position the light source and shade to create the illusion of the glass.
  • Emphasize the importance of paying attention to the direction of light and shadows to achieve realism.


Hands-on Activity (15 minutes):

  • Distribute the 3D sketchbooks or folded papers.
  • Instruct students to use their pencils to lightly draw the outline of a glass of water on one side of the sketchbook.
  • Guide students in using the shading technique they observed during the demonstration to create the illusion of depth and form.


Creating the Illusion (10 minutes):

  • Show students how to use their phone light or a flashlight to cast a shadow on the page, tracing the outline of the glass.
  • Have students fold the sketchbook open and complete the drawing of the glass, ensuring that the shading lines up with the traced outline.


Reflection and Discussion (10 minutes):

  • Ask students to compare their drawings to their initial outline, discussing how the shading and folding techniques created the illusion of a 3D glass.
  • Invite a few students to share their work and explain their shading choices.


Wrap-up (5 minutes):

  • Summarize the main concepts covered in the lesson: shading, light, and folding to create optical illusions.
  • Emphasize that this technique can be used to bring flat drawings to life and create the illusion of depth and volume.


Differentiation:

  • Provide individualized guidance to struggling students during the hands-on activity.
  • Encourage advanced students to experiment with different light angles and shading techniques to achieve varying levels of realism in their 3D illusions.


Designing a Simple House in 3D

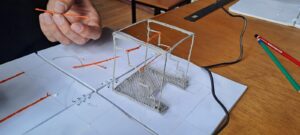
Guide students through the process of creating a simple 3D house using the 3D sketchbook or folded papers, focusing on scale, symmetry, and perspective. Duration: 60 minutes

Review and Warm-up (5 minutes):

Begin the class by briefly reviewing the concepts learned in the previous lesson, specifically the creation of 3D illusions using shading, light, and folding techniques.


Introduction to the Exercise (5 minutes):

  • Explain that in this lesson, students will be applying the knowledge gained from the previous lessons to create a 3D representation of a house.
  • Discuss the importance of scale and symmetry in architectural design.


Demonstration of 3D House Drawing (5 minutes):

  • Display a basic outline of a house on a projector or whiteboard.
  • Show some architectural building drawings of a house
  • Show how to divide the sketchbook into three sections: front and back and side of the house.
  • Guide students through drawing the front and back and side of the house, focusing on scale and symmetry.


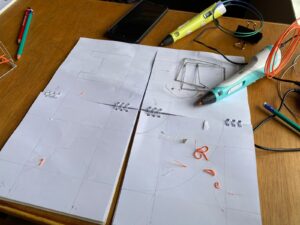
Hands-on Activity: Draw Front and Back of the House (10 minutes):

  • Distribute the 3D sketchbooks or folded papers and 3D pens.
  • Instruct students to draw the front of the house on one side and the back of the house on the other side, maintaining scale and symmetry.
  • Encourage them to use rulers and straight lines for accurate drawings.


Hands-on Activity: Draw the Side of the House (10 minutes):

  • Use the 3D sketchbooks or folded papers and 3D pens.
  • Instruct students to draw the side of the house on the other side, maintaining scale and symmetry.
  • Encourage them to use rulers and straight lines for accurate drawings.


Hands-on Activity: Trace the lines with the 3D pen (30 minutes):

  • Instruct students to unfold the sketchbooks and place them flat on the table.
  • Using the 3d pen, trace the lines of their drawing.
  • Using each side, use the 3d pen to “glue” the parts together
  • Make some fun things to your house (close the roof, make a door etc.)


Reflection and Discussion (5 minutes):

  • Ask students to share their experiences and challenges while drawing the 3D house
  • Discuss the importance of having the right measurements for the pieces to fit

Wrap-up (5 minutes):

  • Summarize the key takeaways from the lesson: understanding scale, symmetry, and perspective in creating 3D representations.
  • Remind students that these techniques can be used in various design fields, from architecture to animation.


Differentiation:

  • Provide additional guidance and support for students who may struggle with perspective drawing.
  • Challenge advanced students to experiment with different architectural styles or add more intricate details to their 3D house designs.
  • Challenge students to design the part they drew in tinkercad, and have them 3Dprint the parts separately. Then assemble the parts into a house.


Standards

  • (MS-ETS1-1): Define the criteria and constraints of a design problem with sufficient precision to ensure a successful solution, taking into account relevant scientific principles and potential impacts on people and the natural environment that may limit possible solutions.
  • (MS-ETS1-2): Evaluate competing design solutions using a systematic process to determine how well they meet the criteria and constraints of the problem.
  • (Fab-Modeling.2): I can construct compound shapes and multi-part components ready for physical production using multiple representations.

Lesson Feedback