- Loading…

This lesson invites students to merge creativity, storytelling, and engineering through the design of a moving automata. Students explore how art and motion can work together to express ideas, emotions, or narratives using simple mechanisms such as a rotating handle and an up-and-down cam system.
In this hands-on lesson, students will brainstorm imaginative scenes, such as a rabbit leaping across a meadow, a boat rocking on waves, or a character popping up behind a wall, and bring them to life using paper, cardboard, wooden sticks, and other simple materials.
Throughout the process, students will document their creative journey through sketches, notes, or digital journals, experimenting with how form and motion can tell a story. This activity connects artistic expression with basic mechanical design, encouraging curiosity, problem-solving, and innovation.
Cardboard
Laser-cut wood cams and followers based on Crank Up Down Document
Scissors
Hot Glue Gun
Skewers
Art Supplies: cardstock, markers, acrylic paint, etc.
By the end of this lesson, students will be able to:
I expect this lesson to engage students by combining creativity and simple engineering through movement. It will encourage them to experiment with storytelling and design while learning how basic mechanisms work and how it can be used combined with art. Students will develop problem-solving skills and confidence as they bring their artistic ideas to life through motion.
Could I have done this activity without the teaching aid you have fabricated?How do you think digital fabrication improves the activity vs utilizing traditional methods? What is the extra value?
I think it could be possible, but it wouldn’t have the same impact. The mechanism makes movement visible and interactive, helping students connect art and engineering. This method also increases the engagement on the project and provides students with tools to create more elaborated projects.
What are some challenges I expect when I do the activity with my class?
I think that the durability and maneagability of materials is something that has to be taken into account, it’s not the same to manipulate the material as a teacher than as a 14-15 year old. Manipulative instructions should be taken care of before providing the material to explore and then instructions for building the final design.
What did I learn during the fabrication process?
There are some awesome ideas online that can be useful but need to be adapted in order to work. Designing the whole artifact requires a lot of practice, trial and error, until one can achieve the desired result. For this specific project I had to adapt the pieces to a cardboard base which made easier the manipulation of material.
In this introductory phase, students would interact with a pre-assembled "teaching aid" to demystify how rotary motion becomes linear motion. This builds the foundational engineering knowledge needed for their own designs.
Print the pieces from the Crank Up Down Document. The pieces for the base didn’t work for me, so I had to adapt it by using cardboard or you can change adapt the design by creating and cutting a different base. The project on the website uses a continuous servo, and a controller. The adapted idea I used is much simpler with a mechanism activated by hand.

(*this picture was taken from the website: www.papermech.net)

This picture was taken by me by adapting the base for the rest of the pieces. The assembly process can be found on the following link: https://www.papermech.net/up-down-crank/ for the woodcams and followers, and then adapt it to a cardboard base.
Distribute Aids to the groups of students: Hand out one pre-assembled laser-cut mechanism per small group.
Mechanical Analysis: Instruct students to rotate the handle slowly and document the relationship between the cam (the rotating part) and the follower (the vertical stick).
Journaling: Have students answer the following in their journals: “How does the shape of the cam dictate the timing of the movement?” and “What happens to the speed of the jump if you turn the crank faster?”
Students bridge the gap between engineering and art by imagining a story that fits the specific "up-and-down" motion of the cam system.
Concept Generation: Challenge students to think distinct scenes that use vertical movement (e.g., a shark fin breaking water, a jack-in-the-box, or a bouncing basketball).
Thumbnail Sketching: Students must draw sketches showing the their drafts for their intended motion.
Peer Review: Students share their favorite idea with a partner to check for “The Reveal”—ensuring the movement adds a surprise or emotional beat to the story.
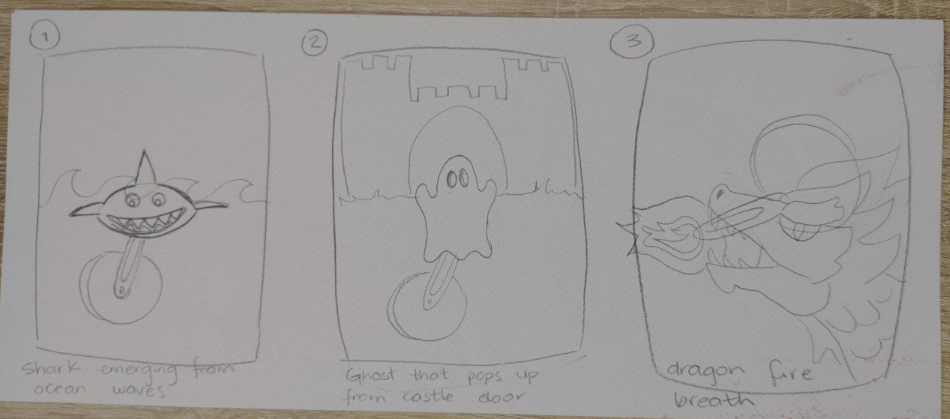
Examples of sketches of different stories scenarios made by me to show students some ideas to consider.
This is the core hands-on phase where students build their own automata using a mix of digital-fabricated parts and traditional materials.
Construction: Provide the Laser-cut wood cams and followers based on Crank Up Down Document and show students the adaptation and how to build it.
Artistic Integration: Create the visual elements using cardstock,markers,paint,etc. and attach the ones that are going to move to the top of the vertical skewer and the ones that don’t move on the cardboard base.
Iteration & Troubleshooting: If the movement is shaky, instruct students to glue a small “guide tube” (a piece of a straw or rolled paper) to keep the vertical skewer aligned.

Simple teacher example that can be shown to students, to give help them analyze how to assemble.
Students showcase their functional artwork and reflect on the success of their engineering choices in relation to their artistic intent.
The Gallery Walk: Divide the class into two groups. Group A operates their automata while Group B rotates through the “gallery” to observe. Switch roles after 10 minutes.
Technical Explanation: While presenting, students must point out one mechanical challenge they solved during the build.
Reflection: Students write an “Artist Statement” explaining: “I chose this specific motion to represent [Action/Emotion] because it creates a sense of [Surprise/Rhythm/Energy].”
Final Submission: Students upload their video and a photo of their finished journal entry to the class digital portfolio.
Here's a Demo of how it should work.
Having trouble? Let us know by completing the form below. We'll do our best to get your issues resolved quickly.
"*" indicates required fields