- Loading…

Students will choose a scientist or inventor from the past or present to research in order to write an informational report.
While the students are progressing through the writing process, they will design and create a bottle that looks like their chosen innovator.
Students will then code with an online program called Scratch and set up a Makey Makey to make their bottle “talk.”
For the research part, you need
For the building part, you need
For the programming part, you need
In this step, the children do research on their inventors by using the form attached.
Introduction (10 minutes):
Start by explaining what a biography is in simple terms. Let students know that they will be researching and learning about inventors and scientists.
Inventor Selection (10 minutes):
You can either provide a list of suggested inventors for students to choose from or allow them to select any inventor they find interesting. If providing a list, make sure it includes a diverse range of inventors.
Research (15 minutes):
Provide age-appropriate resources for students to research their chosen inventor. This could include books, websites, or handouts with basic information.
Encourage students to answer the questions on their Biography Bottle Worksheet (see attachments) based on the information they find.
For grades 4 and lower, you might want to guide them through this process and emphasize key details.
Remind students to record the source of their information, even if it’s just “book” or “website.”
Discussion (10 minutes):
Have a class discussion about what students learned during their research. Encourage students to share interesting facts about their chosen inventor.
In this step of the project, we will actually build the biography bottle
Introduction (10 minutes):
Begin recapping the last lesson about the biographies of the inventors with the students. Explain that they have researched a famous inventor and will create a unique biography bottle to represent their chosen inventor’s life and achievements.
Step 1: Preparing the Bottle (5 minutes):
Instruct students to remove the plastic label from the soda bottle. Have them wash and dry the bottle and its lid thoroughly, ensuring that they are completely dry.
Step 2: Adding Stability (5 minutes):
Insert a funnel into the bottle and fill the bottom of the bottle with craft sand, enough to stabilize the bottle so it won’t tip over. Securely screw the lid back onto the bottle.
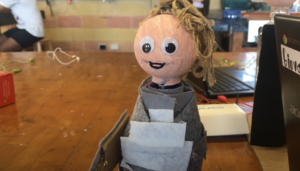
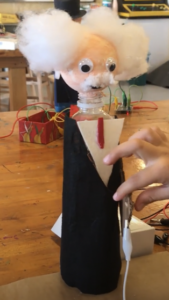
Step 3: Creating a Face Pattern (10 minutes):
Have students create a face pattern by tracing a 4-inch circle onto a piece of paper using a Styrofoam ball as a brace for their pen. Then, they should draw two eyes and a mouth onto the circle, cut them out to create a stencil pattern, and set it aside.
Step 4: Adding the Face (15 minutes):
Instruct students to press the Styrofoam ball onto the soda bottle over the cap and neck section, creating a hole. They can use hot glue to secure it in place.
Step 5: Adding Facial Features (15 minutes):
Have students slide a flesh-colored sock over the Styrofoam ball and trace the facial features onto the sock using the stencil pattern. Then, they can add details to the face using permanent markers.
Creating the Neck (5 minutes):
Instruct students to fasten a twist tie underneath the head (Styrofoam ball) to create a neck-like area.
Step 6: Adding Clothing (10 minutes):
They should use felt fabric to create clothing, arms, and any accessories needed for their inventor’s representation.
Assessment:
Evaluate students’ completed biography bottles based on their creativity, accuracy, and how well they represented the chosen inventor. Provide positive feedback and guidance for improvement.

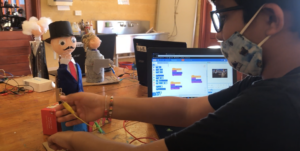
Students will record themselves in Scratch, which will be used later to make the Biography Bottle interactive
Introduction:
Start by introducing the concept of adding audio recordings to Scratch projects. Explain that they can record their voices, sound effects, or music to make their projects more interactive and engaging.
Setting up Scratch (5 minutes):
Ensure that each student has access to a computer or tablet with internet access and a Scratch account. If they don’t have accounts, guide them through the process of creating one.
Accessing the Scratch Sound Editor (10 minutes):
Instruct students to log in to their Scratch accounts and open a project they are working on or create a new one.
Recording Audio (20 minutes):
Show students how to access the Scratch Sound Editor:
Click on the “Sounds” tab in the bottom-left corner.
Click on “Choose a Sound from Library” to explore the existing library of sounds.
Alternatively, click on “Record” to access the recording feature.
Demonstrate how to use the recording feature:
Click on the “Record” button.
Allow Scratch to access the microphone if prompted.
Have students record a short message or sound effect.
After recording, show them how to listen to their recording and adjust the volume.
Adding Recordings to the Project (10 minutes):
Instruct students on how to add their recordings to their project:
Go back to the “Code” tab.
Use blocks like “play sound” or “when this sprite clicked” to trigger the recordings.
Experiment and Create (20 minutes):
Allow students time to experiment with adding their recordings to their Scratch projects. Encourage them to be creative and think about how audio can enhance their stories or games.
Sharing and Feedback (10 minutes):
Have students share their projects with a partner or the class. Encourage them to explain how they used recordings to enhance their projects.
Assessment:
Evaluate students based on their ability to successfully record and add audio to their Scratch projects, as well as their creativity in using sound to enhance their projects.
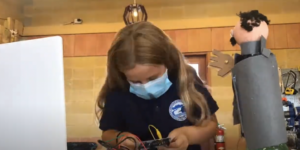
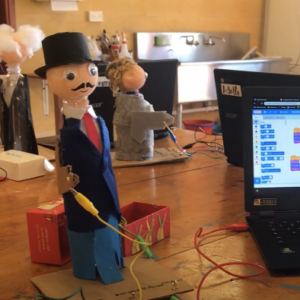
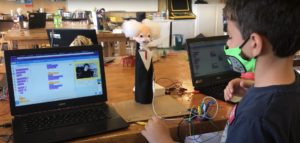
In this last part, the students will connect the Makey Makey to their computer and the biography bottle and will use the parts to make their Biography Bottle interactive
Introduction (10 minutes):
Start by explaining to the students the goal of the activity: to make their biography bottles interactive by connecting them to a Makey Makey and their Scratch projects. Emphasize how this will allow them to share information about their chosen inventor in a unique and engaging way.
Setting up Makey Makey (15 minutes):
Ensure that each student has access to a Makey Makey kit, a computer or tablet, and their biography bottle project in Scratch.
Provide an overview of the Makey Makey kit, including the various components such as the alligator clips and the board itself.
Instruct students to connect the Makey Makey board to the computer or tablet using the provided USB cable. Explain that the Makey Makey board acts as a keyboard when connected.
Connecting the Biography Bottle (20 minutes):
Explain the concept of conductive materials to the students and how the Makey Makey works by completing a circuit when they touch conductive objects.
Instruct students to identify areas on their biography bottles where they want users to touch to trigger audio recordings about the inventor. These areas should have conductive brad fasteners (metal) attached.
Have students connect alligator clips from the Makey Makey board to the conductive Brad fasteners on their biography bottles. Ensure they connect one end of each clip to the Makey Makey’s arrow keys (e.g., up, down, left, right) and the other end to the conductive areas on the bottle.
Testing and Programming (30 minutes):
Demonstrate how to program their Scratch projects to respond to specific key presses. For example, when the Makey Makey board triggers the “up” arrow key, it should play the inventor’s biography recording.
Guide students through the programming process in Scratch. They should use the “when [key] key pressed” blocks to trigger audio recordings and display information about their chosen inventor.
Testing the Interactive Biography Bottles (15 minutes):
Allow students to test their interactive biography bottles by touching the conductive areas. Ensure that they can access the inventor’s information as intended.
Sharing and Feedback (10 minutes):
Have students share their interactive biography bottles with a partner or the class, explaining how they connected the Makey Makey and Scratch to create an interactive experience.
Conclusion (5 minutes):
Conclude the activity by discussing the benefits of making learning interactive and how technology like Makey Makey can enhance educational projects.
Assessment:
Evaluate students based on their ability to successfully connect the Makey Makey to their biography bottles, program their Scratch projects, and create an interactive learning experience.
This activity not only teaches technical skills but also encourages creativity and critical thinking as students design an interactive project that shares information about their chosen inventor.
Below are a few presentations from Grade 3 students
Having trouble? Let us know by completing the form below. We'll do our best to get your issues resolved quickly.
"*" indicates required fields