Project Nightlight - SCOPES Digital Fabrication

Lesson Details

Age Ranges
Fab Tools

You need to login or register to bookmark/favorite this content.

Author

Fab Foundation
Fab Foundation
Maker
Our mission is to provide access to the tools, the knowledge and the financial means to educate, innovate and invent using technology and digital fabrication to allow anyone to make (almost) anything, and thereby creating opportunities to improve lives and… Read More

Summary

Students will study the elements and principles of design and understand how they  are used to create a 3D printed computer programmable night light. In this lesson, students will conceptualize and then turn their ideas into real-life models of nightlights that work.

What You'll Need

Material List

1 Arduino Uno ($6)

1 Adafruit Neopixel Ring or Jewel per student ($5-7) 1 button ($0.50)

Wire.

3D Printing Filament Breadboard

Digital Fabrication Tools

 3D printer Soldering Iron Wire cutter/stripper

Software 

Basic 3D design software (Tinkercad, 123D Design, Shapeshifter.io, or similar) Arduino software

Fritzing

Design Files Developed:

PDSNightLight.ino                     

PDS NightLight Code Examples.pdf

Software templates (middle school / high school)

The Instructions

Lesson requires Three Double Block Class (75 Minutes each)

Step 1: Design Process

Warm-Up: (10 Minutes)

As students begin the design of their nightlights, remind them of the difference between problem-solving and design: In talk aloud session, you should state that design is different because:

  • You don’t know what problems are going to come up
  • You discover and solve problems as you move along
  • Each student challenges will be different
  • You have the right to be wrong
  • There is never one right answer

Review Design Process: (50 Minutes)

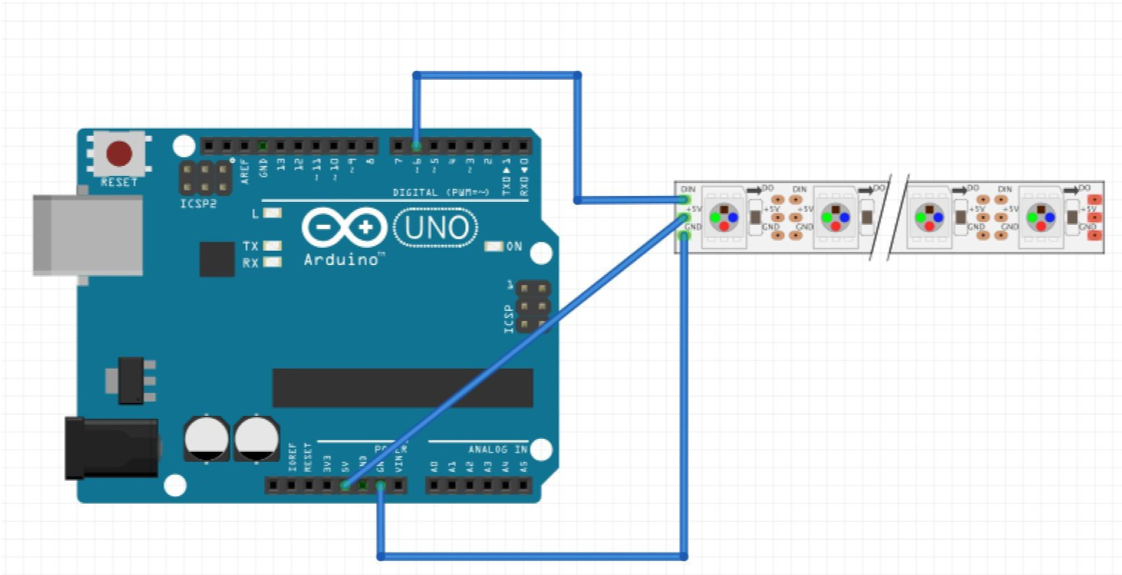
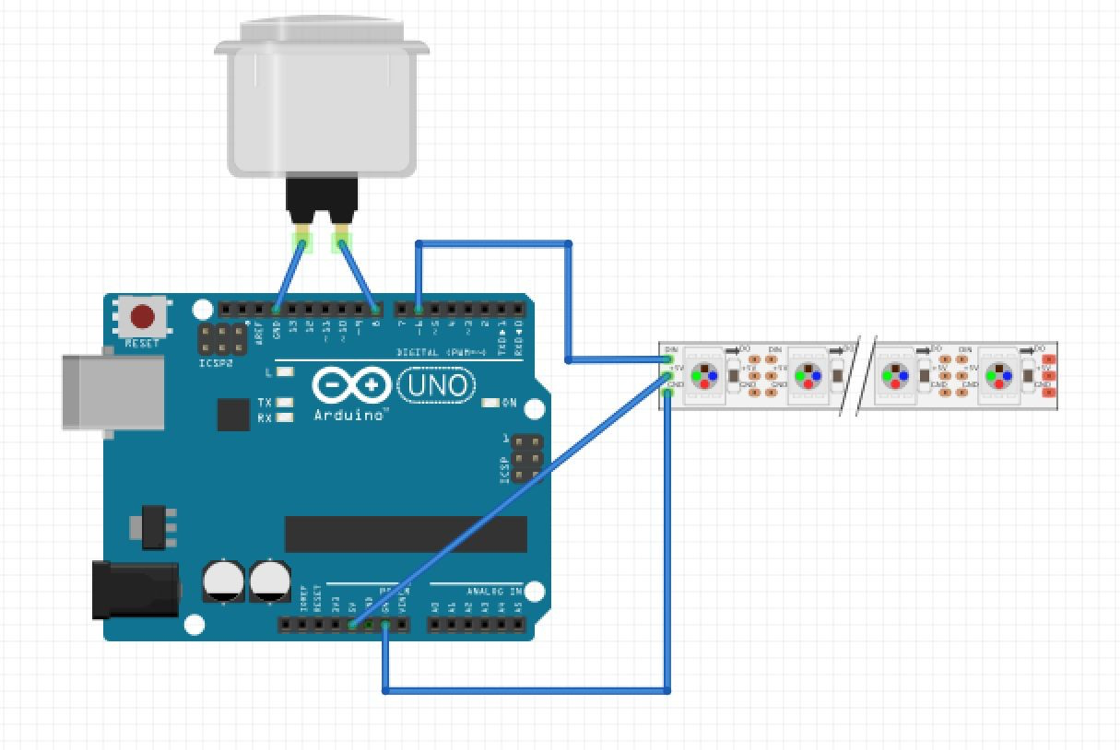
Describe the component of the nightlight:

  1. The design of the nightlight must house the physical components of a microcontroller, a set of RGB LEDS, and a button.
  2. The wiring diagram for the demonstration of the components are given to the students.
  3. Students will program the arduino to control the NeoPixel LED strip to display various light patterns. First, to learn about how the NeoPixel works, have the student experiment with the example code included in the Adafruit Neopixel Library. Open the RGBWstrandtest example code and upload it to the arduino to verify the components are working and connected correctly. Then, walk through some of the sample light states and have the students experiment with changing some of them to see how they impact the behavior of the LEDs.
  4. Next, open the buttoncycler example and connect a button to the code. Have the students experiment with changing light states using the button. In the next session, the students will generate their own codes to control the lights with button presses. They are instructed that there must be at least six “light states” — all LEDs on with white light, all LEDS off, and four moving colored light patterns of their own design.
  5. Students learn to build a 3D structures using a free 3D design software, such as Tinkercad, 123Design, or io.
  6. Once the design is printed on a 3D printer, students then install the electronic components from above into their printed design.Formative Assessment: (15 Minutes)
  7. Students review the circuit diagram and the function of each component.

Step Two: Experiment with Design Principles and Prototypes

Warm up (10 Minutes) (Review Videos of programed light sequences):
Chase

BackForth

  1. The last phase of the lesson require students to write a computer program to change and customize the light sequences. In programming what they have built, students learn the interactions between hardware and software.
  2. Software templates (middle school / high school) are provided to students, and examples are presented that demonstrate programming control structures for them to modify.

Group Time to conceptualize nightlight design (50 Minutes): Several students may have a proclivity towards different aspects of the project. Some students excel in design and construction techniques, while others have a knack for computer programming. Cooperation and collaboration are encouraged so students can help each other in the different aspects of the lesson.

Design Review (15 Minutes): Allow students time to make presentation of their design to their classmates that explain their decisions regarding each step in design process.

Step 3: Final Production

Bell Ringer (15 Minutes)

  • Review how students create a digital file for their nightlights using open-source 3D design software, such as Tinkercad, 123Design, or Shapeshifter.io.
  • Tell students their work will be checked after the successful completion of each step of the project; design, wiring of the circuit and programming.

Final Production (60 Minutes)

When a student feels the lesson is completed, the teacher will review the nightlight with the student. The review will involve decisions about the design of the structure and the 3D model. As a result, the teacher can determine if the student will be able to manipulate objects in the software. The teacher will then review the student’s knowledge of the hardware and software. The student might be asked a series of questions to test knowledge of the hardware/software interactions. An example would be, “if I moved this wire to here, what in the software would have to change?” Finally, the teacher will review the software, examining variable naming conventions, commenting, and efficiency of the code.

Lesson Feedback