- Loading…

In this series, participants are going to learn about the concept of Augmented Reality and Digital Fashion by developing an AR project on Unity software. They will create a scannable image and attach it to a piece of clothing while following an Islamic design theme.

Participants will be introduced to the basics of the Augmented Reality, and how it is can be used in the fashion field. Also, they will be introduced to the Unity software interface and how to import AR tools.
Presentation :
1- Who are we and what we do in Studio 56.
2- Intro to Microsoft Teams interface.
3- Introduce the client letter.
4- What is fashion?
5- The combination of Fashion and Technology.
6- Examples of Digitalized fashion products.
7- What is Augmented Reality.
8- How AR is the fashion field.
9-Software we will be using (Unity).
10-Steps of downloading Unity.
11- What we will be doing today.
Prototype:
1- Instructions to download the Unity software.
2- Introduction to make an account on Vuforia for the AR tools.
3- Import the Vuforia AR package to Unity.
4- Adjust the Unity settings to import the AR tools.
5- Make sure all participants have Unity installed with Vuforia tools.
6- Fix any issues found.
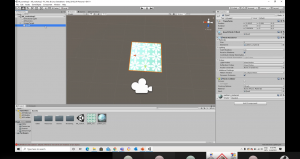
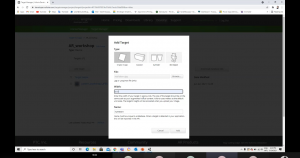
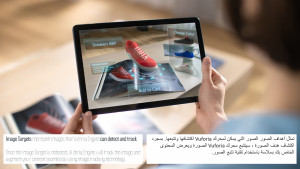
Participants will learn how to add a Target image component that displays a specific output image once recognized by the AR camera.
Presentation :
1- Overview on what was done on Day1.
2- The difference between AR and VR.
3- Examples of AR and VR practices.
4- Tools to create unique images/logos.
5- Steps to create an account on Vufora.
6- Steps to create a database on Vuforia and add target images.
7- What we will be doing today.
Prototype:
1- Open new project.
2- Add AR Camera component.
3- Create a database on Vuforia.
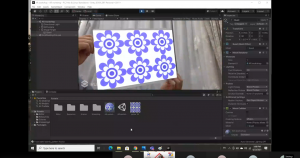
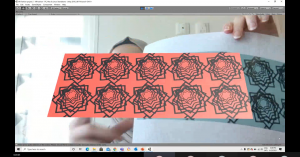
4- Search for the appropriate target image (input image to be read by the computer).
5- Show how you can design your own customized targe image.
6- Add target image component to the database.
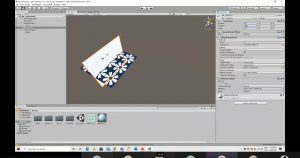
7- Add target image component in Unity and select the desired picture from the database.
8- Add the Quad component under the target image component.
9- Create a material that has the desired output image and drag it to the Quad component.
10- Fix any issues found.
Participants will learn how to add a target image to the project which plays a video once recognized by the camera.
Presentation :
1- Overview on what was done on Day2.
2- Video about basics of AR.
3- What is a Target image.
4- Tips on how to select the best target image.
5- Uses of target images in AR applications.
6- Tool for video making.
7- What we will be doing today.
Prototype:
1- Search for the appropriate second target image (input image to be read by the computer).
2- Show how you can design your own customized targe image.
3- Add target image component to the database.
4- Add target image component in Unity and select the desired picture from the database.
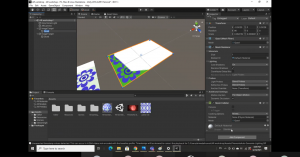
5- Add the Quad component under the target image component.
6- Search for an appropriate video to be played when the target image is recognized.
7- Add a video player component to the Quad component and select your desired video to be the source video.
8- Fix any issues found.
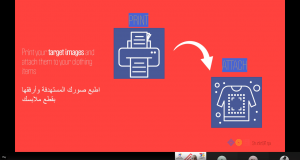
Participants will be asked to attach their printed-target images to their clothing items (Abaya, Thoub, T-shirt, .. ). They will also learn how to build the project and connect it to the phone.
Presentation :
1- Overview on what was done on Day3.
2- Brainstorm ideas of fashion and AR.
3- Other uses of Unity.
4- Other softwares used to develop AR programs.
5- Reminder of printing and attaching the target images to the clothing items.
6- What we will be doing today.
Prototype:
1- Suggest ideas on how you can attach the reading picture to the clothing item.
2- Adjust the settings of Unity to build the project and run it on the phone.
3- Test the application on the phone.
4- Fix any issues found.
Having trouble? Let us know by completing the form below. We'll do our best to get your issues resolved quickly.
"*" indicates required fields