- Loading…
This interdisciplinary lesson integrates English and Art using the picture book Camille and the Sunflowers. Students explore themes of kindness and empathy while learning about the artistic style of Vincent van Gogh.
Singapore primary schools are equipped to teach the Strategies for English Language Learning And Reading (STELLAR) curriculum. STELLAR is an interactive literacy programme that fosters confidence in learning English using children’s literature.
The lesson follows the STELLAR approach, beginning with a shared reading of the story. Students discuss how Camille feels throughout the narrative and consider how acts of kindness affect others. The teacher facilitates questions about characters’ emotions and encourages students to give reasons for their answers, developing both comprehension and emotional awareness.
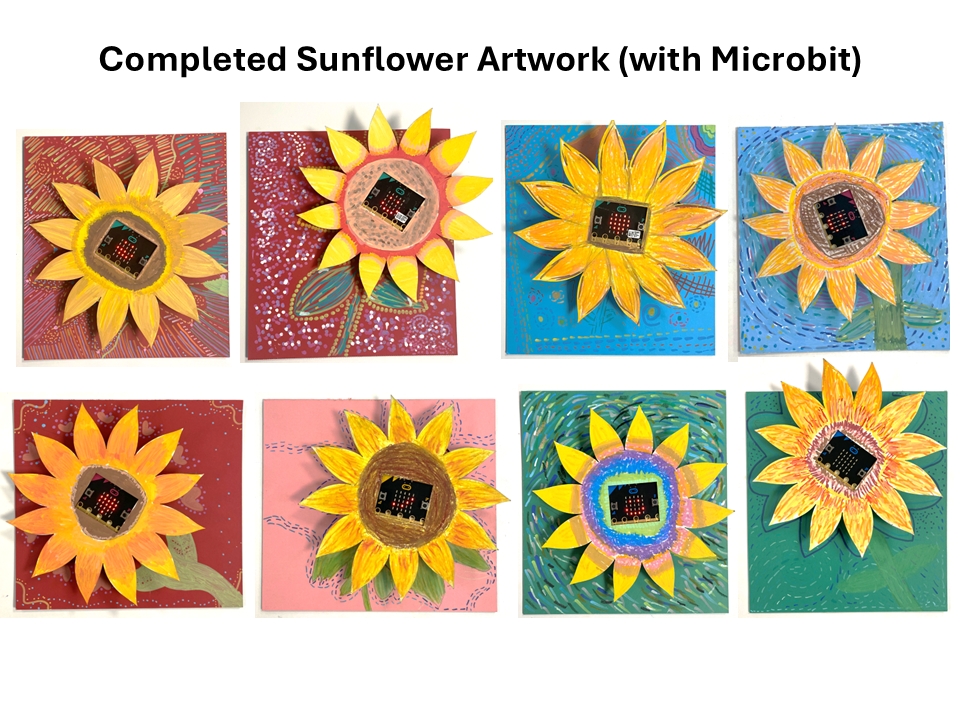
To deepen engagement, students participate in a digital fabrication for kids activity. They design and decorate laser-cut sunflower pieces inspired by Van Gogh’s bold brushstrokes, bright yellows, and textured painting style. This allows them to connect the story to the famous sunflower paintings by Van Gogh while expressing creativity through art.
The lesson also integrates physical computing using the BBC Micro:bit. Students respond to questions about the story and characters’ feelings using the Micro:bit:
Example questions may include:
Students must explain why they chose their answer, reinforcing reasoning and emotional literacy.
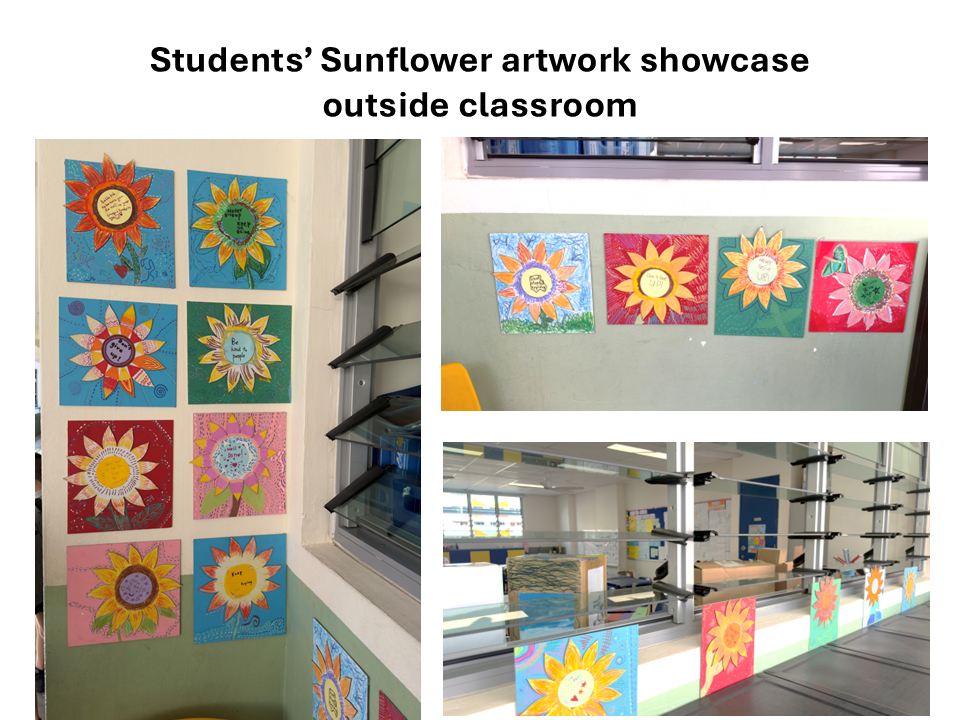
At the end of the lesson, students take part in a gallery walk, displaying their laser-cut sunflowers painted in Van Gogh’s style. During the walk, they observe classmates’ artworks and reflect on how art can express feelings, kindness, and empathy.
Overall, the lesson combines literacy, visual arts, technology, and social-emotional learning, allowing students to explore a story deeply while creating meaningful artistic and digital responses.
Part 1 Lesson : English Language
*Note: If teachers do not have the physical book, students may watch the story in Youtube : https://youtu.be/dJQEdMtGJsE
Part 2 Lesson : Art
Pre-preparation :
During lesson :
Part 3 Lesson : MicroBit programming
Pre-preparation :
– 1 x Microbit
– 1 x battery holder with 2 x AAA batteries
– 1 x USB cable
– 1 x thumb drive (with activity Hex files)
– 1 x Cardboard holder (to mount Microbit and battery pack on sunflower for the gallery walk)
During lesson:
Part 4 Extension Lesson (optional) : Microbit Radio Communication
Pre-preparation :
During lesson :
(File 1: Part4_microbit_level3_sender_instructions.pdf)
(File 2: Part4_microbit_level3_receiver_instructions.pdf)
Download Microbit HEX activity files HERE.
Teacher Assessment rubrics
Curriculum Standards :
Singapore Ministry of Education Primary school subjects and syllabuses
https://www.moe.gov.sg/primary/curriculum/syllabus
Curriculum Alignment :
MOE Primary English Language, Art and Character & Citizenship Education
CSTA K-12 standards:
1B-AP-08 : Compare and refine multiple algorithms for the same task
Part 1 : English Language
Students will learn to:
Part 2 : Art
Students will learn to:
Part 3 : Microbit Programming
Students will learn to:
Link to Li Peng’s reflection page in Module 4 learning diary.
Link to Priscilla’s reflection page in Module 4 learning diary.
Link to sample students’ work and reflections:
Tuning in Use the website: www.vincentvangogh.org to stimulate their interest and raise awareness of Vincent Van Gogh’s paintings.
Experience (Before Reading)
Purpose: Activate prior knowledge and build context
Activate & recall (10 min) (Refer Slide #1-3)
Unit background:
Students learnt about Van Gogh’s Starry Night painting previously in their Primary 2 art lesson. This lesson will tap on their previous knowledge.
1) Teacher asks questions to activate and recall (slide #2):
· What do you remember about Starry Night?
· What colors were used?
· What kind of lines did Van Gogh use?
· How did it make you feel?
2) Show samples of student’s past artwork and recap (slide #3):
– Foreground / Middle Ground / Background
– Warm and Cool Colours
– Rhythm
– Thick brush strokes (Impasto)
Introducing Van Gogh’s Sunflower painting and lesson objectives (Refer Slide #4 & 5)
1) Show an image of Van Gogh’s sunflower painting. (slide #4)
2) Guide students to notice:
3) Go through learning goals. (slide #5)
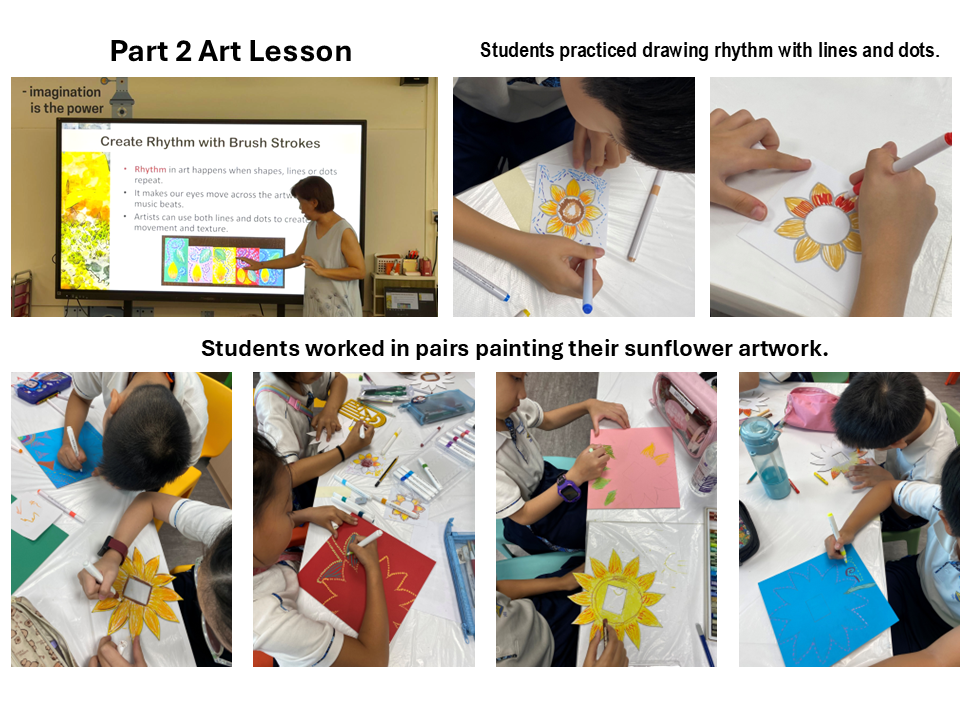
Explain rhythm visually using examples and live modelling. Students practice rhythm painting with a 5-min warm-up activity. (Refer Slide #6-9)
1) Teacher explains Rhythm in art and shows simple visual examples using lines & dots. (slide #6,7,8)
2) Live modelling: Teacher demonstrates how to paint/draw using different types of lines & dots on a printed sunflower outline picture.
3) Individual activity: Rhythm warm-up exercise (slide #9)
· Give each student 1 printed sunflower outline picture.
(File: Part2_sunflower_rhythm_practice.pdf)
· Instruct students to:
Teach how warm & cool colors can be used to express feelings in an artwork. (Refer Slide #10-12)
1) Teacher explains how warm and cool colors can be used to express feelings in art. (slide #10)
2) Show visual examples of 4 different feelings in the sunflower paintings: Joyful, Calm, Energetic, Hopeful. (slide #11 & 12)
Students paint the sunflower & background using warm and cool colors to express the feelings they wish to show in their artwork. (Refer slide #13-15)
1) Each student pair is given 1 laser cut flower template and 1 backing board to paint. Explain to students why use sunflower templates instead of drawing their own. (slide #13)
(File: Part3_sunflower_template.svg)
*Note to teacher*
The use of pre-cut templates was a deliberate pedagogical scaffold to reduce extraneous cognitive load, allowing students to focus on expressive use of colour, texture, and rhythm rather than structural drawing accuracy.
2) Teacher instructs students to discuss and plan before painting. (slide #14)
3) Inform students they can choose the pathway which makes them feel more confident to work on the painting. (slide #15)
Differentiation Strategy:
· By Choice of Feelings:- Students are given 4 different emotions to choose from
· By Pair Roles: – Instead of both doing the same thing, students decide their roles:
Flower artist or Background artist. Advanced pairs can switch roles halfway.
· By Materials: – Students can choose oil pastels or acrylic markers
· By Task : – Starter, Explorer, Artist
Both students discuss and complete the art lesson reflection worksheets.
(File: Part2_sunflower_reflection_worksheet.pdf)
*Note to teachers:
There will be an opportunity for students to display their artwork at the end of Part 3 Microbit lesson through a gallery walk.
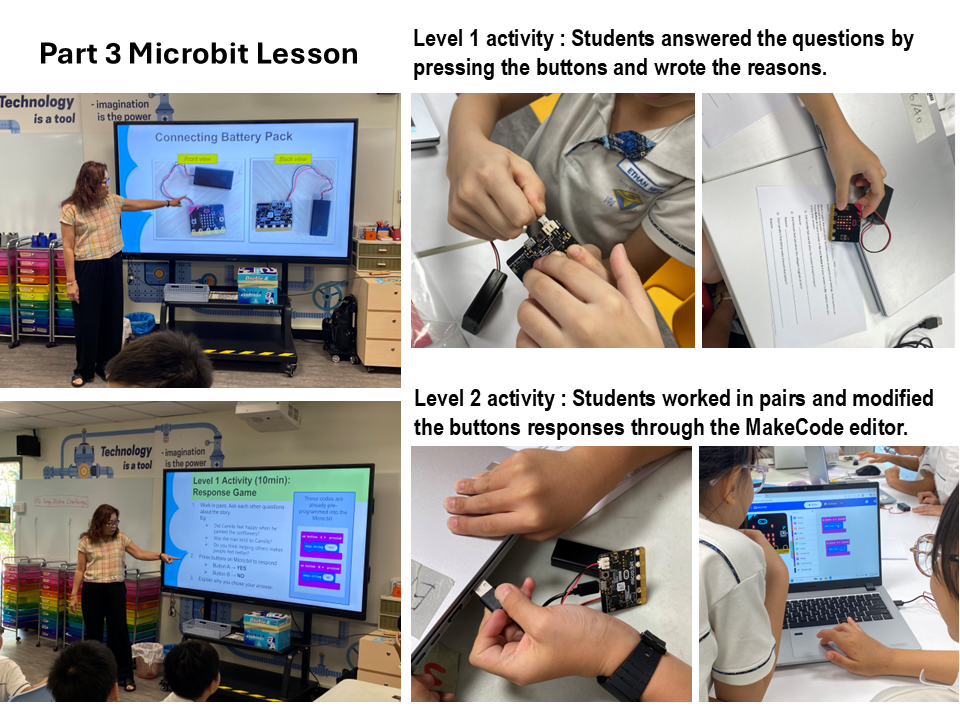
Recall & Introduction to Microbit (20 min) Students learn about what Microbit is and what it can do. (Refer Slide #1-7)
1) Teacher recap Art lesson & go through learning goals for this programming lesson. (slide #2 & 3)
2) Introduce Micobit and what it can do through a video and some examples. (slide #4,5,6)
3) Explain briefing how coding works (slide #7)
Students understand how Micro:bit programs respond to button inputs by asking and answer questions about characters’ feelings in the story. (Refer Slide #8-10)
*Note to teacher: Preload the AB-buttons.hex program into each Microbit before conducting the lesson.
1) Working in pairs, instruct students to collect the activity materials in slide #8.
2) Students connect the battery pack to Microbit by looking at the images. (slide #9)
3) Instructions to students (slide #10):
– Refer to the activity worksheet questions. (File: Part3_microbit_level1_worksheet.pdf)
– Ask each other questions about the story.
– Press buttons on Microbit to respond:
Button A → YES
Button B → NO
– Write the reasons in the worksheet.
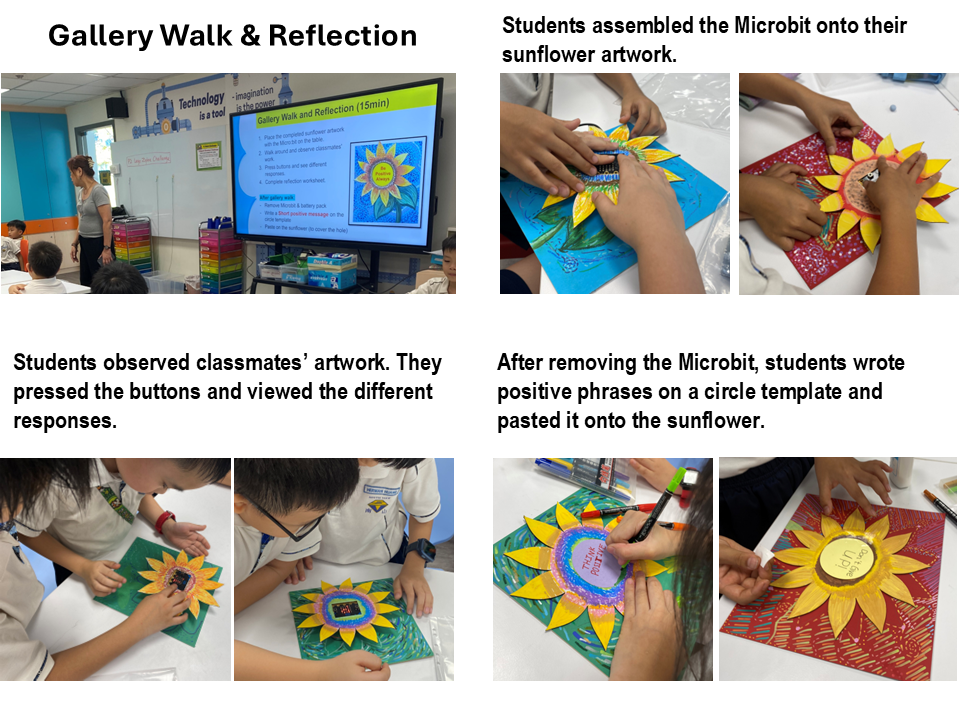
Students attach their Microbit to their sunflower artwork. (Refer Slide #15 & 16)
1) Teacher connects the technology to the story:
“In the story Camille and the Sunflowers, kindness made Camille feel better. Today we will use technology to express our ideas and encourage others.”
2) Students paste the cardboard holder behind the sunflower and insert the Microbit and battery pack. (slide #15 & 16)
(Refer slide #17)
Instruct students place the completed sunflower artwork with the Microbit on the table.
1) Walk around and observe classmates’ work.
2) Press buttons and see different responses.
3) Complete reflection worksheet. (File: Part3_microbit_reflection_worksheet.pdf)
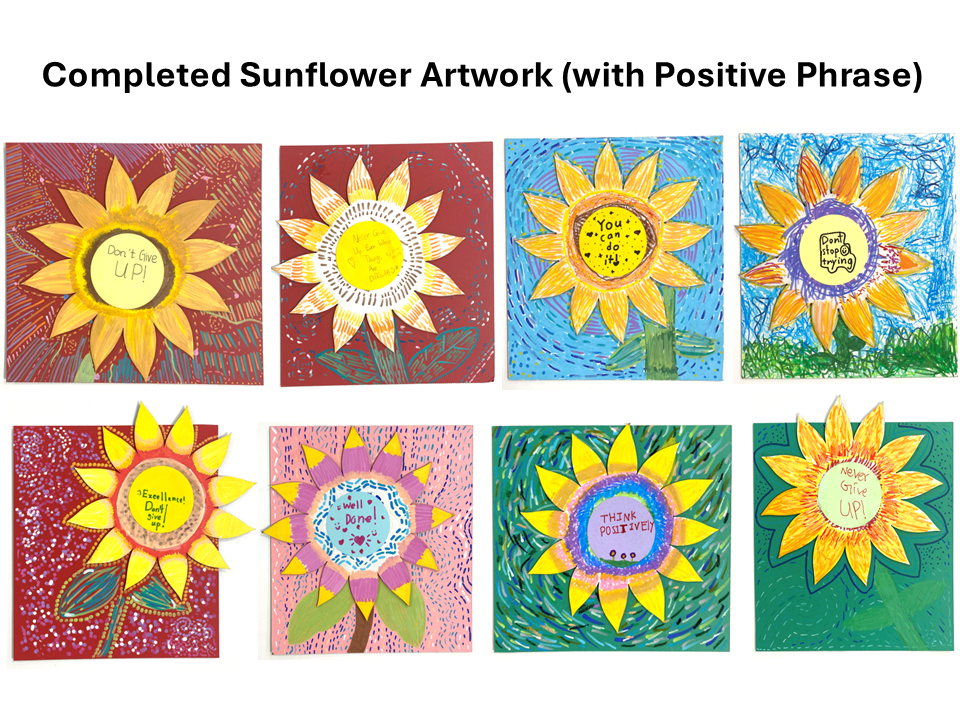
After gallery walk, instruct students to:
1) remove Microbit & battery pack
2) write a Short positive message on the circle template provided
3) paste it on the sunflower (to cover the hole)
*Note to teachers:
Create a “Kindness” wall in the classroom by putting up the students completed sunflower artwork.
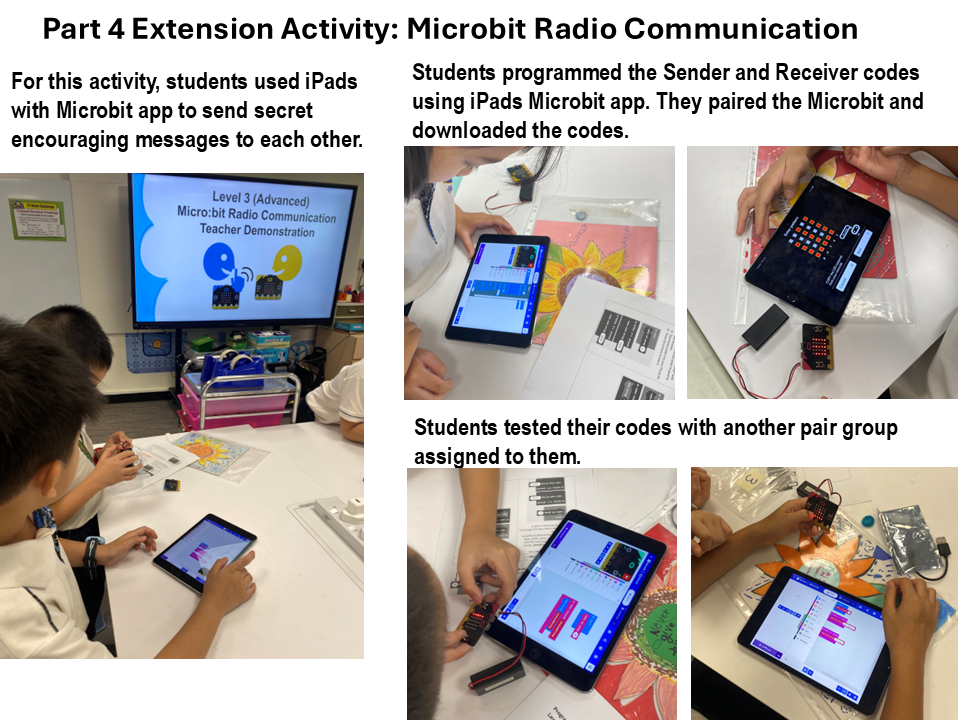
Recap & Introduce radio communication (10 min) (Refer Slide #2)
Context: Extension lesson after Level 1 & 2 (button input and code customisation). Focus on:
· Understanding how Microbit uses radio communication to send messages
· Recognising how technology can be used to communicate kindness
Teacher says:
“Today, instead of just responding, your Microbit can also communicate with others, just like how we share kindness with people around us.”
*Note to teacher: Copy the radio-send.hex and radio-receive.hex files into a thumb drive before conducting the lesson.
1) Recap level 1 & 2 learning (slide #2)
2) Review button input and custom responses
3) Introducing radio communication and explaining same radio group concept. (slide #3)
Students modify the program & test messages (Refer Slide #5 & 6)
1) Organise the students and inform which pair groups are to be the sender and receiver.
Eg: group 1 → 2, group 3 → 4, etc..
2) Emphasize that both groups must have the same “radio set group” number.
3) Live modelling: Teacher demonstrates step-by-step on how to import and modify the Sender and Receiver codes in MakeCode editor before students work on the activity.
*Note to teacher: Remind students to write short positive messages.
4) Pair activity: Sending Secret Encouraging Messages (slide #5 & 6)
(File 1 : Part4_microbit_level3_sender_instructions.pdf
(File 2 : Part4_microbit_level3_receiver_instructions.pdf)
Teacher Role:
(Refer Slide #7)
Reflection Questions:
• What did you learn today?
• How is this different from button A/B?
• How can Micro:bit show kindness?
Having trouble? Let us know by completing the form below. We'll do our best to get your issues resolved quickly.
"*" indicates required fields